Category Archives: Body

Lily Restoration Series 60

Jon Yinger passed along this video of his series 60 Lily undergoing a complete restoration finishing with a mild custom. There are some nice still of the engine compartment both before and after the restoration. He has a nice shot at the end with it cruising down the road. He also passed along a link to the rest of the cars in his collection.

I am going to add another category for videos on the right hand side to make these easier to find. I will try to categorize these as much as possible but some will just be eye candy.

DROOPING DRIVERS DOOR HANDLE REDUX

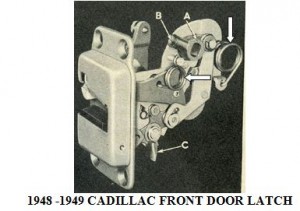
We’ve touched upon this problem in past issues of the Times, but there’s always new information coming to hand. Drooping door handles, particularly that of the driver’s door which gets more use, is an annoying problem on ’48 and ’49 Cadillacs. Referring to the photo on the next page of a front latch, it is caused by the door handle’s square steel shaft that goes inside the door to enter the square opening in a softer pot metal piece in the latch called the tumbler, indicated by Arrow A.
Over the years, constant use causes the square opening in the tumbler to become partially rounded, resulting in the weight of the handle causing it to droop. (Arrow B points to the hole in the tumbler for the door handle set screw and Arrow C to the lock plate controlled by the outside key lock.)
There are several fixes, as set forth in the next paragraph, all of which, unfortunately, require removing the door panels and getting into the innards of the door. Though this is a lengthy job, as lots of screws must be unscrewed and lots of parts removed, unless you have to deal with taking apart the door latch itself it is not technically difficult. (The larger arrows in the photo point to two difficult-to-deal-with springs in the mechanism that must be removed and replaced when taking apart the latch.) Note that convertibles and Coupe de Villes have different door latches than club coupes and sedans. The above photo comes from the 1948 Fisher “C” Body Manual for Cadillacs and Oldsmobile 98s, which has excellent, well written, illustrated step-by-step procedures for doing this type of work. They can usually be found on Ebay and I suggest you buy one.

1. The best fix is to find another door latch in better or new condition. This way you avoid taking apart the latch which, as mentioned above, can be tricky. I once lucked out at a flea market and found a brand new ’49 Buick driver’s door latch for a club coupe (such as mine) or a sedan. 1949 Buick Supers and Roadmasters as well as ’48 and 49 Oldsmobile 98s used the same door latch as ’48 and 49 Cads. In my experience Buick and Olds parts frequently sell for less than the identical Cadillac parts, so you can try dealers that sell stuff for those cars. I was recently told that in the 1948 version of the latch the tumbler is made of bronze, which is much more durable than the’49 pot metal tumbler.

2. If the car is a convertible or Coupe de Ville, ’49er Ron Brooks of Twin Lake MI makes a sturdier tumbler to replace the original pot metal tumbler, which he sells for $125 or so. His phone number is 231-821-2812.

3. For other models of ’48 or ’49 Cadillac, All Cadillacs of the ‘40s and ‘50s www.allcads.com sells a sturdier replacement tumbler for $50 or so.

While both of the above are excellent replacement parts which are far superior to the original part, as mentioned above removing the latch from the door then installing the new part is not easy and requires much patience.

jun 11 door

door 3

newsletter

RUST BEHIND THE ROCKER PANEL MOLDING

Hi everyone. I know I am a new-comer and that there are many people who are very experienced about working and restoring ’49 cars. But I would like to give a little contribution even if, probably, many of you already know what I am talking about.

Taking apart my car I came to the lower chrome molding. I took it apart and then I took off the retainer metal strip. Really a lot of dirt and mud came out from the space between the retainer and the body and the retainer and the chrome. Probably this is a kind of mud trap which can be harmful for both chrome and body metal, especially if you drive your car all year round and in bad weather. Too bad I did not take a picture when there was all that mud around. Better, maybe, to periodically have a look at this spot once in a while as rust may be developing there. Hope this little tip can help someone.

rust sep 10

newsletter

FOUR TAKES ON INSTALLING HOOD SPRINGS

by Art Gardner et. al.

For various reasons, all four authors removed the large hood hinge springs on their’49s. They have similar takes on removing and re-installing these springs, as has the Cadillac factory itself in an article in the June 1949 Serviceman bulletin (supplied by John). Their comments include Herman who said that, “It is not an easy job”, while Art says it can involve “safety issues” and Jim goes so far as to say “Wow, is this ever dangerous; be very careful”. So, if you are going to do this job, it’s best that you heed these voices of experience. You should also consult page 192 and 193 in the ’49 Cadillac Shop Manual which has the factory take on the procedures involved. (Note: Doing this job on Series 75 limousines is slightly different.)

1. JIM ON TAKING OFF THE SPRINGS
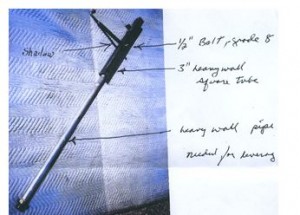
Jim made the tool shown in the photo below and writes: “1. Take hood off hood hinge brackets on cowl; 2. Take both front fenders off; 3. Slip hook into lower eye of spring and set angle iron on top of frame and pull down; 4. Remove lower hook of spring from bracket and SLOWLY relieve pressure on spring.”
jun10 spring 1

2. HERMAN ON RE-INSTALLING THE SPRINGS
Herman writes, “When re-attaching the hood springs to the hinge assembly the items that you will need to begin are:
1. A 5/16″ braided, tar impregnated wire loom, Cut 4 pieces about 2 inches long and place one on each end of the spring hook.
This prevents chafing and was originally done by Cadillac;
2. Next you will need 2 “S’ hooks as used in mounting garage door springs (available at any hardware store);
3. Next, a piece of heavy duty chain, about 16-20 inches long;
4. A very sturdy long steel, bar (a piece of one inch pipe about 6-8 feet long will work).

You are now ready to tackle the job. Hook the hood spring (with wire loom slipped over the end) on the hood hinge assembly with upper hook facing to the front of the car. Next slip a piece of wire loom onto the lower hook of the spring. Hang the “S” hook on the lower spring. Make a loop of the chain and hook the ends onto the bottom of the “S” hook.

With this assembly hanging down toward the ground, slide your pry bar or pipe into the loop. Have someone hold the pry bar for you when doing this so nothing falls off or becomes unhooked. Slide your pry bar through the loop of chain and under the car frame. Apply downward and backward (toward rear of car) pressure to the pry bar, while trying to hook the spring to the boss on the firewall. This may take a few tries to get the hang of it. It helps if you have an assistant trying to nudge the spring while you apply downward pressure on the spring towards the boss on the firewall. The job is certainly easier with two people and is much safer with the two front fenders removed.

3. ART ON MAKING HIS VERSION OF THE TOOL NEEDED FOR WORKING ON THE SPRINGS
Art writes, “The photo at the left was taken by Forty-Niner John Washburn of an original factory “Hood Spring Tool
J-1638A” which is used to remove and install hood hinge springs.

I designed a replica of this tool as shown in the drawing at the right. This tool can be made by anyone and would be relatively safe. Basically, the 2×6 needs to be long enough to give you good leverage. The notch in one end avoids it slipping off the frame as you lever the hood spring down. The chain (bolted to the board) is coupled to the hood spring with a “connector link”, sometimes called a “master” link. This is a special chain link that has a split in it with a nut to connect the two halves and allow the link to be slipped over another link or, in this case, over the J-hook part of the spring.

jun10 spring  2

4. JOHN ON USING THE TOOL NEEDED FOR REMOVING AND RE-INSTALLING THE SPRINGS
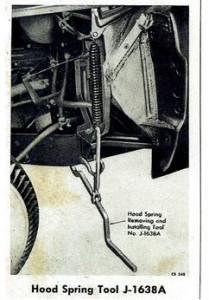
Besides his photo at the left above of the original tool, John also sent in a copy of the June 1949 Cadillac Serviceman bulletin which contains the photo on the next page and the following instructions on using this tool: “The long pivot hook should be slipped over the bottom bracket of the hood spring, and the stationary hook slipped over the frame side member. Force the handle of the tool down to release the spring bracket from its catch, as shown. Although the picture shows the fender removed to photograph the tool in use, it is not necessary to remove the fender. To install the spring, first hook it in place at the top and then pull down with the hook, and fit the spring into the catch of the spring bracket. To obtain added leverage on the tool, make up a section of 1 inch pipe about 4 feet long and slide it over the handle of the tool.”
jun 10 spring3

newsletter

A PRESERVATION TIP

There is a drain hole at the bottom of each end of the rear ’48-’49 Cadillac bumper where an upright brace is welded on the inside of the bumper (by the large cheek of the upright under the tail light). The hole, the size of your finger, is not round but rather of an odd shape as it is formed by the brace welded to the bottom of the bumper. It is apparently to drain out the water that will collect inside of the mounting brace that is welded to the back of the bumper at that point. If you lay on the ground and look under the rear bumper you will see what I am talking about.

Well, when I took off my rear bumper for plating I noticed that a large nut was wedged in one of the holes. When I tried to pop it out with a screwdriver it would not budge. When I tried a long drift punch and a hammer I got a large amount of small rocks and sand. Both sides were plugged up. I had to put the bumper in my sand blaster to really clean the area up for plating and got enough sand and rocks to fill two coke cans. My suggestion is that when you wash your car you should give these two holes a very generous spray of high pressure water. Incidentally, I have wondered why the ‘49s I have seen in junk yards have rusted out rear bumpers; now I know.

series 62 mar 10


newsletter

ANOTHER TECH TIP

If doing a detailed restoration on your ’49, you’ll probably want to remove the hood hinge assembly so that not only can you blast and paint it and the hood springs, but so you can paint the firewall. The four holes on each side, through which go the large bolts and flat washers to attach this unit to the firewall, were purposely made larger to make a fair amount of adjustment possible. Thus, it can be tricky to re-install this assembly in the same position it was originally and, once the hood springs have been re-installed, virtually impossible because of the tremendous spring pressure. I’ve devised a solution to this problem that I’ve used on several restorations that is not only easy, but foolproof and very successful. This procedure should be followed, of course, only if your hood fits and was aligned properly in the first place.
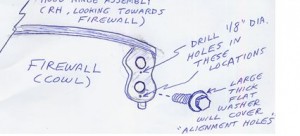
First, remove the hood. Then remove both hood springs. (In the next installment I’ll write up my method for removing and re-installing them.) Now take a 6-point socket (½ inch drive recommended) with a 3 inch extension and ratchet, and remove only one of the four large bolts and thick flat washer that attach the hinge assembly to the firewall. Now center-punch a mark close to the bolt hole and drill a 1/8 inch (0.3175 cm.) diameter hole through the hood hinge bracket and through the firewall at this location. Be sure this 1/8 inch hole close enough to the hole so it will be covered later by the thick washer upon re-installation.

Now re-install this bolt and the flat washer and tighten securely. Repeat this step on the remaining 3 large bolts, doing only one at a time. (See sketch below.)

When re-installing the hood hinge assembly, you simply slide a 1/8 inch (0.3175 cm.) drill bit through each hole previously drilled, then re-install each large bolt and flat washer one at a time. The hood hinge assembly will be in the exact location it was originally. IMPORTANT NOTE: When removing the hood hinge assembly, be sure to place your hand under each large bolt as you remove it, as often times there are one or more shims installed behind the hinge assembly at the factory. Label each shim so you can re-install it in the same position.

I’ve also used this technique of drilling “alignment holes” before removing doors. As long as the doors fit properly originally, using this method they will fit properly when re-installing. This saves untold time and aggravation.

tip mar 10

tip  2 mar 10

newsletter