Category Archives: Doors

DROOPING DRIVERS DOOR HANDLE REDUX

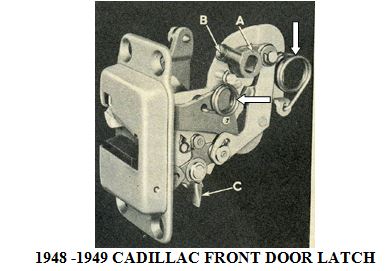
We’ve touched upon this problem in past issues of the Times, but there’s always new information coming to hand. Drooping door handles, particularly that of the driver’s door which gets more use, is an annoying problem on ’48 and ’49 Cadillacs. Referring to the photo on the next page of a front latch, it is caused by the door handle’s square steel shaft that goes inside the door to enter the square opening in a softer pot metal piece in the latch called the tumbler, indicated by Arrow A.
Over the years, constant use causes the square opening in the tumbler to become partially rounded, resulting in the weight of the handle causing it to droop. (Arrow B points to the hole in the tumbler for the door handle set screw and Arrow C to the lock plate controlled by the outside key lock.)
There are several fixes, as set forth in the next paragraph, all of which, unfortunately, require removing the door panels and getting into the innards of the door. Though this is a lengthy job, as lots of screws must be unscrewed and lots of parts removed, unless you have to deal with taking apart the door latch itself it is not technically difficult. (The larger arrows in the photo point to two difficult-to-deal-with springs in the mechanism that must be removed and replaced when taking apart the latch.) Note that convertibles and Coupe de Villes have different door latches than club coupes and sedans. The above photo comes from the 1948 Fisher “C” Body Manual for Cadillacs and Oldsmobile 98s, which has excellent, well written, illustrated step-by-step procedures for doing this type of work. They can usually be found on Ebay and I suggest you buy one.

1. The best fix is to find another door latch in better or new condition. This way you avoid taking apart the latch which, as mentioned above, can be tricky. I once lucked out at a flea market and found a brand new ’49 Buick driver’s door latch for a club coupe (such as mine) or a sedan. 1949 Buick Supers and Roadmasters as well as ’48 and 49 Oldsmobile 98s used the same door latch as ’48 and 49 Cads. In my experience Buick and Olds parts frequently sell for less than the identical Cadillac parts, so you can try dealers that sell stuff for those cars. I was recently told that in the 1948 version of the latch the tumbler is made of bronze, which is much more durable than the’49 pot metal tumbler.

2. If the car is a convertible or Coupe de Ville, ’49er Ron Brooks of Twin Lake MI makes a sturdier tumbler to replace the original pot metal tumbler, which he sells for $125 or so. His phone number is 231-821-2812.

3. For other models of ’48 or ’49 Cadillac, All Cadillacs of the ‘40s and ‘50s www.allcads.com sells a sturdier replacement tumbler for $50 or so.

While both of the above are excellent replacement parts which are far superior to the original part, as mentioned above removing the latch from the door then installing the new part is not easy and requires much patience.

jun 11 door

door 3

newsletter

REMOVING AN OUTSIDE FRONT DOOR HANDLE

A special tool is not needed to remove an outside door handle on a ’49 Cadillac. The outside door handles are attached to a 3 or 4 inch long square shaft that is perpendicular to the axis of the handle and which goes into the door. Inside the door, the male shaft goes into a square female hole in the door latch mechanism. This male shaft is held into the female hole by a lock screw that is, in turn, perpendicular to the axis of the shaft. On early ’49s the screw has an ordinary slotted head. On later cars the screw is really a small bolt with a ¼ inch hex head.

Let’s assume it is a front door. (Sedan rear doors should be the same. Can anyone enlighten?) To access the screw/bolt, peel back the rubber weather-strip on the side of the door at a point slightly above the level of the door latch. In doing so, you will uncover a small hole in the door about a ½ inch in diameter.

Shine a flashlight into the hole so you can see the screw head, which is 2 or 3 inches down inside the door. This will reveal whether the screw head requires a screwdriver or a ¼ inch socket. If it requires a ¼ inch socket, the hole is sometimes too narrow in diameter to admit the socket into the hole. If this is the case, enlarge the hole with a file or use a ¼ inch nut driver which has a narrower head than a socket.

With one hand on the door handle, loosen the screw just enough to free the door handle and pull it out of its place. Do not loosen the screw any further, as it may come out of the threads in the door latch and fall to the bottom of the inside of the door. To retrieve it you would have to take apart the door or, if it is a slotted screw, replace it using a magnetic screwdriver, both of which procedures you obviously want to avoid.

newsletter

A BETTER WAY TO REMOVE COUPE DOOR GLASS IT WORKED FOR ME

by Art Gardner

My driver’s side front door glass cracked, necessitating replacement. The 1948 Olds 98 and Cadillac Fisher Body Manual, pages 45-47, sets forth the procedure, which seemed lengthy and complicated. As I proceeded, I realized there is a simpler way, which worked on the front door of my 2-door Club Coupe and MAY work on other body styles, as well as sedan rear doors and cars with power-operated windows.

Everything is done to the inside of the door with the door open. As there are lots of screws and small parts, I suggest using several containers to keep the loose parts organized according to the large parts they fasten.

1. Remove the reveal molding at the top and sides of the window frame. Be careful not to lose the two small pieces of rubber at either end which prevent the garnish molding below from being scratched.

2. Remove the inside door handles and window cranks. Although these can be removed with dental picks or other pointed tools, you will do better to use an inside handle removal tool. I recommend the pliers-type illustrated below. This one is made by the KD Company, but similar tools are made by other firms. The flat-type tool is inferior. (See the body manual for removing the switches on Hydro-lectric equipped cars.)

.
3. Remove the arm rest if a front door.

4. Remove the screws holding the garnish molding below the window to the door. Besides the visible screws, this molding is held to the door by: A. an L-shaped metal hook screwed to the door frame, and;
B. the large heads (diameter: ¾ inch, 18 mm.) of screws which slide into slots in the back of the molding, whose shafts are screwed to the door frame. You have to twist the molding slightly to remove and re-install it. To remove it, you push down on the back end and pull up on the front slightly to get it off the hook. Then, the molding is unlocked from the screw heads by pushing down on the molding while gently pulling it toward you. Later, when re-installing it, you hook the molding over the L-shaped hook with the rear of the molding pushed down to get the large heads of the screws into the keyholes. Once the heads are through the big openings in the keyholes, you pull up on the rear of the molding while keeping the front over the L-shaped hook. Pulling up on the back of the molding brings the heads into the narrower part of the keyholes and secures the molding in place, ready for the small finish screws to be installed. (There won’t be a quiz.)

5. Remove the screws holding the upholstered door trim panel to the door. This panel is also held to the door by several metal tabs that protrude upward and outward from an access panel in the inner door into the back of the trim panel. In addition, the trim panel is held to the door by tracks at the bottom and front side of the door which enclose the corresponding edges of the panel. To remove the panel, gently pull it up and toward the back of the door.

6. As it is now visible, remove the large, square-ish access panel secured to the inner door with screws.

7. Raise (or lower) the window so that two of the four screws that hold the window support channel to the window regulator lift arms are visible through the hole uncovered when the panel in paragraph 6 was removed. At the same time, the second two of the four screws should be visible in the small, round hole to the side of the square hole. See the arrows of letter “A” in the illustration below. Remove the four screws.

8. Lower the glass all the way to the bottom of the door, slipping it past the regulator arms and out from the lower end of the window channels. If the channels are too long to release the glass, it may be necessary to unfasten the lower mount of the divider channel between the quarter window mechanism and the large window and move it slightly to loosen the glass.

9. To make room through the slot at the top of the inner door for the window support channel under the glass, particularly the lower pieces through which screws attach it to the regulator and the rubber molding under the glass, you must now remove the inner beltline fuzzy strip carrier which runs along the length of the top of the door and is secured with a half dozen screws.

10. With the glass now at the bottom of the door and free from the side window channels, it can be rotated 45 degrees or so and eased out of the upper slot in the door.

If the glass is removed this way, you don’t have to remove the divider channel, which is how the Fisher Body Manual says to do it, thereby saving a ton of time and effort. Installation of the new glass (after setting it in the support channel) was simply the reverse.

glass sep09

glass sep09 2

newsletter