Author Archives: admin

Index of All Past 49 Time Articles

Thanks to Dan we have this index. It was a great help putting this site together. I suggest copying this off to a Word document where you can search for particular text. You can also do a search on this page as well holding down the Ctrl key and f key then typing in what you are searching for.

’49 TIMES TECHNICAL ARTICLE INDEX: MARCH 2001 – MARCH 2010
By Dan Fisher

March 2001: Did You Know? Production Numbers For 1949; First Aid For Fog Lights.
June 2001: Radial Wide Whitewalls For Your ‘49? Did You Know?…1949 Convertibles.
September 2001: To Plate Or Not To Plate: Headlight Rims/Bezels; Tech Tip: Check Your Battery;
Forty Nine Fastener Fun: Club Coupe (Fastback) Rear Window Removal; Drooping Door Handles (Again).
December 2001: How To Take Out Your 1949 Radio.
March 2002: Tracing Turn Signal Wires; Your Shock Absorbers; Rebuilding The Rear Stabilizer;
’49 And ’50 Ammeters—Not The Same.
June 2002: Wind Wing Chroming.
October 2002: Restoration Tip: 1949 60 Specials And All ‘49s With Parking Lamps: Painting Fine White Lines.
December 2002: Did You Know?…Early And Late Engines, Convertibles And Trunk Lids; Make Your Own Rubber Gaskets; Getting A Vacuum Antenna To Rise To The Occasion; Replacing Your Windshield Wiper Transmission Shafts;
Removing The Chrome Trim On A Club Coupe Rear Window;
March 2003: Did You Know?… Early ’49 Convertible Trunk Lids; Dealing With Those Six Volt Blues;
Windshield Wiper Restoration Tip; A Final (?) Word About Vacuum Antennas; Servicing Hydro-Lectric Pumps.
June 2003: Technical Help 4-U “Technical Assistance Hotline Numbers”; Some Tech Tips: Rear Shock Absorber Link;
Fix For Locked Up Brakes; Windshield Washer Pump & Nozzle Repairs; Hydro-lectric System; Auto Glass Source.
September 2003: Did You Know?…’49 Fuel Filters And Fuel Lines; Other Voices, Other Opinions: Hydraulic Brake Hoses.
December 2003: Those Other 1949 Cadillacs Or Stick Shift’s Last Hurrah;
Did You Know: Differences Between Series 61 And 62 2-Doors And 4-Door Cars In 1949.
March 2004: Our Readers Write: Fixing No Start Problem, Fuel System; Replacing A Front ’49 Shock Absorber.
June 2004: Two Tech Tips: Tighten Those U-Bolts (Rear Leaf Springs) & Car Won’t Start: Adjusting Neutral Safety Switch;
Filling Your Shock Absorbers With Fluid: Doing The Back Ones Ain’t As Easy As It Might Look.
September 2004: Viagra For Windshield Wiper Motors: A Tech Tip;
Overheard At The Grand National: Correct Gas Cap And Door Handle Escutcheon Gasket
December 2004: From The Busted Knuckle Garage: Slicker Sweepers (Aka Fuzzies) On Exterior/Interior Window Moldings;
Shocked Again: Adding Fluid To Shock Absorbers; Don’t Neglect Those Windshield Washers!
March 2005: Did You Know That: (Correct Procedure For Checking Head Bolt Torque); More On Those Other ’49 Cadillacs;
Restoration Tips From The Busted Knuckle Garage: Priming And Painting Small Bolts And Screws.
June 2005: Forty-Nine Engine Colors; Check Your Fuel Pump; More On Filling Your Master Cylinder;
’49 Times Index Of Articles (Technical And General Interest) March ‘01 To Dec. 2004; That Gas Filler Light.
September 2005: Mistakes In The ’49 Cadillac Shop Manual; More On Battery Cutoff Switch;
Trico Equipment And Service Specifications 1949 Cadillac.
December 2005: Taking Out Your 1949 Instrument Panel; If Your Horn Doesn’t Work.
March 2006: ‘49 Radiator Hoses; Detailed Specifications: Series 60, 61, 62 And 75;
Restoration Tips From The Busted Knuckle Garage: Restoring Your ’49 Cadillac Radio Speaker Grille.
June 2006: Tech Tip: Outside Door Handle Escutcheon Mounting Pads; More On Drooping Driver’s Outside Door Handle;
Series 61 And 62 Four-Door Sedans Compared To Series 60 Four-Door Sedans (Body, Trim, And Upholstery).
September 2006: ’49 Interior Paint Colors.
December 2006: Little Known Secrets Of Master Cylinder Rebuilding; Good Housekeeping In Your Car;
The 1949 Cadillac Vacuum System; Tech Tip: Larger Diameter Exhaust Pipe.
March 2007: Inoperative Cadillac Windshield Washers Can Be Easily Diagnosed And Serviced;
Unleaded Fuel And Exhaust Valve Seats; Tech Tip: The Clevis Pin On Your Master Cylinder.
June 2007: ’49 Cadillac Dimensions (Body); Replacing Motor Mounts; Locating The ‘Sweet Spot’ For Outside Door Mirror.
September 2007: Mini-Tech Tips: Have Your Brake Lights Failed? And Graphite Phright!
Fine Tuned Installation Of A Door Latch Repair Part.
December 2007: Keep Your Hats ‘Er, Sombreros On; Trunk Handle Problems; ’48 And ’49 Design Differentiation.
March 2008: Hood Bumpers; How To Remove/Replace A 1949 Cadillac Speaker Grille Without Taking Half The Dash Apart;
How To Fix Your Trunk Lock; Different Chrome Trunk “V” Emblems.
June 2008: Be Seen With Halogen Bulbs! Engine Of Change: Early And Late ’49 Cadillac Motors;
Deck Lid Designs; More On Trunk Lid “Vs”.
September 2008: 1949 Cadillac Carter 722S Carburetor Rebuilding Tips; Tech Tips: Sixty Special Dome Light
And Outside Door Handle Removal; Repairing Heater Control Valves; The Wooden Wheel Chock.
December 2008: Hydra-Matic Shifting Problems On My Coupe De Ville; Stopping An Oil Leak (Rear Main Seal);
Hydra-Matic Shifting Problems II: Shift Lever Slop; Did You Know That 60 Special Trunk Letters Are In 2 Pieces?
March 2009: Tech Tip: Chasing Down Those Elusive Exhaust Noises; Semi Tech Tip (Directional Signal Flasher);
Beware Non-Steel Head Gaskets; Mysterious Nether Noises In A ’49 (Rear Springs, U-Joints, Drive Shaft).
June 2009: Bias Ply Versus Radial Tires: A Never Ending Discussion; Conversion Of Air Cleaner To Use A Paper Element;
How To Hook Up Your 49’s Under Hood Heater Hoses; Come Blow Your Horn.
September 2009: A Better Way To Remove Coupe Door Glass: It Worked For Me; Removing An Outside Door Handle;
New Procedure For Testing Gas Gauge Tank Units; More On Bias Ply Versus Radial Tires.
December 2009: A Tail Light Tale; If Your Ammeter Is Neither Positive Nor Negative, But In Between.
March 2010: More Power, Mr. Scott (’49 Horsepower); Power Window Switches;
Another Tech Tip From The Busted Knuckle Garage: Hood Hinge Installation
Stopping an Oil Leak – Update

Thanks Art and Jay! This is a compilation of some earlier work.

I hate an oil leak. It is embarrassing, frustrating and just plain messy. One of the worst oil leaks on a 1949-55 Cadillac motor is the engine rear main bearing seal, a repair job that intimidates many owners. I know, I suffered with this leak in my 55 Series 62 Sedan for about 12 years because I didn’t want to take the engine out, but replacing the rear main seal CAN be done correctly with the engine in the car.

The engine in my ’49 6107 Club Coupe was carefully rebuilt recently with the installation of a Teflon-impregnated rope rear seal, which after 500 miles started to leak. The oil pan also seemed to be leaking for two additional reasons: 1. the bolts were slightly loose, which typically occurs after the engine is put back in service and the engine heat shrinks the gasket; 2. the rear pan gasket had been made out of silicon liquid instead of the original cork strip, and it came apart. I repaired everything without removing the motor and it seems to be holding perfectly — no more drips on the driveway! So here is my recommendation on how to proceed:

1. Buy a neoprene (rubber) seal from Terrill Machine in Deleon TX, Olson’s Gaskets in WA or from one of several other Cadillac parts vendors that sell them. Do NOT use a rope seal. Some guys are good at installing the rope seal, but the installation and trimming of the rope to just the right length is CRITICAL. Instead, the modern-style rubber seal provides a true dynamic lip seal and the installation is more idiot-proof. Also buy a quality oil pan gasket set. I like the “BEST” brand for these types of parts instead of FELPRO. Olson’s carries them.

2. Drain the oil, then use a lift or jack the front of the car up relatively high, preferably putting the front wheels on ramps (be sure to chock the rear wheels or put the rear of the car on jack stands);

3. Remove the 2 bolts in the frame holding the idler arm on the passenger’s side of the steering links and lower the center link. Remove the exhaust crossover pipe;

4. Disconnect the battery ground cable and remove the starter (heavy!). To do this, unscrew both of the small wires that attach to the solenoid, noting which one connects to which terminal. Place a rag on the frame rail and rest the starter on it. The positive cable will hold it there satisfactorily, so there is no need to undo any of the other wires;

5. Remove the oil pan and the lower flywheel cover (heavy) to provide working room to get at the seal. Inspect and repair any “dished” bolt holes in the pan — the oil pan surface should be flat. Often, when an oil pan or valve cover is leaking, some ham-fisted mechanic or owner will over-tighten the bolts trying to stop the leak. This deforms the pan or valve cover and ensures that it will leak from now on. If need be, hammer the bolt holes flat with a small hammer and a narrow block of wood to act as an anvil. Re-check for flatness. Use a long, STRAIGHT board with a long piece of sand paper to flatten and re-surface the bolt pattern surface, if desired.;

6. Remove the windage pan, the tray-like baffle bolted to the bottom of the block and the oil pump;

7. Remove the rear main bearing cap. Remove or, better yet, just loosen the 3 middle main bearing caps, leaving the front one alone. (Note the direction the middle bearing caps face if you remove them, as it is important to replace them in exactly the same position.) You do this to let the crankshaft droop just a fraction of an inch or so to slightly free up the upper half of the rear main seal;

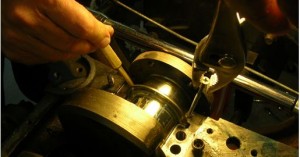
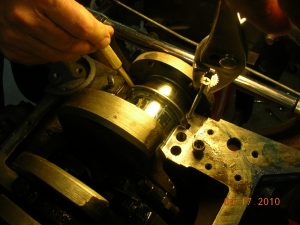
8. Screw a slender wood screw into one end of the upper half of the rope seal and grab the screw with pliers. Using a brass, wooden or plastic rod (in order to not scratch the crankshaft journal), push up on the other side of the upper half of the existing rear main seal, while pulling down on the pliers to draw the rope seal out of the crankshaft journal. Once it protrudes out a bit, you can grab the seal itself and pull it with the pliers.

ART GARDNER DEMONSTRATES HOW TO REMOVE THE UPPER HALF OF A ROPE-TYPE REAR MAIN BEARING SEAL WITH THE ENGINE IN THE CAR. YOU MUST REMOVE THE OIL PAN AND REAR MAIN BEARING CAP, LOOSEN THE 3 MIDDLE MAIN BEARING CAP BOLTS AND SCREW A WOOD OR SHEET METAL SCREW INTO ONE SIDE OF THE SEAL. PULL ON THE SCREW WITH A PAIR OF PLIERS WHILE PUSHING AGAINST THE OTHER SIDE OF THE SEAL WITH A SOFT PUNCH AND OUT IT WILL COME.

rope main bearing seal

9. Installation of the rubber seal requires no tools — just slip it into place in the upper half. NOTE: the direction/orientation of the new rubber seal is critical. Follow the directions on this that come with the seal.

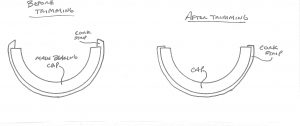
10. Install the cork strip in the groove/channel in the rear main cap and trim to length, as shown below. Trim it so that the ends of the cork slightly protrude from the end of the cap in such a way that the ends of the cork strip are parallel to the ends of the cap. You want the cork gasket to have some “crush” to it when the oil pan is bolted up. This is much easier to trim before installing the cap (otherwise, substantial trial and error is required). Although probably unneeded, you can place a small amount of silicone gasket sealant on the end of the cork strip immediately prior to final fitment of the rear main bearing cap against the block (before the silicon has a chance to set). Place the lower half of the rubber rear main seal in the rear main bearing cap and orient it according to the instructions;

timing cork strip

11. After coating the lower main bearing halves with oil, replace the main bearing cap(s), including the rear cap, and torque them according to the shop manual specifications. Cleanliness is of paramount importance here.

12. Take apart and clean the oil pump. If the lower plate upon which the gears rest is worn, send the pump away for rebuilding. Unless it is broken, I would retain and re-use the same oil pressure regulator relief valve spring, since some rebuilders install a stiffer spring which would increase the oil pressure excessively and maybe cause more oil leaks! Before replacing the pump, fill it with Vaseline so that it is primed and will have pressure when you first start the engine. The Vaseline will then melt away.

13. Install the front cork seal, after trimming to length. This trimming is a careful, slow, iterative process of stuffing it in the groove, noting the excess length, removing the cork, trimming it slightly and test fitting it again and repeating as needed until done. Trim small amounts and sneak up on the final trimmed length. Again, you want a slight crush to the cork seal. Also, you want the ends of the cork seal to be parallel to the machined engine block surface. Here, as contrasted with the rear cork seal, you definitely want to seal the ends (tops) of the cork seal with a dab of silicone sealant just prior to final fitting (and just prior to installing the pan).

14. With the front and back cork seals now trimmed and in place, next test fit the side gaskets and trim them to closely abut the sides of the cork gaskets. Use as little silicone sealant as needed to seal the side gaskets to the cork gaskets. Use gasket sealant to hold the side gaskets in place against the underside of the block while you bolt the oil pan in place. Apply the gasket sealant only to the top surface of the gasket, since it will be easier to scrape the gasket off the machined engine block than off the ribbed surface of the oil pan next time this job has to be done.

15. Replace all parts mentioned in steps 3 through 7. When installing the oil pan, torque it to proper specs (10ft-lbs max). Do NOT over-torque or the pan will distort in the vicinity of the bolts and cause leaks.

16. When you start the motor, the first thing to do is make sure the oil pressure is normal. Then check for leaks. After 500 miles, re-torque all bolts, especially the oil pan bolts. Two of the oil pan bolts are above the starter, which will have to be removed temporarily to get at them.

If the engine has a lot of miles, then it would be prudent to replace the main bearings while doing the rear seal (and won’t cost much). If you were going to do more than just the main bearings and these seals, you would remove the engine, but this job can be done with the engine in the car. There is a trick to “spinning” the top half of the bearings out (using a flattened cotter pin inserted in the oil hole of the crank and turning the crank by hand). Taking off one bearing cap at a time, after installing the new bearings halves re-install and torque the bearing cap back on twice: the first time for a preliminary bearing clearance check with Plastigage; the second a permanent installation.

By the way, on a lift this job can be done in 4-6 hours, maybe a good bit less. It took me the better part of a weekend on a creeper since extra time was spent over-restoring some parts (powder coating the oil pan and some bolts, etc). NOTE: A high-quality torque wrench is the key to this job. You probably need two different torque wrenches. A low torque unit for the pan bolts (probably 1/4″ drive” and a stronger one for the main caps (probably 1/2″ drive). The specified torque on the pan bolts (and the valve covers) is so low that there is a substantial risk that you will over tighten them or under tighten them by a good bit if you use too large a torque wrench, with equally leaky results either way. Below is a picture of the rear cap reinstalled, with the cork gasket in place on its underside, just to the left of the flywheel in the right center.

Heater Removal and Rebuilding

Thanks to Fab for posting this on the CLC forum

just rebuilt my entire heater system about 3 or 4 months ago. To remove it, you need to do the following:

1. Unhook the electrical connections under the dash. I think there are only two wires, a fused power source, and a wire to your underseat heaters.

2. Detach the two control levers.

3. Unscrew the metal bracket holding the thin copper capillary tube in place.**

4. In the engine compartment, remove the heater hoses from the bottom of the unit.

5. Remove all the bolts attaching the unit to your firewall. There’s a rubber gasket between the heater unit and the firewall. Mine had somehow sealed the unit to the firewall, so I had to pry it off. (You can buy a replacement here: http://www.steelerubber.com/heater-gasket-70-0448-31)

6. Once you get everything removed and the unit free, start to pull it out gently. You’ll see a vent cable attached to the side of it. Unscrew and release this.

**MOST IMPORTANT THING: make sure not to pinch or break the thin copper capillary tube. If you damage this, your heater valve will be useless. Best to have somebody on the inside helping guide the unit out.

Once you get the unit out, you can remove the two heater valves. I sent mine to Jim Tucker: http://www.heatercontrolvalve.com/. I think it was about $250 to rebuild both valves.

Lily Restoration Series 60

Jon Yinger passed along this video of his series 60 Lily undergoing a complete restoration finishing with a mild custom. There are some nice still of the engine compartment both before and after the restoration. He has a nice shot at the end with it cruising down the road. He also passed along a link to the rest of the cars in his collection.

I am going to add another category for videos on the right hand side to make these easier to find. I will try to categorize these as much as possible but some will just be eye candy.

49 Chapter Revival

First off, a big THANK YOU for all of the kind words on the Cadillac LaSalle forum on the revival of the 49s chapter and this Web Page. I started out this site as an experiment. I am in the process of getting three start-up companies off of the ground and I needed some content to learn WordPress for my other companies. Now I am chapter president. Hmmmmm fate can be truly strange. Anyhow, going forward we have an opportunity with the Internet to bring valuable information to everyone across the globe. We are averaging 90 unique visitors per day so it looks like we are fulfilling a need. We also have the old newsletters stored as an electronic magazine with a link on each page. So now you can take your tablet or other mobile device with you to your car and search this page or look at an old newsletter while you are working on your car. It is up to you to figure out how to keep your greasy fingers off of the display.

Going forward, I would like us to use more of the technology that we now have available such as videos. Think back to the time you did your first brake job and how nice it would have been to have a video showing instructions that you can watch as you are working rather than a shop manual or through brute force. Most of us have cell phones with video cameras. Even a short video of some stills of assembly and reassembly would be helpful to someone else. If you don’t know how to post a video to YouTube or some other video sharing site, do some Internet searching or go find a teenager to teach you. Once you get it posted, send me the link and a short description in the contact form and I will post it here.

Knowledge sharing is what is going to keep this hobby alive long after we have hung up our keys. So as we work on our projects this winter, try to come up with a video or even a few sentences of lessons learned the hard way that you can pass along to others.

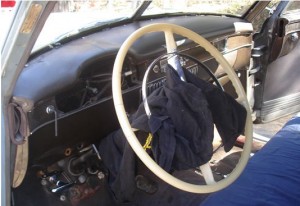
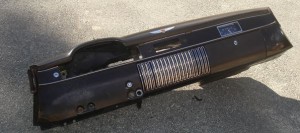
AN ENTIRE DASH IN THE PROCESS OF BEING REMOVED FROM A 49

In the photo, the following has been done so far: 1. The vent control knob and bracket have been unfastened from the dash; 2. The hand brake handle bracket has been unbolted; 3. The windshield wiper-washer switch and the fog light switch have been removed; 4. The instrument panel has been removed, with a piece of cloth protecting the steering column from being scratched by the instrument panel as it is withdrawn from the dash; 5. The molding has been removed from the bottom of the windshield and the top of dash to expose the screws holding the dash to the cowl.
The following is still to be done: 1. The radio must be removed; 2. The steering column bracket holding the steering column to the dash must be removed. 3. The head light switch must be removed. 4. The wiring harness must be disconnected. (Note the Allen wrench in the nut holding the head light switch to the dash after the switch knob has been removed).

AND OFF IT COMES, A PIECE OF CAKE!
dec 12 dash1

dec 12 dash2

newsletter

HOW TO REMOVE THE UPPER HALF OF A ROPE-TYPE REAR MAIN BEARING SEAL

HOW TO REMOVE THE UPPER HALF OF A ROPE-TYPE REAR MAIN BEARING SEAL WITH THE ENGINE IN THE CAR AS PER HIS ARTICLE IN THE DECEMBER 2008 TIMES.
YOU MUST REMOVE THE OIL PAN AND REAR MAIN BEARING CAP AND SCREW A WOOD OR SHEET METAL SCREW INTO ONE SIDE OF THE SEAL. PULL ON THE SCREW WITH A PAIR OF PLIERS WHILE PUSHING AGAINST THE OTHER SIDE OF THE SEAL WITH A SOFT PUNCH AND OUT IT WILL COME.

dec 12 seal

newsletter