Monthly Archives: September 2012

ANOTHER 6269

[Ed. Note: Following the sale of his gorgeous 4-door, the Baroness, Prez Joe Cutler has been continuing the resurrection of his newly acquired 37,000 mile, original 6269 sedan from Colorado, The Empress.]
Joe writes: “We wet sanded the recently re-painted hood, firewall and dashboard with 2000 grit and buffed out the pieces. I masked off the hood & freshened up the under-carriage with new undercoating. My glass man swung by and installed the brand-new driver’s side windshield, and my auto body man helped me re-install the hood. Lookin’ great!
I also re-wired the back-up lights–they work perfectly—and eliminated the electric fuel pump the previous owner installed so the car will run off the original rebuilt mechanical pump.
Now for the bad news. (I thought things were going too well so far!) While running the engine and getting ready to time it, I (thank God) happened to notice the reflection of light off something shiny on the garage floor. I looked underneath the car and discovered, much to my surprise and horror, a massive puddle of fresh oil under the rear parts of the engine! I thought the rear main seal let go, as over a quart of oil was pumped out onto the floor in a matter of minutes. Luckily it turned out to only be a loose fitting where the oil pressure gauge tube screws into the upper rear of the motor, which was a great relief. Just another obstacle to overcome, and there’s been loads of those this year with all the cars! The car now runs like a Swiss watch! Here’s a recent photo

anothher 62 sep 12

newsletter

REMOVING AND REPLACING A 49 CADILLAC CYLINDER HEAD

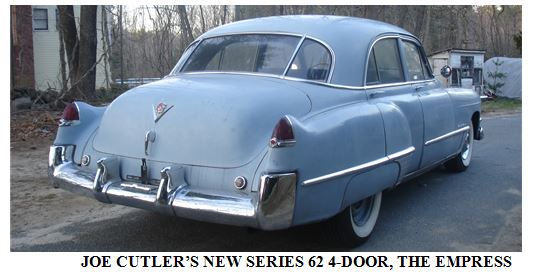
Some months ago the cylinder heads of my ‘49’s motor needed rebuilding, so I removed them and took them to a machine shop for repair. Taking off the cylinder heads with the motor in the car is not particularly difficult technically and the only special tool needed is a torque wrench. On the other hand, there are lots of parts to remove (and later re-install) and the heads are heavy, weighing more than 50 pounds each, so it can be a 2-person job.
The first task is to completely drain the coolant from the radiator and engine block. To do this, first raise the front of the car on jack stands. The motor has 2 small drain outlets on either side of the middle of the block, just above the oil pan. The Cadillac factory closed these off with small pipe plugs, which when removed usually results in the coolant flowing out in the wrong direction and making a mess. I replaced mine with drain cocks identical with the radiator drain cock, so I can put a rubber hose on each to direct the flow into buckets. While you are under the car, remove the oil dipstick tube and dipstick. Back on top, after lowering the car, unfasten one of the battery cables and remove the windshield washer bottle and bracket.
Next, remove the rubber fuel line. Then, drain the oil filter if you have one. Now, disconnect the upper and lower oil filter tubes at the oil filter end, leaving the tubes attached to the motor, and remove the oil filter. Unfasten the 4 bolts holding the thermostat housing to the water pump. Loosen the upper radiator hose clamp, turn the upper hose on the radiator outlet one quarter to one half turn to free the thermostat housing and remove the hose and the thermostat housing as a unit. Remove the fan belt, the fan and the generator along with its adjusting strap. Remove the lower radiator hose. Now the radiator and water pump can be unbolted and removed. I find it’s easier for 2 people to lift the radiator.
The next task is to remove the intake manifold. First, remove the air cleaner. Next, remove the accelerator linkage spring and unhook the accelerator linkage from the carburetor. Fold the accelerator linkage back against the firewall and hook it under one of the hoses or wires on the firewall. Disconnect the Hydramatic “kickdown” rod at the carburetor and transmission ends and remove it from the car. Disconnect the vacuum advance tube at both ends and remove it. Disconnect the manifold vacuum tube at the fuel pump end. Disconnect the automatic choke tube at both ends and remove it from the car.
Disconnect all wires from the coil (back-up light wire, coil power wire, coil to distributor primary and secondary wires) and tie them back to a hose or wire at the firewall. Disconnect the fuel pump to carburetor tube at the carburetor end. Tilt it up to a sufficient angle on the fuel pump that fuel doesn’t flow out but leave it in place. Loosen and remove the four bolts and four nuts with their washers that hold the intake manifold to the cylinder heads. Now the manifold can be removed with the manifold-to-fuel pump vacuum tube, carburetor and coil still attached. One person can lift it, it may be easier if you are two people.
Now the heads are almost ready to remove. Starting with the driver’s side head, unthread the spark plug cables from the loops on the valve cover on a late motor, or unfasten the spark plug wire conduits on an early motor, and tie them up to a hose or wire on the firewall. Remove the valve cover and set it aside. Remove the water hose that runs between the head and the defroster assembly. (I find it easiest to cut this hose, as it is hard to get a good grip to pull it off.) Unscrew the cylinder head ground strap at the firewall end. Now, unscrew the cylinder head bolts. Since the rocker arm assembly is full of oil, before removing it get a pan or other receptacle longer than the rocker arm assembly. With the pan ready to catch any oil, lift off the rocker arm assembly with its four bolts and set aside on the pan.
Remove the push rods. You must re-install the push rods with the same end toward the rocker arms and, preferably, in the same valve lifter. Note the shape of the push rod at each end. Punch holes in a piece of card board, number the holes with a pen or pencil and, to keep them organized, insert the push rods into the holes in numerical order with their top ends up.
Remove the 6 exhaust manifold bolts. Leave the exhaust manifold in place, since the crossover pipe is very rigid and will easily support the exhaust manifold after the head is removed.
Getting the passenger’s side head ready is similar. Unscrew the nut holding the wire to the water temperature sending unit. The voltage regulator can be left in place, but you risk banging the head into it. I usually unscrew the voltage regulator mounting screws and lay the regulator with its wires still attached on the nearby shock absorber with a rag underneath it. Deal with everything else in the same manner as the driver’s side head. The crossover pipe and exhaust pipe are very rigid and will support the exhaust manifold easily after the head is removed.
Before lifting off the heads, it’s a good idea to put some towels or other protection on the fenders and on the baffle in front of the radiator. If a head is stuck, tap it with a hard rubber hammer to dislodge it. You can grab the head by the water pump hole at one end and either the heater pipe, temp gauge sending unit or the ground strap at the other end. An assistant’s help can be useful at this point. Alternatively, you could use a “cylinder head lifting tool”, which are T-shaped tools that screw into the spark plug holes. You then pick up the head by the “T” crossbar. I have two I’ll lend to anyone who needs them. On the bench, remove the driver’s side head heater hose pipe, the passenger’s side head temperature gauge sending unit, both ground straps and the small pipe plugs at the rear of the passenger’s head and the front of the driver’s head.
Have your heads rebuilt in a reputable shop. It’s a good idea to have the re-builder install hardened steel exhaust valve seats so the engine can better cope with unleaded fuel.
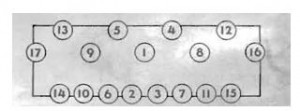
Re-install everything in reverse order. Head gaskets will say “TOP” on one side, so lay new ones thusly on the block with the guide studs engaged. Carefully lay the heads on the block, engaging the guide studs underneath it and ensuring that the gasket is not folded back or kinked. Torque the head bolts to 65-70 foot pounds in the order shown on the next page:

Re-install everything else using new gaskets. Be sure to put a bit of oil at both ends of the push rods. To make their installation easier, lightly cement new water pump gaskets to the front of the pump after scraping off the old gaskets. To facilitate exhaust manifold gasket installation, use a pry bar or large screwdriver to slightly pry the manifolds away from the head. Don’t install the intake manifold until all cylinder head bolts are torqued. Intake and exhaust manifold bolts and water pump bolts should be torqued to 25-30 foot-pounds.

head sep 12

newsletter

FOG PARKING LIGHT HOUSING TO FENDER GASKET

When our ‘48s and ‘49s were new there was a gasket between the perimeter of the front of the fog light or parking light assembly and the back of the opening in the fender where it mounts. This was the subject of a lively discussion on the CLC online Forum a couple of months ago. It seems the gaskets frequently become so worn with time that they not only disappear but have been largely lost to our collective memory. A well known Cadillac parts vendor even stated that he was unaware of the gasket. Bill Bickle wrote, “No one beyond a select few chapter members appear to know about this anomaly. Jeff Maltby appears to have a set but he is the only one.”
The Cadillac Master Parts List, the ultimate arbiter, shows that the gasket indeed exists. It’s the “Fog Lamp Opening Rubber Gasket, group number 10.0085, part number 145 4917 for ‘49s and 145 2989 for ‘48s. Prez Joe Cutler writes that “I’ve scraped off melted remnants of said gaskets from original fog light housings during my restorations. The gaskets prevent junk thrown up by the front wheels from ‘seeping’ through the gap between the housings and inside of the fender. I also believe they act as a ‘cushion’ to help eliminate squeaks and other objectionable noises that could otherwise occur.” Since the gaskets are not being reproduced, Joe adds that “What I use, that is inexpensive and effective, is a simple roll of foam weather-strip with one self-adhesive side, such as used around door openings in a home. I buy the largest size possible–I think it’s ¾ x ¾ of an inch (19 mm.). I’ve found it works quite well and no one will see it anyway once the fog light units are re-installed.”

fog sep 12

1948 FOG LAMP 1949 FOG LAMP

Editor Art Gardner writes that to make this gasket “I used a flat, rectangular roll of foam rubber that I bought at Home Depot. I think it was about ½ an inch (12 mm.) thick by about ¾ of an inch wide. I may have doubled it on the ends of the housing, but I forget exactly. It worked pretty well. The seal is skinnier in the middle and fatter on the ends. I tried to find the real stuff, but no one makes or sells it. I bought wrong items twice. I also talked to Steele Rubber about it and never could understand why they wouldn’t make it. I guess they are hoping to develop some pent up demand and then make one big batch, so I finally gave up. Steele once told me that to make the seal, they needed an original to use as a pattern, but all of the originals I have seen have been disintegrated garbage and were not usable as a pattern. But Jeff Maltby’s gaskets look good enough to be used as a pattern, so maybe he could lend them one to allow them to make these parts for the first time.” Art reports that Steele supposedly is working on making this item using Jeff’s good set of gaskets as a pattern. Let’s hope so!

fog 2 sep 12

newsletter

THOSE 6 VOLT BLUES

Scenario: You’ve just pulled into the local Cruise Night with your freshly-polished and detailed pride and joy. She’s “lookin’ good,” and a crowd of admirers quickly assemble to get a closer look and hear all about your gem on wheels. You proudly field onlookers’ questions and, of course, someone wants to “hear her run”. Having already exclaimed that “she purrs like a kitten,” you slide behind the wheel and turn the key, expecting the engine to instantly spring to life. Instead, you’re greeted with a sickening, groaning noise as the engine laboriously turns over and the battery goes flatter than the lens on the Hubbel Space Telescope. The crowd quickly dissipates and walks away shaking their heads, leaving you sitting there quite embarrassed, wondering what happened!
The following may seem elementary, and many of you may already know all about it, but I never cease to be amazed at the number of phone calls I receive from owners of older cars with 6 volt systems who are experiencing similar starting problems and are stymied as to the solution to their woes. American cars and trucks didn’t switch over to 12 Volt systems until the mid-1950’s. Far too many owners of vehicles with the original 6 volt systems who experience starting problems in desperation convert, or attempt to convert, their vehicle to 12 Volts using special batteries or 6/12 Volt “converter” units, some resembling Rube Goldberg inventions, with mixed results, rather than getting to the heart of the problem! My contention is, and always has been, “If they started back then, they should start now!” However, that’s true only if everything related to the starting system is in top condition.
I experienced this problem firsthand when I recently bought a 1949 Cadillac limousine. The previous owner complained that the car would never start once the engine warmed up, so he had some enterprising “mechanic” install a 6/12 Volt “converter” that would supposedly “fix the problem”. I guess it may have worked for awhile – until the owner pulled the car into his garage one day and noticed smoke billowing from the engine compartment. Yep, he had a wiring fire! After emptying a fire extinguisher on the melted mess, he became disgusted with the car and decided to sell it.
Once I got the car home I went to work. I discovered the converter mounted on the inner fender well with a myriad of narrow gauge wires going everywhere, most of which had fused together during the fire. I first eliminated this converter and deposited it where it belonged – in the scrap metal pile. I then cut back and disposed of all non-original wiring and proceeded to solder in new, proper gauge wires. I removed the starter and brought it to a local re-builder, who informed me the armature was junk. I had a few extra parts and a new solenoid, so he was able to put together a starter, which now functioned as it should.
Then I found that someone had installed a light gauge positive battery cable. I had a new one custom-made at R.I. Wiring Service in the heaviest gauge they offered – ONE GAUGE. Finally, I removed the negative ground strap and cleaned it, including all points at which it was connected – starter bolt, frame, and the battery terminal itself. I then cleaned the end of the starter where it bolts to the bell-housing, and the bell-housing itself, and installed the rebuilt starter. I bought a heavy-duty 6 volt battery with a minimum of 650 cold cranking amps and installed it. VOILA! The engine now “whips over” and starts like new, no matter how hot the engine!
In summary, here are some things to check/remedy if you experience hard starting on your 6 Volt vehicle:
1. Condition of the engine itself. The engine must have at least decent compression. Check the condition of electrical components like ignition points, condenser, rotor, distributor cap, spark plug wires, spark plugs, engine timing, condition of the carburetor, and proper carburetor adjustments.
2. Check the condition of the starter motor. Worn brushes, armature or solenoid, and worn end bushings can all cause problems.
3. CLEAN all electrical connections, including battery terminals, battery posts, and all points where battery cables attach to the starter and frame. Don’t forget to clean any rust and/or paint from the starter and the bellhousing where the starter bolts!
4. Buy the heaviest-duty battery available. A minimum of 650 cold cranking amps is recommended.
5. Install the heaviest gauge positive battery cable possible, such as #1 gauge as previously outlined. Be sure to install a cable of the PROPER LENGTH! Too long a cable could result in current/voltage “drop”, which will adversely affect the starting system.
If all of the above is observed, your pride and joy should spring to life upon demand each and every time!

newsletter

GRAND NATIONAL REPORT

The 2012 Cadillac and LaSalle Club Grand National Meet took place in St. Augustine, Florida, June 13-16. I drove the 380 miles from my Georgia home to St. Augustine in my 6207, arriving Wednesday morning, the 13th (Art Gardner drove down from Georgia in his 56 Fleetwood). The host hotel, The Renaissance Resort, was great, as was the city of St. Augustine which has a neat waterfront area with lots of good restaurants. There were a number of ‘49ers attending besides me, including Ray Anderson, Sig Chrey, Frank Dickinson, Bill Edmunds, Art Gardner, John Giltinan, Ned Hannah and John Washburn. No doubt, there were others, too. A few of us gathered one evening, some with drinks in hand, as per the photo below. Left to right: ‘49er John Washburn, non-member Matern Harmsel, CLC Director of Technical Services Bill Anderson, ’49 Times Editor Art Gardner, ‘49er Sig Chrey and your author.

On the other hand, only 3 of us brought ‘49s to the GN: Ray Anderson’s Series 75 limousine, John Giltinan’s Series 62 4-door and my aforementioned Series 61 Club Coupe.

The photo below is of Ray’s limo, which won a first prize in Primary Class 12 for all ‘42-‘47s and ’48-‘49 Series 75.

gn sep 12 4

gn sep 12 3

gn sep 12 2

gn sep 12 1

newsletter

FINDING THOSE 49 PARTS AT HERSHEY AND ELSEWHERE

Greetings and salutations, my fellow ‘49ers! As another summer rapidly wanes, and we continue waxing, it’s an ideal time to look back on the shows, cruise nights and tours that we attended with our Cadillacs and “evaluate” just how well our “babies” looked and performed. With Old Man Winter on the horizon, it’s an excellent time to decide which parts we would like to upgrade or replace, whether they be cosmetic or mechanical in nature.
With Hershey only a month or so away, I always find it helpful to make up a “shopping list” of parts that need replacing/upgrading. When making such a list, it’s useful to include part numbers, if available. Sketches, with measurements, and even photos, will prove invaluable when searching for these parts. You will be amazed at how many parts can look similar, but not be correct, especially considering the thousands of parts available at such a huge venue!
Here are a couple of tips, based on many years buying and selling ’48,’49 and ’50 parts. Many chrome trim parts were made from “pot metal”, typically a “mix” of several metals that have a low melting point and therefore were easy to cast. The problem is pot metal parts tend to deteriorate badly, especially when exposed to the elements. When deciding whether to buy or not a particular part, keep in mind the difficulty and expense of having the part re-plated. If badly pitted, it very well may cost more to have the part re-plated than continuing your search for another in much better condition. Also, the sad fact is that many plating shops just do not have the expertise to properly re-plate pot metal parts. I could relate horror stories galore about paying large amounts of $$, only to find the plating shop essentially ruined the part(s) by grinding out all the detail. If the pot metal part is broken, search for another, unless the part is extremely rare, since pot metal is extremely difficult to weld.
Many other ’49 chrome parts, such as grill pieces, side “spears”, grill extensions, stone shields and the like were made from stamped sheet steel, then plated. Examine closely not only the outside surface but, more importantly, the inner side of these parts. More often than not, they develop rust out and corrode from the inside as debris gets trapped over the years. Although the outside chrome will appear perfect, it will look like Swiss cheese after being stripped and dipped at the plating shop, either necessitating repairs or even rendering it useless.
Finally, when searching for and buying parts, it’s always best if you can hold the part in your hand to examine it. If you decide or have to buy parts based on photos, such as on Ebay, the old Latin adage applies, “caveat emptor”, let the buyer beware. All too often, the condition of a part, or even the correct application, will be misrepresented, not necessarily intentionally, but due to the seller’s lack of knowledge. Always deal with reputable vendors who can provide references and offer a full refund if you’re not satisfied. A little prior planning and caution go a long way! Looking forward to seeing and chatting with you at Hershey!

newsletter