Monthly Archives: June 2012

A FEW WORDS ON 49 SPRING HEIGHTS

Front Springs
There is usually no need to replace a front spring if it is not broken. With the front wheels on the ground, the front shock absorber arm should be about 1½-2 inches above the rubber bumper directly under the arm. If the shock absorber arm touches the rubber bumper with the wheels on the ground the springs are too high or “too strong”. As shown on a diagram on page 207 of the shop manual, there should be a distance of 4½-5¼ inches between the lower suspension arm and a point in the middle of the frame.

Rear Springs
The bottom of the ’49 rear fender skirt should be at the center of the rear hub cap medallion. More specifically, the ’49 shop manual has a diagram on page 208 showing the desired rear spring height. The center of the rear axle (or the center of the axle flange with the hub cap removed) should be 6-7 inches below the frame member directly above it. As these two surfaces are not in the same plane, it would be best to use two or more straight edges to approximate the linear distances between the surfaces. Note that the shop manual also states on page 48 that a variation of ½ inch is allowed in the rear spring height and that a variation of 3/8 inch is allowed between the right and left spring. The shop manual further states on page 48 that springs settle after installation, so it is best to wait 2,000 miles before taking these measurments to allow the springs to seat and settle. I had new rear springs installed some years ago and the back of my car was very high and looked odd for several months afterwards before the springs settled.

newsletter

GENERAL MOTORS FRANCE

56 à 60 Avenue Louis-Roche – GENNEVILLIERS (Seine)

MARQUE CADILLAC
TYPE 4962
CHASSIS NO 496250485
MOTEUR NO 496250485
N. DE CYLINDRES 8 96,84 X 92,07
ALESAGE ET COURSE
POID TOTAL MAXI 2339 KG.
EN CHARGE

Gennevilliers, the site of the GM headquarters in France in 1949, is a northwestern suburb of Paris in the Department of the Seine (named after the river which divides Paris into Left and Right Banks). Those of us not knowing much French should be able to easily figure out most of the rest of the information on the name plate down through “N. DE CYLINDRES”. The number 8 to the right of this phrase denotes, of course, the eight cylinders in the Cadillac motor.
The meaning of “Alésage et Course”, however, is not so readily apparent; in fact, these words mean bore and stroke. Commas in French numerals are the equivalent of decimal points in the English-speaking world, so “96,84 X 92,07” is the equivalent in millimeters of the familiar 3-13/16 inches x 3-5/8 inches bore and stroke dimensions of the ‘49 Cadillac motor. “Poids Total Maxi En Charge” means Maximum Total Weight When Loaded, presumably with fuel and passengers. 2,339 kilograms is the equivalent of 5,145 pounds, a full load for a 6207, since without fuel or passengers 1949 club coupes weigh not much more than 4,000 pounds or about 1,800 kilos.
You may be wondering why the car’s bore, stroke and weight would be important enough to merit inclusion on Carlos’ car’s French ID plate. I’m fairly certain this information was used by the French authorities as a basis to calculate the annual tax on the car. Compared to most French and other European motors, the ’49 Cadillac and its motor are large indeed, so it was assumed its fuel consumption would be much more than the typical Renault, Peugeot or Citroen. Since France imports all its petroleum products, the French government’s theory must be that higher taxes on heavy vehicles with large motors such as a ’49 Cadillac would discourage their sales and lead to lower overall fuel consumption.
The 331 cubic inch ’49 Cadillac motor’s displacement is the equivalent of 5,424 cubic centimeters. At the same time, a 1949 Peugeot 203’s motor was 1,290 cc. or 79 cubic inches, a ’49 Renault Juva’s motor was 1,000 cc. or 62 cubic inches and the diminutive 2-cylinder Citroen 2CV’s motor was only 374 cc. or 23 cubic inches, less than 1/10th the size of the 331, so the French government does have a point. Nonetheless, the car’s original owner in France thought the extra cost in price, fuel and road tax was worth paying for the power, prestige and luxury of a Cadillac 6207. And in 2012 so does Carlos and every other member of the Forty Niners.


newsletter

49 POWER STEERING REQUEST

My Dad bought a new dark blue four door Cadillac in 1950, trading in our 1938 Cadillac Sedan. Although quite young I loved that ’50 Cadillac. I always felt very safe riding in it and have many fond memories of it. For example, I was “allowed” to sit in the front seat, next to my Dad, only as long as I did not touch the wonder bar on the radio. It was an irresistible marvel. We called it a “wonder bar” because when you touched it the station selector would wonder back and forth, never finding a station. It would then have to go back to the dealer for repair.
As I got older I decided I wanted my very own replacement for the ’50. The rear fenders on the 1949 were more appealing to me so that was the way to go. I also wanted a car with the new OHV V-8. I had had a 1937 and wanted the newer motor. After several misses I finally did get a nice original 1949 two door fastback. It’s a great drive. My wife and I like to take it out for leisurely Saturday drives around some of our lakes. That old gal (the Car!!) sure turns heads.

newsletter

It would be more fun for me if it had power steering, guess I am getting old and soft. I have bought power steering parts from a 1955 Cadillac parts car to convert the 1949 to a factory like power steering set up. This is not a bolt in type of conversion and so I want to do it correctly the first time with safety and a workman like appearance.
Guys I really need your help here. I would like to hear from anyone who has successfully done this conversion or knows someone who has.

THE INFAMOUS HYDROLECTRIC SYSTEM PART II

In Part 1 in the December 2011 issue, I outlined the basic operating principles of Hydro-lectric systems, which were used by several automobile manufacturers during the1940s. Essentially, the Hydro-lectric system was an early version of power windows, seat and top which utilized a pump and reservoir containing (originally) brake fluid, a closed loop of metal lines and flexible hoses, hydraulic pistons, switches, springs, and solenoids to operate the various components.
In this second, and final, installment, I’d like to outline various trouble-shooting and testing procedures, and touch upon more technical aspects of the system. First, check the battery. For efficient operation, battery gravity reading should not be less than 1200 or equivalent voltage. In laymen’s terms, be sure the battery is fresh and fully charged. In some cases, a slightly discharged battery may be sufficient to run the hydraulic motor, but not sufficient to operate the power cylinder solenoids also. Hence, the complete system will not operate.
Next, check the fluid level in the pump reservoir. Typically, there is a line stamped into the front of the reservoir canister indicating the proper fluid level. Important note: When checking the fluid level in the pump reservoir, be sure all the windows are lowered, the top on convertibles should be down, and the front seat should be in a full rearward position! Failure in the electrical system, aside from a low battery, may be due to any number of causes such as loose wiring terminals, “grounds,” “shorts,” broken wire(s), or inoperative solenoids or switches.
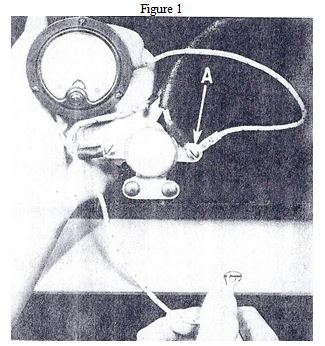
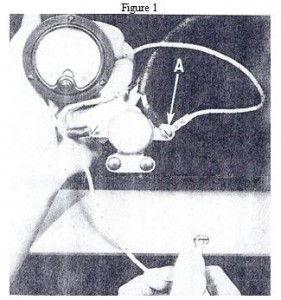
There should be a solenoid, usually mounted on the firewall near the pump. To determine if current is reaching the circuit breaker, connect the positive lead of a tester to the power source terminal “A” of the circuit breaker and the negative lead to a good ground, as shown in Figure 1 on the next page. A current flow should register on the tester. If not, check the wire from the power source for a break or a short. In some cases, failure of the hydraulic motor to start may be caused by an inoperative motor solenoid switch.

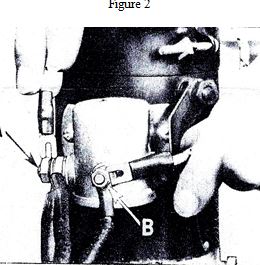
To check the operation of this solenoid, connect one end of a jumper wire to the battery wire terminal “A” and the other end to the switch wire, terminal “B,” as shown below in Figure 2. If the switch is operating satisfactorily a “click” will be heard and the battery to motor circuit will be closed, starting the motor. If no “click” is heard, the solenoid should be replaced.

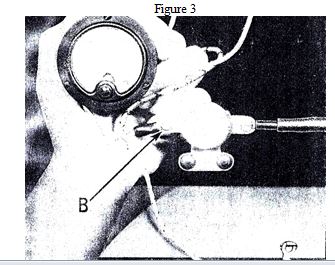
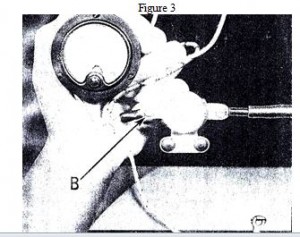
Next, to determine if the circuit breaker is operating, connect the positive lead of the tester to the switch feed wire terminal “B” of the circuit breaker and ground the negative lead, as shown below in Figure 3.
A current flow should register if the circuit breaker is operating. Sometimes, the power window, or power seat, switch may be at fault. On the back of the switch, using an individual window switch as an example, will be three terminals. These terminals will be marked “BAT” (battery), “MOT” (motor), and “CYL” (cylinder). The center terminal is typically the “battery,” or feed, terminal. You can test the operation of the switch by disconnecting the wires and using a simple ohmmeter. Place the 2 leads of the ohmmeter between the “BAT” and “MOT” terminals and push the toggle switch in the upwards position. If the switch is okay, you should get a reading on the ohmmeter. Use the same procedure to check for continuity between the “BAT” and the “CYL” terminals. Another simple way of testing the switch, with all wires connected, is to place a jumper wire between the “BAT” and “MOT” terminals. If the circuit and switch are okay, the hydraulic motor should start. When placing the jumper wire between the “BAT” and “CYL” terminals, you should hear a distinctive “click”, which is the cylinder solenoid operating.
As with most everything made in “the good old days,” these switches can be disassembled for cleaning or repair. They are basically a toggle with return springs and copper contacts. If the spring(s) or toggle assembly are not broken, you can usually restore these switches to operating condition simply by cleaning the copper contacts using 600 grit wet/dry silicon carbide sandpaper or a good commercial electrical contact cleaner.
In addition to the electrical system, it is imperative that all windows, power seat, and convertible top mechanisms operate freely by hand with no binding or obstructions. Clean and lubricate (I use white lithium grease) all pivot points on the frameworks containing the hydraulic cylinders, seat tracks on power seats, and pivot points on the convertible top. Inspect the mohair-lined U-shaped channels in which the window glass rides and replace if worn or damaged.
Finally, on convertibles only, there is an additional component I refer to as the power top control switch. This is a Bakelite unit mounted on the firewall with two wires attached to terminals, and fittings with metal lines attached. The top portion of this switch is attached to the “power top” operating knob and lever, which goes through the firewall and is attached to the bottom of the dash with a mounting bracket. When you “PULL” this rod, it rotates the top portion of the Bakelite unit. Inside this unit are return springs, a circular copper contact plate, and ports. When you “PULL” or “PUSH” the power top control rod, the upper portion of the Bakelite switch rotates, completing the electrical circuit and starting the hydraulic motor. At the same time, the appropriate ports inside the unit are uncovered, thus diverting the fluid to either raise, or lower, the top. This Bakelite switch can also be disassembled for cleaning, and can usually be restored to operating condition as long as the Bakelite housing isn’t broken.
So there you have it. What seems like a complicated system is actually quite simple when broken down into its individual components. New cylinders, hoses, Hydro-lectric motor and top control switch rebuilding, and expert technical advice are readily available from Hydro-E-Lectric in Punta Gorda, Florida by calling (800)343-4261. They are very knowledgeable and wonderful people to deal with!

jun 12 hy 1

jun 12 hy2

jun 12 hy3

newsletter

From the Prez

Greetings and salutations, my fellow ‘49ers! Spring has sprung and you know what that means: time to fire up our ’49 Cadillacs and get them ready for another season of cruise nights, shows and general enjoyment.
As part of the spring start-up ritual, I always recommend the following be done: 1. Remove all the spark plugs and squirt a couple of tablespoons of oil into each cylinder and crank the engine over by hand. During storage, the cylinders may become “dry” as gravity causes the oil film to seep downwards; 2. Change the oil and filter. Condensation can build up in the oil pan over the winter; 3. Check all fluid levels; 4. Check all tire pressures and examine the tires for signs of dry rot or other defects/damage; 5. Check all belts and hoses. Turn the fan belt inside out and closely examine it for cracks and splits which may not normally be visible; 6. Check the condition of the battery with a hydrometer. Fill low cells with distilled water. Remove both battery cables and clean them and both battery posts. Apply a small amount of grease to the top of each post and re-tighten cables firmly; 7. Performa thorough safety insection. Check proper operation of headlights (high and low beam), tail-lights, brake lights, directionals, wipers, horn, emergency brake, front end and steering components; 8. Examine all brake lines and hoses and look for telltale signs of brake fluid on the inside of the tires, which could indicate a leaking wheel cylinder; 9. When was the last time you cleaned, re-packed and adjusted the front wheel bearings; 10. Don’t forget to check the fluid level in the differential! This list is not all-inclusive, but I believe I’ve covered the salient points. Adherence to this preventative maintenance routine could save you a lot of grief on the road and, more importantly, possibly prevent an accident!
The ‘49ers chapter continues to grow, and we have well over 200 members in 38 US states and 10 other countries. We extend a hearty welcome to new members. Unfortunately, I won’t be able to attend the Grand National in St. Augustine, Florida, but Jay Friedman, newsletter editor Art Gardner and many other members will be there. Meet chairman Len Berman has informed the Times that a room has been reserved for our annual Forty Niners chapter meeting at the host hotel, the Renaissance Resort, at 4:15 pm on Saturday, June 16th, immediately following the car judging. Be sure to check the registration desk and hospitality room for the location of the meeting.
Remember, if you’re in the market to purchase Steele Rubber Products, please call our friend and chapter benefactor, Ed Cholakian at AllCads of the ‘40s, telephone: 702-454-1147 or online at allcads.com to place your order. Mention that you are a member of the ‘49ers and Ed will extend a 20% discount. Allcads also stocks a massive supply of new and used ’49 parts.
Wishing all of you the best for 2012. Get your ’49 out and have fun.

Keep ‘Em Rolling!

newsletter