Monthly Archives: June 2009
COME BLOW YOUR HORN
by Art Gardner
Installing my 6107’s horns was one of the last tasks to complete after getting her running. I hooked up the wires to the horns, relay, etc and tried out them out. They blew for a second or two and then quit. So I had to take the horns off and give them a “tune up” by taking them apart, filing the points (using an ignition points file), cleaning them up internally, adjusting the points to give a consistent tone, painting, etc.
The task of adjusting the points is a bit irksome, as it will annoy the neighbors! Basically, you turn the adjustment nut while energizing the horn with a couple of wires until a good sound comes out of the horn. After reinstalling the horns, all that was left was to install the horn button and horn ring. That job took a little bit of patience in order to make the system work reliably, as described next.
To get the horn ring and button working right, I first had to adjust the longitudinal position of the steering shaft relative to the steering column. This was because I had changed this positioning inadvertently as part of the installation of a rack and pinion steering unit. This is not necessary on cars with stock steering.
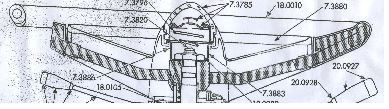
Next came the task of trying to find the right replacement for the fiber washer that originally was fitted under the little contact at the top of the steering shaft. As you can see in the schematic below of a generic Cadillac steering wheel, the horn button (7.3785) is held away from the steering shaft by a conical spring (7.3796) which rests at its small end against the nub of the contact (7.3820).
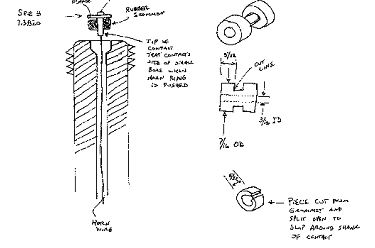
The contact has a flange and a shank (not seen in this parts diagram). I thought that the horns were energized by the flange of the contact touching the top of the steering shaft. But that is not the usual manner of blowing the horn. Instead, the flange is held slightly away from the top of the steering shaft by the washer, even against the force of the horn button spring. When the horn ring is pushed, it causes the contact to tilt slightly in the same direction as the horn ring. The lower tip of the contact apparently then touches the inner wall of the steering shaft, completing the circuit. See my sketch (not to scale and a little rough, but you will get the idea). The trick then is to come up with a decent replacement for the washer that will be thick enough to keep the flange from contacting the top surface of the shaft and yet will allow the horn to blow when the horn ring is tilted. Jay Friedman told me that some folks take a small rubber band and wrap it around and around the shank to make a replacement. I tried that, with poor results. The car had an O-ring on there as some previous owner’s attempt at a repair, but it wasn’t doing the job.


What I came up with is a bit of rubber grommet as shown in the drawing above. I cut the grommet with a scissors to make a suitable collar to wrap around the upper part of the shank of the contact. To slip it over the shank without removing the horn wire from the shaft, I simply sliced it lengthwise (split it) with the scissors. Since it is captured in the bore, the split in the rubber is of no consequence. I found that a grommet with a 3/16″ ID worked well. Alternatively, a bit of rubber hose with a similar diameter would work as well. It takes some careful trial and error to get the length of the rubber /grommet just right, but I managed in 4 attempts. The set up works well and my car has working horns for the 1st time in 2 decades
A 49 IN SWEDEN
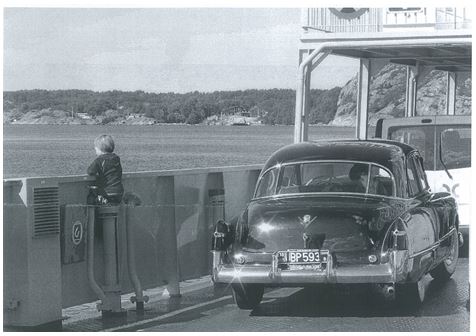
Chapter member Lars Pettersson now lives in County Galway, Ireland but owns a ’49 back home in Sweden. Lars writes that it’s a “4-door, Series 62 Touring Sedan, black, with 42,363 original miles as of April 2008”. The photo below shows Lars’ car on a ferry crossing a Swedish fiord at Lysetil. The little boy, naturally, is much more interested in the water than the car. He’ll see the light when he’s older!
HOW TO HOOK UP YOUR 49s UNDER HOOD HEATER HOSES
Before hooking up the hoses, observe that the defroster core and motor on the driver’s side firewall has three pipes pointing downwards. Two of these pipes are on the inboard side of the defroster, one of which is in front of the other. The third pipe is at the outboard side of the defroster.
Directly under the defroster, sitting on the frame rail, is a T shaped pipe fitting (to which hoses will be connected). The T connection sits on the frame in an upside down position, something like this ?, with the axis of its bottom facing longitudinally toward the front and back of the car.
From the pipe connection at the back of the driver’s side cylinder head, a short hose goes through an L-shaped elbow pipe (which looks like this: ?) to the front pipe of the two inboard pipes on the defroster. From the back pipe of the two inboard pipes on the defroster, another hose runs under the car’s body to the driver’s side under-seat heater. A third hose runs from the outboard pipe on the defroster straight down to the upward facing pipe on the ? (or T) connection. (See the photo on the next page.)
From the second pipe on the driver’s side under-seat heater, a hose runs across the top of the frame to the passenger’s side under-seat heater. From the second pipe on the passenger’s side under-seat heater, a hose runs back over the frame to the driver’s side of the car’s underside, and then all the way to the backward facing pipe on the ? (or T) connection. Another hose runs from the front facing pipe on the ? (or T) connection, up through a clip on the inner fender, to the pipe on the left side of the water pump.

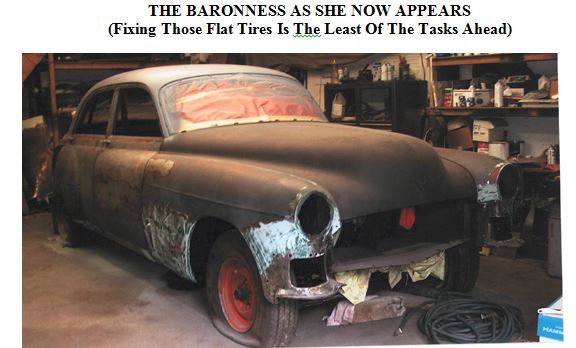
MY COURTSHIP WITH THE BARONESS
It all started innocently enough, as many “romances” do. In October, 2008 I decided to drive my ‘49 Club coupe, The Duchess, to the annual Cadillac Day held at Norwood Cadillac in Norwood, Mass. It was a picture-perfect New England fall day, resulting in a large turnout of vintage Cadillacs and LaSalles.
As I sat by my car enjoying the festivities and the last vestiges of the old car season, an older gentleman approached and struck up a conversation. He obviously liked my car, mentioned how he had always loved the 1948-49 “fastback” coupes, and said he owned a 1949 Cadillac Series 62 4-door sedan that he was considering sending to the crusher. He further explained that while the car had lots of rust-out, it did have many new parts, including brand-new rear leaf springs and shackles as well as a new battery box, that the water pump, carb and generator had been rebuilt, and that it ran and shifted perfectly. The die was cast; I obtained his address and promised I’d take a “look” at it the next day.
I arrived at the appointed time, and as I drove up his driveway I caught my first glimpse of “Her” sitting forlornly beside his garage. I was anxious to examine this derelict, and wasted no time doing the requisite “walk-around”, opening the hood, doors, trunk and peering underneath. She was indeed a rusty one: the “tin termites” had enjoyed an all-you-can-eat buffet, in the process devouring both inner and outer rocker panels and the bottom front and rear sections of the front fenders. The rest of the body had ample surface rust and peeling paint, but the intriguing aspect was that this appeared to be a totally original unmolested car, right down to its original paint, Avalon Grey. In addition, amazingly enough, the doors were rock-solid as was the trunk and, except for the front corners, the floors. He started her up and the engine sounded strong. A lot of accessories still worked, including all the interior lights, and the car was 100% complete, right down to the original washer bottle and perfect vacuum antenna sitting in the trunk.
He wanted $1,000 for it, but when I waved $800 cash under his nose the deal was done. The next weekend a fellow Cadillac enthusiast and I brought her home on a trailer. I gave her an interim name, The Grey Ghost, and started her up every day after work. The more I ran her the better the engine sounded! I started feeling pity for the poor girl (a dangerous emotion) and before I knew it she was in the garage and up on jack stands. I rebuilt the brake system, reasoning, against everyone’s sound advice (including my own) that, perhaps, there was a glimmer of hope for this rusty relic, and doing most of the work myself I’d possibly transform this “diamond-in-the-rough” into a fun “driver”. Yeah, right! I further rationalized by telling myself I had many of the parts she needed and five other ’49 four-door sedan parts cars.
I finished the brake system and commenced completely disassembling her. I found it utterly amazing that most everything came apart with relative ease, especially considering her rusty state of disrepair. When I pulled up the original carpets, I even found an interesting assembly-line checklist glued to the rear passenger area floor! I had never seen one of these in the many ‘49s I had already restored or parted out.
The disassembly progressed at a feverish pace. (Even as a kid I loved taking things apart. The hard part is putting it back together!) Before I knew it I had a bare shell on a chassis. All the stainless moldings even came off as though they had been installed last week; not one clip was rusty or broken.
A few weeks later, pondering where I might locate better fenders, I remembered a ’49 sedan I had previously owned which ended up inside a trailer at a local salvage yard. On a whim, I called the yard, whose owner told me the car had not moved, was now disassembled and had lots of spare parts in it. We agreed upon $600 and this gem was hauled to my yard to join the others.
After discussing it with The Duchess, I decided that, in keeping with the regal theme, her final name would be the Baroness. I contacted the guy whose name was on the title, and learned that he had driven her daily for 3 years, and it was not uncommon to have her up to 90 mph! He was thrilled to learn she finally had a good home and a prospect of salvation.
My auto-body man and I have put in many long weekends already, and the Baroness is now rock-solid. I lost track of how many patch panels I fabricated to bring her to this point; my auto-body man even suggested I name her “Patches” instead.
All the upholstery is being redone in grey Bedford Cord with blue Broadcloth and blue carpets, which is 1949 Cadillac trim number 41. I’ve always been a stickler for authenticity, but this time I’ve decided to deviate and paint her a 2-tone color, Triumph Blue on the bottom with a French Grey roof. Instead of “sombreros”, I’ve decided to install the small “standard” hubcaps with trim rings. Finally, I’m going to do the dash like a convertible: Triumph Blue Metallic with a Beach Beige insert, which I think is going to be a striking color combination.
The Duchess is really excited abut her new sister, and I plan to show them side-by-side at future shows. Projected date of completion is Spring 2010
BIAS-PLY VS. RADIAL TIRES: A NEVER-ENDING DISCUSSION
Most radial tires change the “stance” of the car, as they are wider and of a smaller overall diameter than the original 8.20 X 15 bias ply tires. Besides the difference in appearance, the greater width of radial tires can cause two problems:
1. Greater steering effort is required when parking or maneuvering at low speeds because “more rubber is on the road”;
2. Under certain conditions the rear tires could scrape the fender skirts; for example, when rounding a curve at higher speeds.
According to one tire company official, another problem is that when going over a bump radials exert much more lateral pressure on the wheels than the original tires. Since ’49 wheels are 2 halves welded together, in extreme circumstances the car could go over a harsh bump and, allegedly, the wheel will split in two. On the other hand, many knowledgeable people say this is an old husband’s tale and that, in general, ’49 owners have no problem at all with radials; they last longer, ride better and may be safer.
A good source of radials tires is Diamond Back in South Carolina, since one of their lines of tires (possibly called “SE”) has dimensions that are closer to 8.20 X 15s than other radials; that is, they are narrower and taller. Diamond Back advertises in Hemmings, usually on or near the back cover.
If you stay with the original-type 8.20 X 15 bias-ply tires, they have their virtues, too. For one thing, until they wear significantly, many owners find that they ride very well, even at high speeds, and require less effort when parking. Secondly, bias-ply tires cost less. In fact, some suppliers occasionally sell “seconds” or “blems”, with minor blemishes on the white sidewall but no structural damage, for not much more than $100 each. Thus, while bias-ply tires don’t last as long as radials, if you don’t drive your car much, in the long run they will provide an entirely satisfactory ride, will save you money and will look authentic. So, the question then becomes, “why bother with radials”? (Personally, I use bias-plies and drive my car a lot.)
There is probably no hard and fast conclusion to this discussion, so whether you choose to use bias ply or radial tires is ultimately a matter of personal preference. If you have a an opinion one way or another that you would like to share with the rest of us Forty-Niners please email the Times at jaysfriedman@yahoo.com or snail mail to Jay Friedman’s address in the CLC Directory
49ERS GETTING READY FOR LAS VEGAS GRAND NATIONAL
which should be a great one. Unfortunately, I won’t be able to go myself due to various other commitments, but my absence will be more than made up for by the Forty-Niners Chapter Member-at-Large, Frank Stagnitto, who will be attending. Frank has promised a full report on the GN activities of ’49s and their owners, which will appear in the September issue of the Times.
The Cadillac-Lasalle Club recently sent a flyer touting the virtues of the 2nd edition of the ’48 and ’49 Cadillac Authenticity Manual to all CLC members who are owners of such cars but who have not yet bought a copy. Get a copy of the 2nd edition of the manual by sending a $65 check to CLC Director of Technical Services, Bill Anderson 2198, Johns Hopkins Road, Gambrills, Maryland 21054-1614.
There are four Series 62 4-door sedans featured in this issue, which is only fitting as they were the most popular ’49 Cadillac mode, with 37,617 being sold or more than 40% of all ‘49s produced.
Now that summer is upon us, take your ’49 out and drive it whatever the model. That’s what they’re for!
COME BLOW YOUR HORN
by Art Gardner
Installing my 6107’s horns was one of the last tasks to complete after getting her running. I hooked up the wires to the horns, relay, etc and tried out them out. They blew for a second or two and then quit. So I had to take the horns off and give them a “tune up” by taking them apart, filing the points (using an ignition points file), cleaning them up internally, adjusting the points to give a consistent tone, painting, etc.
The task of adjusting the points is a bit irksome, as it will annoy the neighbors! Basically, you turn the adjustment nut while energizing the horn with a couple of wires until a good sound comes out of the horn. After reinstalling the horns, all that was left was to install the horn button and horn ring. That job took a little bit of patience in order to make the system work reliably, as described next.
To get the horn ring and button working right, I first had to adjust the longitudinal position of the steering shaft relative to the steering column. This was because I had changed this positioning inadvertently as part of the installation of a rack and pinion steering unit. This is not necessary on cars with stock steering.
Next came the task of trying to find the right replacement for the fiber washer that originally was fitted under the little contact at the top of the steering shaft. As you can see in the schematic below of a generic Cadillac steering wheel, the horn button (7.3785) is held away from the steering shaft by a conical spring (7.3796) which rests at its small end against the nub of the contact (7.3820).
The contact has a flange and a shank (not seen in this parts diagram). I thought that the horns were energized by the flange of the contact touching the top of the steering shaft. But that is not the usual manner of blowing the horn. Instead, the flange is held slightly away from the top of the steering shaft by the washer, even against the force of the horn button spring. When the horn ring is pushed, it causes the contact to tilt slightly in the same direction as the horn ring. The lower tip of the contact apparently then touches the inner wall of the steering shaft, completing the circuit. See my sketch (not to scale and a little rough, but you will get the idea). The trick then is to come up with a decent replacement for the washer that will be thick enough to keep the flange from contacting the top surface of the shaft and yet will allow the horn to blow when the horn ring is tilted. Jay Friedman told me that some folks take a small rubber band and wrap it around and around the shank to make a replacement. I tried that, with poor results. The car had an O-ring on there as some previous owner’s attempt at a repair, but it wasn’t doing the job.
What I came up with is a bit of rubber grommet as shown in the drawing above. I cut the grommet with a scissors to make a suitable collar to wrap around the upper part of the shank of the contact. To slip it over the shank without removing the horn wire from the shaft, I simply sliced it lengthwise (split it) with the scissors. Since it is captured in the bore, the split in the rubber is of no consequence. I found that a grommet with a 3/16″ ID worked well. Alternatively, a bit of rubber hose with a similar diameter would work as well. It takes some careful trial and error to get the length of the rubber /grommet just right, but I managed in 4 attempts. The set up works well and my car has working horns for the 1st time in 2 decades