by Art Gardner et. al.
For various reasons, all four authors removed the large hood hinge springs on their’49s. They have similar takes on removing and re-installing these springs, as has the Cadillac factory itself in an article in the June 1949 Serviceman bulletin (supplied by John). Their comments include Herman who said that, “It is not an easy job”, while Art says it can involve “safety issues” and Jim goes so far as to say “Wow, is this ever dangerous; be very careful”. So, if you are going to do this job, it’s best that you heed these voices of experience. You should also consult page 192 and 193 in the ’49 Cadillac Shop Manual which has the factory take on the procedures involved. (Note: Doing this job on Series 75 limousines is slightly different.)
1. JIM ON TAKING OFF THE SPRINGS
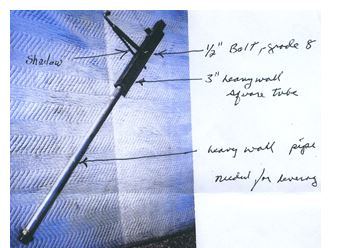
Jim made the tool shown in the photo below and writes: “1. Take hood off hood hinge brackets on cowl; 2. Take both front fenders off; 3. Slip hook into lower eye of spring and set angle iron on top of frame and pull down; 4. Remove lower hook of spring from bracket and SLOWLY relieve pressure on spring.”
2. HERMAN ON RE-INSTALLING THE SPRINGS
Herman writes, “When re-attaching the hood springs to the hinge assembly the items that you will need to begin are:
1. A 5/16″ braided, tar impregnated wire loom, Cut 4 pieces about 2 inches long and place one on each end of the spring hook.
This prevents chafing and was originally done by Cadillac;
2. Next you will need 2 “S’ hooks as used in mounting garage door springs (available at any hardware store);
3. Next, a piece of heavy duty chain, about 16-20 inches long;
4. A very sturdy long steel, bar (a piece of one inch pipe about 6-8 feet long will work).
You are now ready to tackle the job. Hook the hood spring (with wire loom slipped over the end) on the hood hinge assembly with upper hook facing to the front of the car. Next slip a piece of wire loom onto the lower hook of the spring. Hang the “S” hook on the lower spring. Make a loop of the chain and hook the ends onto the bottom of the “S” hook.
With this assembly hanging down toward the ground, slide your pry bar or pipe into the loop. Have someone hold the pry bar for you when doing this so nothing falls off or becomes unhooked. Slide your pry bar through the loop of chain and under the car frame. Apply downward and backward (toward rear of car) pressure to the pry bar, while trying to hook the spring to the boss on the firewall. This may take a few tries to get the hang of it. It helps if you have an assistant trying to nudge the spring while you apply downward pressure on the spring towards the boss on the firewall. The job is certainly easier with two people and is much safer with the two front fenders removed.
3. ART ON MAKING HIS VERSION OF THE TOOL NEEDED FOR WORKING ON THE SPRINGS
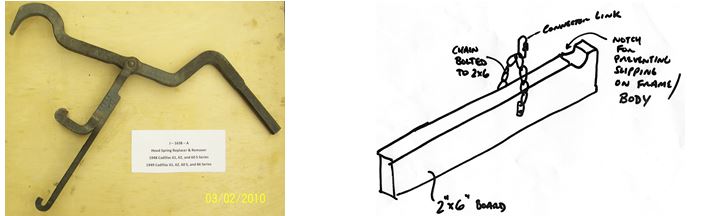
Art writes, “The photo at the left was taken by Forty-Niner John Washburn of an original factory “Hood Spring Tool
J-1638A” which is used to remove and install hood hinge springs.
I designed a replica of this tool as shown in the drawing at the right. This tool can be made by anyone and would be relatively safe. Basically, the 2×6 needs to be long enough to give you good leverage. The notch in one end avoids it slipping off the frame as you lever the hood spring down. The chain (bolted to the board) is coupled to the hood spring with a “connector link”, sometimes called a “master” link. This is a special chain link that has a split in it with a nut to connect the two halves and allow the link to be slipped over another link or, in this case, over the J-hook part of the spring.
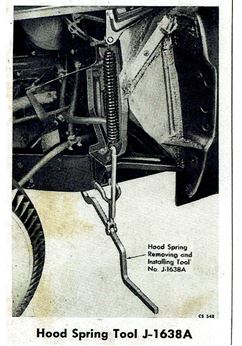
4. JOHN ON USING THE TOOL NEEDED FOR REMOVING AND RE-INSTALLING THE SPRINGS
Besides his photo at the left above of the original tool, John also sent in a copy of the June 1949 Cadillac Serviceman bulletin which contains the photo on the next page and the following instructions on using this tool: “The long pivot hook should be slipped over the bottom bracket of the hood spring, and the stationary hook slipped over the frame side member. Force the handle of the tool down to release the spring bracket from its catch, as shown. Although the picture shows the fender removed to photograph the tool in use, it is not necessary to remove the fender. To install the spring, first hook it in place at the top and then pull down with the hook, and fit the spring into the catch of the spring bracket. To obtain added leverage on the tool, make up a section of 1 inch pipe about 4 feet long and slide it over the handle of the tool.”