Category Archives: Brakes

STOP PLEASE DON’T CHOP THAT CADILLAC OR ARE YOUR DESIGN SKILLS REALLY BETTER THAN HARLEY EARLS

by Art Gardner

I have had ten 1949-56 Cadillac’s over the last 25 years. Some I kept bone stock, one I highly modified, and to several I made minor “tweaks” to improve performance/reliability/safety/convenience. From my experience, I encourage you to consider keeping your ’49 or any other old Cadillac completely stock or very stock — for financial, aesthetic, and enjoyment reasons. Don’t do something you will regret later, as there are many hidden dangers and pitfalls in modifying old Cadillac’s.
To me, the biggest drawback is that most people are not as skilled at car design as the original designers (no surprise there) and the car is likely to end up looking and performing much worse than the original. Secondly, it is often a financial disaster to make big changes to a ’49 or other old Cadillac. Many people start down a path of “customizing” a classic car by chopping the top, frenching the headlights, shaving the door handles and other exterior chrome, adding louvers, replacing the engine with a generic Chevy 350, etc. Most of the time this ends up ruining the car permanently. Do you really think you can make a classic Cadillac more beautiful than did the original designers? Perhaps, but most such modifications rob the car of its intrinsic appeal and make it uglier, not prettier. Sometimes the car does end up looking good. But often not.
I strongly recommend retaining the original drive train, as the 331 Cadillac engine is very, very good – in fact it was at the top of the heap for decades and is just as mechanically reliable as any small block Chevy. Same thing for the our HydraMatic transmission. It is just about bullet-proof. If yours doesn’t work like it should or if it leaks, get it professionally rebuilt and enjoy years of trouble-free automatic shifting.
Without going into all of the gory details, here are my bottom-line recommendations, learned the hard way, for what works well on a 1949 Cadillac:
1. If it came with 6 volts, keep it 6 volts if possible. Pay attention to grounds and the proper cables. Six volts works!
2. If you must improve the electrics, use a 6 volt alternator (keeping the voltage regulator in place for looks).
3. On a ’49, just a “sample” of the current goes through the ammeter, so keep the ammeter as is.
4. Use a better battery (I like the 6v Optima a lot).
5. Add air conditioning if you have to in order to use the car (in which case you would have to convert the car to 12 volts). Otherwise, don’t.
6. Use stainless steel brake lines (to resist internal corrosion) and dual circuit master cylinders for redundant safety. If sticking with a single circuit master, have it sleeved with brass or stainless steel to stop internal corrosion. If you can afford it, have the wheel cylinders sleeved with brass or stainless steel also. Use a remote brake reservoir (you can use parts from a ’54 and later Cadillac) to allow you to check the fluid regularly.
7. Convert your non-functioning clock to a quartz movement.
8. Use an electronic ignition module (e.g., Pertronix) or a dual point distributor plate for better ignition.
9. Keep the exhaust stock, but increase the pipe size slightly to a 2¼ inches diameter for better breathing.
10. Keep the fuel system stock. If vapor lock or engine overheating is a problem, use an electric fuel pump for “go” and keep the mechanical pump just for “show” (remove the rod and route the fuel through the non-working mechanical pump).
11. Avoid adding power steering; but if you must, use a later Cadillac system. Avoid rack and pinion.
12. Use radial tires. If your car doesn’t have power steering, look for radials with a very narrow contact patch (e.g., the Diamondback 700R15) and run the recommended higher inflation air pressure.
13. Keep your stock radio, but have it rebuilt. Rebuilders can add an MP3 input to the radio to play FM and digital music files.
14. Add seat belts, which can be easily done. On 4-door sedans and Series 75 limos, you should add shoulder belts.
15. Install a thicker stabilizer bar up front (like the’49 limos and hearses have) – you will be glad you did and no one will know.
16. Stick with the vacuum wipers if you can. If not, enjoy your electric wipers!

If you follow this advice, you will love using your car and will find that you drive it more and more. Above all, my cardinal rule is that if you feel compelled to change something, please change it in a way that can be undone easily (keep the original parts if you can and make the change a bolt-on operation). In other words, make the change a reversible one! Also, if possible, try to make the change look like it came that way from the factory. For example, if you are replacing the generator with an alternator, don’t use a chrome-plated alternator that will look terribly out of place in a 1949 Cadillac engine bay. Instead, get one that is black or paint it black to fit in with the rest of the engine bay.
In the end, it is your car, not mine, so do what makes you happy. But if you do want to tweak your car some, you will be miles ahead if you learn from my mistakes and triumphs. If you have specific questions about any of this, feel free to contact me
newsletter

BLEEDING BRAKES AFTER REPLACING BRAKE LINES

by Art Gardner

If you replace brake lines and/or replace or re-do wheel cylinders, it can be a chore to get all of the air back out of the lines and cylinders. Here is a trick I came up with recently (this probably been used by lots of mechanics over the years, but it only occurred to me in the last month or so).
The idea is to fill the lines and the cylinders as full as possible with fluid before installing them. Recently, we replaced the rear lines, rear hose, F-to-R line, and rebuilt the rear wheel cylinders on my ‘50. To avoid endless pumping and bleeding of the brakes, I filled the cylinders as full as I could with fresh fluid, then attached the new (relatively short) steel lines and snugged them up. Then I filled the line and the cylinder the rest of the way by pouring brake fluid down the line, using a skinny awl to lead the fluid into the line like a reverse funnel. (See drawing on next page.) After filling the line and cylinders completely, we put a tight rubber cap on the end of the line and installed the cylinder/line. For the flexible rubber brake hose and the F-to-R steel line, we did basically the same thing.
We had removed the wheel cylinders to rebuild them and were installing new lines at the same time. So pouring the fluid into the lines up was no trouble. If you were doing it with the wheel cylinders still on the car, you could put a rubber hose on the end of the line and bend up the rubber hose to give you a vertical run to pour into and to provide the elevation change needed to force the air to rise up and out of the line. If you do it with the wheel cylinder still on the car, you might need to open the bleeder valve to let some of the air out that way. Since I had the lines oriented vertically with the wheel cylinders off the car, I didn’t need to open the bleeder and the air escaped up the line.
As a result, there was very little spillage and it didn’t take very long to fill the system or bleed the brakes. The net effect is that when we bled the brakes, there was very, very little air in the system that needed to be purged. We had a firm pedal almost from the start and the entire bleeding process only took about 10 minutes.

newsletter

YOUR 49s HAND BRAKE

If you’ve ever wondered how your hand brake works and particularly what makes the handle “spring” forward when you turn and release it, the following should tell you everything you need to know about this arcane subject.

There are three hand brake cables in the system. The first cable runs from the under-hood end of the familiar T-shaped chrome handle at the lower left of the dash to the top of the “hand brake relay lever”. This lever is the flat rod supported by a bolt in its middle which is located just inboard of the driver’s side inner fender. The second cable runs from the bottom of this relay lever, through a rubber-coated sheath under the car to the “equalizer”, which is a V-shaped metal piece in the center of the car, just to the rear of the X-member of the frame. The third cable runs to both rear wheels from the equalizer.

Near the rear end of the second cable, just before the cable itself emerges from the its rubber outer sheath, a metal part of the sheath, about 1½ inches long, is held to the frame by a clamp on the frame’s upper flange. (This clamp is just in front of the X-member of the frame.) Just to the rear of this clamped metal part of the sheath is an integral spring, through which passes the second emergency brake cable itself. Attached at the very rear end of this second cable is a several inch long screw or bolt whose threads go through the equalizer and upon which is screwed an adjusting nut which controls the third cable’s tension.

At each rear wheel, the third (rear) cable passes through the brake backing plate, then through an integral spring and finally to the “operating lever” on the rear brake shoe. (The integral spring is very stiff, which, as mentioned below, can make it difficult to remove the cable from the operating lever.) When you pull the T-shaped hand brake handle toward you, the operating lever presses against the “strut rod” between the two rear brake shoes and which in turn pushes the shoes against the brake drum. When you release the handle, the three springs mentioned (one at the second cable, two at the rear wheels) as well as the brake shoe springs themselves, cause the rear brake shoes to release and the T-shaped handle in your hand to move forward.

Tip: if you buy a second-hand strut rod, make sure that it is for a’49 as there is much variation in these between model years even though they are similar in appearance. For example, the ’48 rod is different from the ’49, while the ’49 left and right rods also fit 1950-52 Series 75 cars and all 1953-55 cars.

Speaking of emergency brake cables, when working on the rear (or secondary) brake shoe on the back wheel while doing a brake job have you ever struggled disconnecting and reconnecting the cable to the emergency brake operating lever? In my experience, the cable’s powerful spring sometimes fights back tooth and nail. So much so that the last time I did this it took me a long time to get both cables re-connected after lots of tries and choice words. Eventually, I had to loosen the emergency brake adjusting screw to make the job easier.

As a young guy I worked in a garage doing brake jobs and did this several times a day. In those days it was a breeze, so what happened in the intervening years? With age, either the springs got stiffer or my hands got weaker. So, if you’re an old guy like me, a better way to deal with the cable and spring is to leave it connected to the operating lever and, instead, detach the operating lever from the brake shoe at its upper end by unscrewing the bolt, nut and spring washer which hold it to the brake shoe. Then, after the brake shoe is re-lined, bolt the operating lever back on.

newsletter

BRAKE ADJUSTMENT BLUES

by Art Gardner et. al.

Ever try to adjust your ‘49’s brakes and just couldn’t get them right? If so, you are not alone. Many of us have adjusted our brakes at one time or another by doing just the following. You stick your brake adjusting tool in the slot at the bottom of each backing plate, push down on the “star wheel” inside to tighten the brakes, while listening as it clicks against the lower brake shoe spring, and raise the star wheel to loosen the brakes. And that’s all there is to it, right? Not totally, since in our experience success sometimes eludes you. Leaving aside the contention by some that ’49 drum brakes are very mysterious things indeed, the main thing is that adjusting them involves more than the simple procedure outlined above. There are additional procedures you can do to get a ’49 to stop like it should, which is the topic at hand.

Turn to page 63 in your ’49 shop manual, on which is set forth the official procedures for adjusting brakes. The first step is to get under the car and adjust the “Brake Pedal Operating Rod” between the bottom of the brake pedal and the master cylinder in order to have 1/8 inch (0.3175 cm.) clearance between the rod and the master cylinder piston. This is not particularly difficult and, as the manual says, “This adjustment is important…”, since if not done right the brakes will drag or have excessive play.

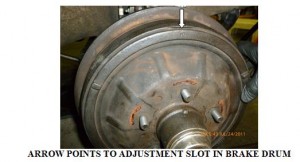
For the second step you’ll need a .015 inch (0.04 cm.) flat feeler gauge. Remove the wheels and refer to the photo of a brake drum below. You’ll see that there is a narrow “adjusting” slot in the perimeter of the outer face of the drum. (Didn’t know it was there? You are not alone on this either!)

ARROW POINTS TO ADJUSTMENT SLOT IN BRAKE DRUM

Turn the brake drum until the slot is opposite the “lower end of secondary or rear [brake] shoe”. This would be about the “8 o’clock” position on the passenger’s side of the car or the “4 o’clock” position on the driver’s side of the car Insert the feeler gauge and, following the procedure in the manual, raise or lower the star wheel with your brake tool to “establish a clearance of .015 inch at 1½ inches [3.8 cm.] from each end of secondary shoe”. This would be about the “8 o’clock” and “10 o’clock” positions on the right side of the car or “2 o’clock” and “4 o’clock” positions on the left side of the car.

Couldn’t get the required clearances at either or both positions? If so, the third step is to get the secondary brake shoe centered vertically on the backing plate so that there is .015 inch clearance at both positions. To do this, refer to Figure 56 on page 65 of your shop manual. You’ll see at the top of the brake mechanism on each wheel is the “anchor pin”, onto which the two “brake shoe return springs” are hooked. You can’t see it, but this anchor pin is an “eccentric”, which means it can be adjusted up and down and right to left.

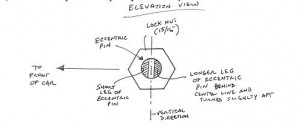
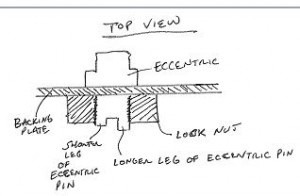
To adjust the anchor pin first refer to the illustration below, and then stick your head under the car to the rear of the backing plate. You’ll see that the back of the anchor pin is in the form of a bolt, onto which is screwed a large 15/16 inch (2.4 cm.) diameter lock nut. Also, the back end of the anchor pin has a large slot for inserting a flat tool such as a large screwdriver or the end of your brake adjusting tool. You’ll notice that one leg of the slot is longer than the other.

To adjust the anchor pin, the shop manual merely says to “loosen the anchor pin lock nut….and turn eccentric anchor pin in direction required to equalize clearances. Re-tighten lock nut and check clearances.” This statement doesn’t provide much detail since it doesn’t tell you which direction to turn the back of the anchor pin for the brake shoe clearances needed and, in addition, doesn’t tell you the best way to do so.

The answer to this is in a separate manual called “Manufacturing Information”. This publication, dated October 1948, was circulated in the Cadillac factory in Detroit to foremen and others to provide instructions on assembling ’49 Cadillacs. At the bottom of page 5-A-1 it says: “Assemble the anchor pin so the long end at the slotted [inner or back] end is just back to rear of vertical center line.” (Authors’ note: we interpret this somewhat unclear sentence to mean the longer leg of the slotted pin should be in a vertical position toward the back of the car with its upper tip pointing slightly toward the rear of the car, as in the drawing below.) This locates the pin for subsequent up and down adjustment.

And how to do so? We found the easiest way to turn the anchor pin is to loosen the lock nut, insert the blade of your brake adjusting tool in the slot, get a good grip on it and, to get a .015 inch clearance at both the upper and lower positions, turn it toward the rear of the car if you need to lower the secondary brake shoe and toward the front of the car to raise it. When finished, it says in Manufacturing Information to torque the lock nut to 70 foot-pounds. This procedure should yield the best possible brake pedal for your car, while minimizing drag on the brakes.

brake adj sep 11 2

brake adj sep 11

brake adj sep 11 3

newsletter

GETTING YOUR BRAKES’ HYDRAULIC SYSTEM IN SHAPE OR STOPPING IS MORE IMPORTANT THAN GOING

by Art Gardner

Many of you are aware of the tendency these days to “update” the car’s brakes with disk brakes in an effort to make the car safer. In my opinion, the biggest danger with the original 1949 Cadillac brakes is the lack of a second circuit, not raw stopping power. Up through 1961, I think, the brakes were all single circuit. Certainly in 1949 they were single circuit. That means that if you pop a line or hose or wheel cylinder anywhere on the car, you will lose ALL brakes all at once. Dual circuit brakes, which I think started with the 1962 Cads, eliminate that risk and leave you with either front or rear brakes in the event of a calamity. Many people will say, but “hey, I have never had a problem, so why change anything.” But when you do have a problem, this is a BIG problem.

So, the most important thing, in my opinion is to make sure the original parts are PERFECT, especially the metal lines. Brake fluid is hydrophilic, meaning it attracts moisture (right out of the air). The water that gets in the lines in this way rusts the metal lines from the inside out. They can look perfectly normal in a visual inspection, but be rusting away on the inside. One day a pinhole pops though and you lose all brake pressure. This happens more regularly than you might think, which is why the government eventually outlawed single circuit brakes. This fluid-borne rust is also how your wheel cylinders and master cylinder get pitted. The fix is to replace the plain metal lines with stainless steel lines. Put on all new hoses. Sleeve the wheel cylinders and the master cylinder with brass or stainless steel. Flush out the brake fluid and replace it with new fluid every 2-3 years. Do that and the original drum brakes should be safe for a long time!

If you want to make them even safer, you can put in a dual circuit master cylinder. It takes some extra work and plumbing, but to me it is worth it for the additional peace of mind. This is what I did with my last ‘49 6107 Club Coupe and am doing it to my new ‘49 coupe. I developed a nice kit for installing such in the original mounting place on the frame, so everything looks great and works correctly. I haven’t worked out how to do this on my 1956 Series 60 Fleetwood, but I am still noodling on it (as there is precious little room at the front of the 56 power brake booster for a dual circuit master).

I tried a disk brake “kit” on my last 49 and it was a disaster. I never did get it to work right, so I gave up and went back to the reliable drum brakes (augmented by my dual circuit master kit using a modern Wilwood dual circuit master).

I drive my old Cadillac’s as daily transportation. Right now, I use the ’49 fastback in the cold months (it is black and has no air conditioning) and use the ’56 60S in the warm months (its factory air works great). So I am relying on my good old drum brakes every day to stop my cars and keep me safe.

If you use the car only occasionally, such as for club events a few times per year, you might feel less motivated to be so finicky about brakes and might be tempted to do the minimum, instead of the maximum, in restoring the brakes. I can understand that tendency. But keep in mind that, as the song says, rust never sleeps and the corrosion inside the lines and the cylinders continues whether you use the car or not. So you can still have a safety issue with the brakes, even if you only use the car a few times per year.

If you keep the single master, but make the entire system perfect, you should be okay. A dual circuit master is a nice peace of mind as an extra safety measure, but you should be okay without it if everything else is right.

newsletter