Pete Hoffman of Danville, New York owns the beautiful 6107 shown below. To jazz it up, he installed dual exhausts and wire wheels (from a ‘50s El Dorado?) As for its color, Pete writes, “It is Dartmouth Green but looks black
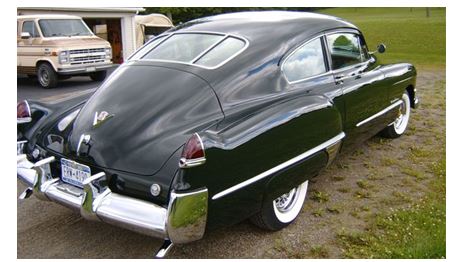
Pete Hoffman of Danville, New York owns the beautiful 6107 shown below. To jazz it up, he installed dual exhausts and wire wheels (from a ‘50s El Dorado?) As for its color, Pete writes, “It is Dartmouth Green but looks black
Members will recall that in the June ’09 Times issue we had an article on the “never-ending” discussion regarding original bias ply vs. radial tires on a ’49. Since then Dwight Smith and Dennis Akerman, both of the “Live Free or Die” state of New Hampshire, have written in with their views on this subject, as follows:
Dwight says that his 2 cents worth is “At the start of the 2001 season I put a new set of bias ply tires on the car (49,217 miles) and I removed them at the end of the 2007 season (59,950 miles). During the 10,733 miles I drove during this period, including a trip to Dearborn, MI, my car was difficult to steer when parking, and out on the road seemed to follow the grooves and cracks in the road. It was difficult to stay on course as the tires seemed to have a mind of their own. And my usual gas mileage was 15 mpg.
At the start of the 2008 season I installed a set of American Classic P235/75R15 radial tires with 3 1/8″ whitewalls. The change in handling was dramatic. Standing still steering is easier, and the car follows the path that I choose out on the open road. I ran the tires 1,547 miles in 2008 (including the 1,000 mile roundtrip to Cherry Hill) and averaged 18 mpg. I am totally pleased with the radial tires, both their appearance and handling abilities, and regret that I didn’t buy them sooner.
Dennis writes “I’ve now had a couple of years’ experience with the Diamond Back radials I put on my ’49 6269. I can’t say enough good things about them. They look authentic, they’re quiet, and the car handles infinitely better than it did with bias ply tires. It is night and day, and for the better.
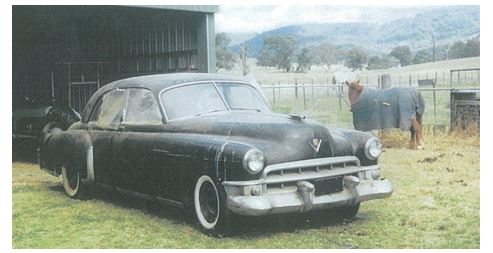
Robert Mitchell, of that lovely Australian city, owns the 60S shown below (and perhaps the horse behind it, too). Robert writes the car was owned by an elderly man who “lost interest in the car to the extent that it just sat from 1975 to 2000, though I would occasionally start it for him. The car was not preserved very well, with possums, cats and moths making a home for them-selves. Unfortunately, he passed away and I bought it from his estate. It’s a complete, original car except for seat covers. The motor runs well and it has been converted to right hand drive. The window lifts are not working, it needs chrome work and there is surface rust on the body. I have not done a lot to it since I’m working on other Cadillacs.”
A special tool is not needed to remove an outside door handle on a ’49 Cadillac. The outside door handles are attached to a 3 or 4 inch long square shaft that is perpendicular to the axis of the handle and which goes into the door. Inside the door, the male shaft goes into a square female hole in the door latch mechanism. This male shaft is held into the female hole by a lock screw that is, in turn, perpendicular to the axis of the shaft. On early ’49s the screw has an ordinary slotted head. On later cars the screw is really a small bolt with a ¼ inch hex head.
Let’s assume it is a front door. (Sedan rear doors should be the same. Can anyone enlighten?) To access the screw/bolt, peel back the rubber weather-strip on the side of the door at a point slightly above the level of the door latch. In doing so, you will uncover a small hole in the door about a ½ inch in diameter.
Shine a flashlight into the hole so you can see the screw head, which is 2 or 3 inches down inside the door. This will reveal whether the screw head requires a screwdriver or a ¼ inch socket. If it requires a ¼ inch socket, the hole is sometimes too narrow in diameter to admit the socket into the hole. If this is the case, enlarge the hole with a file or use a ¼ inch nut driver which has a narrower head than a socket.
With one hand on the door handle, loosen the screw just enough to free the door handle and pull it out of its place. Do not loosen the screw any further, as it may come out of the threads in the door latch and fall to the bottom of the inside of the door. To retrieve it you would have to take apart the door or, if it is a slotted screw, replace it using a magnetic screwdriver, both of which procedures you obviously want to avoid.
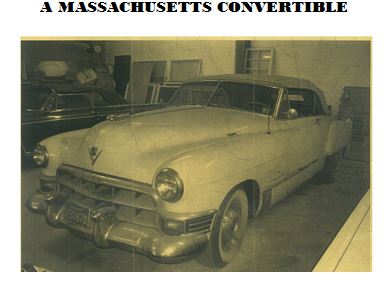
Chris Crowley of Beverly MA owns the convertible pictured above. Chris writes that “we are replacing all of the original hydraulic hoses and lift cylinders. I’m in dire need of a left (driver’s side) window regulator assembly. It was missing when I acquired the car.”
Chapter member Joe Foerster found a copy of, as he called it, “a snip” from the Nov.-Dec., 1948 Cadillac Serviceman’s bulletin, as follows:
A PROCEDURE FOR TESTING gasoline gauge tank units, which included lowering the gasoline tank in order to make the tank unit accessible, was announced on page seven of the February, 1948 issue of THE CADILLAC SERVICEMAN. In order to shorten the period of time required to replace this unit, the factory Engineering Department now recommends that the following procedure be used, which omits lowering of the gasoline tank. This new procedure takes less time than that allotted for lowering the tank in the old procedure. The new method is as follows:
1. Disconnect one of the battery cables.
2. Using a standard 4″ sheet metal saw, drill a 4″ diameter hole in the body floor pan directly over the gasoline tank float unit.
3. Disconnect the wiring from the tank unit.
4. Remove the screws which fasten the tank unit to the tank.
5. Lift out the tank unit. The float and arm will come away with it. Test the old tank unit against the dash unit. Failure may have been caused by poor ground.
6. Set the new tank unit with gasket, float and arm in exactly the same position on the tank. Install all screws and tighten securely.
7. Reconnect the wire to the binding post of the tank unit.
8. Fabricate a sheet metal cover for the 4″ hole in the body floor pan. Install this cover, seal with 3-M body sealer and secure it with at least six self-tapping screws.
9. Connect the battery cable.
Joe concludes, “Believe me. Once you’ve done this, you will wonder why the factory didn’t punch a hole there in the first place”.
by Art Gardner
My driver’s side front door glass cracked, necessitating replacement. The 1948 Olds 98 and Cadillac Fisher Body Manual, pages 45-47, sets forth the procedure, which seemed lengthy and complicated. As I proceeded, I realized there is a simpler way, which worked on the front door of my 2-door Club Coupe and MAY work on other body styles, as well as sedan rear doors and cars with power-operated windows.
Everything is done to the inside of the door with the door open. As there are lots of screws and small parts, I suggest using several containers to keep the loose parts organized according to the large parts they fasten.
1. Remove the reveal molding at the top and sides of the window frame. Be careful not to lose the two small pieces of rubber at either end which prevent the garnish molding below from being scratched.
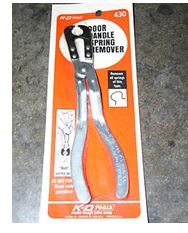
2. Remove the inside door handles and window cranks. Although these can be removed with dental picks or other pointed tools, you will do better to use an inside handle removal tool. I recommend the pliers-type illustrated below. This one is made by the KD Company, but similar tools are made by other firms. The flat-type tool is inferior. (See the body manual for removing the switches on Hydro-lectric equipped cars.)
.
3. Remove the arm rest if a front door.
4. Remove the screws holding the garnish molding below the window to the door. Besides the visible screws, this molding is held to the door by: A. an L-shaped metal hook screwed to the door frame, and;
B. the large heads (diameter: ¾ inch, 18 mm.) of screws which slide into slots in the back of the molding, whose shafts are screwed to the door frame. You have to twist the molding slightly to remove and re-install it. To remove it, you push down on the back end and pull up on the front slightly to get it off the hook. Then, the molding is unlocked from the screw heads by pushing down on the molding while gently pulling it toward you. Later, when re-installing it, you hook the molding over the L-shaped hook with the rear of the molding pushed down to get the large heads of the screws into the keyholes. Once the heads are through the big openings in the keyholes, you pull up on the rear of the molding while keeping the front over the L-shaped hook. Pulling up on the back of the molding brings the heads into the narrower part of the keyholes and secures the molding in place, ready for the small finish screws to be installed. (There won’t be a quiz.)
5. Remove the screws holding the upholstered door trim panel to the door. This panel is also held to the door by several metal tabs that protrude upward and outward from an access panel in the inner door into the back of the trim panel. In addition, the trim panel is held to the door by tracks at the bottom and front side of the door which enclose the corresponding edges of the panel. To remove the panel, gently pull it up and toward the back of the door.
6. As it is now visible, remove the large, square-ish access panel secured to the inner door with screws.
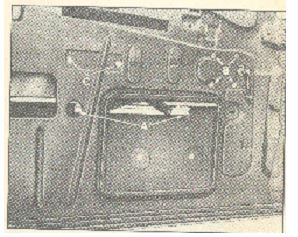
7. Raise (or lower) the window so that two of the four screws that hold the window support channel to the window regulator lift arms are visible through the hole uncovered when the panel in paragraph 6 was removed. At the same time, the second two of the four screws should be visible in the small, round hole to the side of the square hole. See the arrows of letter “A” in the illustration below. Remove the four screws.
8. Lower the glass all the way to the bottom of the door, slipping it past the regulator arms and out from the lower end of the window channels. If the channels are too long to release the glass, it may be necessary to unfasten the lower mount of the divider channel between the quarter window mechanism and the large window and move it slightly to loosen the glass.
9. To make room through the slot at the top of the inner door for the window support channel under the glass, particularly the lower pieces through which screws attach it to the regulator and the rubber molding under the glass, you must now remove the inner beltline fuzzy strip carrier which runs along the length of the top of the door and is secured with a half dozen screws.
10. With the glass now at the bottom of the door and free from the side window channels, it can be rotated 45 degrees or so and eased out of the upper slot in the door.
If the glass is removed this way, you don’t have to remove the divider channel, which is how the Fisher Body Manual says to do it, thereby saving a ton of time and effort. Installation of the new glass (after setting it in the support channel) was simply the reverse.
From my hometown of Novato in Northern California, about 30 miles north of the Golden Gate, I toured south to Bakersfield and across the desert with three other cars from our NorCal Regional club: Don Barnes in a ’58 Biarritz, Dave & Patti Ricci in a ’61 SDV and Larry & Jo Ann Brennan in a ’60 Biarritz. We traveled early and stayed overnight in Bakersfield in an effort to beat the heat and make the trip more leisurely. It was necessary to keep the top up on my convertible just to get the shade and cope with 90+ degree heat, but all of us made the trip without a problem. Las Vegas is like an adult Disney World constantly under construction, but I was able to cruise my ’49 up and down the glamorous strip with Frank Sinatra crooning from my boom-box — a long time fantasy come true. Also, seeing the Hoover Dam was awesome — a tribute to what massive projects Americans can build.
The Las Vegas Region did an outstanding job of planning and executing a great event. Having the car show indoors provided a secure, air conditioned space, and the lights really made those Cads and LaSalles sparkle. I was the only entry in my 48-49 judging class. There was a beautiful dark cherry maroon ’48 convertible, but it was entered as display only.
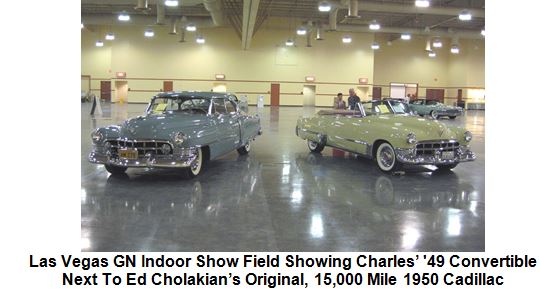
Las Vegas GN Indoor Show Field Showing Charles’ ’49 Convertible
Next To Ed Cholakian’s Original, 15,000 Mile 1950 Cadillac
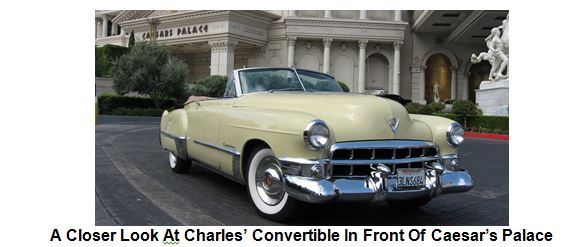
A Closer Look At Charles’ Convertible In Front Of Caesar’s Palace
Scanning the April of 2008 list of 49ers and the list of people in attendance, I believe ‘49er chapter members attending besides me include Dan Fisher, Ed Cholakian, Frank Stagnitto, Herman Desser and Larry Brennan. There may have been others.
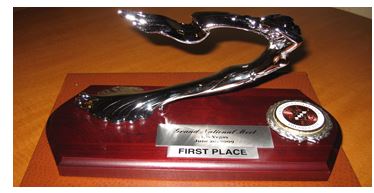
The photo on the previous page is the First Place award I won. Needless to say, I was thrilled even though the competition was absent. [Ed. Note: But, as can be seen in the top two photos, the award to Charles’ gorgeous convertible was richly deserved, regardless of competition.]
I think everyone who drove or trailered a car across the Mojave Desert to Nevada could easily be named a winner just for that effort alone. I left only a small amount behind in the slot machines, and as evidenced by my thorough exhaustion upon arriving back at home, I can definitely state that I had a great time