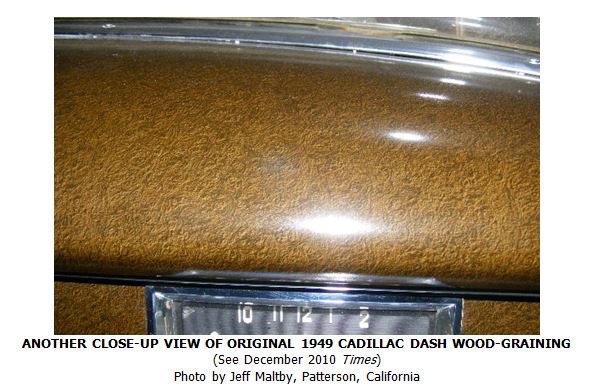
ANOTHER CLOSE-UP VIEW OF ORIGINAL 1949 CADILLAC DASH WOOD-GRAINING decal
In my article in the March 2011 issue of the Times entitled “Tech Tip: If Your Rear Axle Is Noisy”, in discussing leaks from same it was suggested that you “check the pinion seal as well as the large, round gasket where the differential meets the axle housing…”.
However, I neglected to mention that another source of leakage from this same area can be from around one of the 12 nuts fastening the differential assembly to the axle housing. Check the nuts to make sure that behind each one is a special copper sealing washer. If such a washer is missing or damaged, or if an incorrect ordinary steel lock (or flat) washer has been substituted, a leak may result.
Besides warning ’49 owners whose cars have engine numbers between 85392 and 88800 (the last 5 digits, that is) of possible camshaft problems, the Cadillac Service Bulletin above has several interesting facts:
1. The 4th paragraph explains how to remove the fuel pump and oil filler housing as one assembly, which is an easier way to remove and replace the fuel pump. The reason is that when replacing the fuel pump with the oil filler housing still on the motor, it’s a bit tricky getting the pump bolts started because of the pressure the fuel pump operating rod exerts on the pump actuating lever, even with the rod in its lowest position. To do it the easier way, before installing either on the motor, first bolt the new fuel pump to the oil filler housing, then insert the operating rod in the motor, then bump the starter until the rod is in its lowest position and lower the pump and housing over the rod as one assembly. At this point it’s easy to draw the assembly down over the rod by progressively tightening the 2 bolts holding it to the motor. Don’t forget the gasket that goes under the housing;
2. Also, this way you can inspect the operating rod and replace it if worn, as they can still be bought new. The rod has a top and a bottom with a smaller diameter cast iron insert at the bottom (see diagram in service bulletin), so be sure you insert it with the cast iron insert down;
3. If the last 5 digit’s of your ‘49’s engine number are indeed between 85392 and 88800, then heed the instructions in the next to last and last paragraphs, particularly if you have had camshaft problems.
A year or so ago Forty Niner Pete Hoffman and his 6107 moved from snowy upstate New York to sunny Southern California. (See the Sept. ’09 Times for a photo of Pete’s car) In the Golden State he not only drives the ’49 year round, but has had a series of successes which he recounted in a letter to the Times. Pete started off by saying “My ’49 has been doing great out here. It has six Best of Shows and one of them was outstanding. At a show in Orange County there were 425 cars. The ’49 took Best of Show and I was interviewed for Channel 6 News.” Next, echoing the article in the June ’11 Times on 8 volt batteries as a solution to 6 volt starting problems, Pete wrote: “I just changed the ’49 to an 8 volt battery and I am so happy with the results. It really spins the 331. I bought an 8 volt battery tender to keep it fully charged.”
by Art Gardner et. al.
Ever try to adjust your ‘49’s brakes and just couldn’t get them right? If so, you are not alone. Many of us have adjusted our brakes at one time or another by doing just the following. You stick your brake adjusting tool in the slot at the bottom of each backing plate, push down on the “star wheel” inside to tighten the brakes, while listening as it clicks against the lower brake shoe spring, and raise the star wheel to loosen the brakes. And that’s all there is to it, right? Not totally, since in our experience success sometimes eludes you. Leaving aside the contention by some that ’49 drum brakes are very mysterious things indeed, the main thing is that adjusting them involves more than the simple procedure outlined above. There are additional procedures you can do to get a ’49 to stop like it should, which is the topic at hand.
Turn to page 63 in your ’49 shop manual, on which is set forth the official procedures for adjusting brakes. The first step is to get under the car and adjust the “Brake Pedal Operating Rod” between the bottom of the brake pedal and the master cylinder in order to have 1/8 inch (0.3175 cm.) clearance between the rod and the master cylinder piston. This is not particularly difficult and, as the manual says, “This adjustment is important…”, since if not done right the brakes will drag or have excessive play.
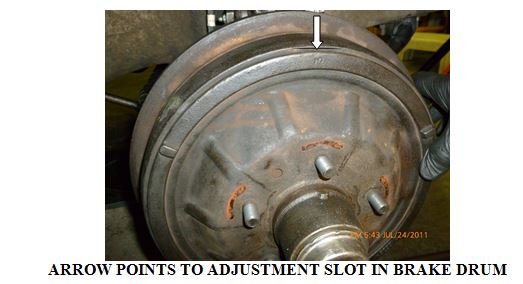
For the second step you’ll need a .015 inch (0.04 cm.) flat feeler gauge. Remove the wheels and refer to the photo of a brake drum below. You’ll see that there is a narrow “adjusting” slot in the perimeter of the outer face of the drum. (Didn’t know it was there? You are not alone on this either!)
ARROW POINTS TO ADJUSTMENT SLOT IN BRAKE DRUM
Turn the brake drum until the slot is opposite the “lower end of secondary or rear [brake] shoe”. This would be about the “8 o’clock” position on the passenger’s side of the car or the “4 o’clock” position on the driver’s side of the car Insert the feeler gauge and, following the procedure in the manual, raise or lower the star wheel with your brake tool to “establish a clearance of .015 inch at 1½ inches [3.8 cm.] from each end of secondary shoe”. This would be about the “8 o’clock” and “10 o’clock” positions on the right side of the car or “2 o’clock” and “4 o’clock” positions on the left side of the car.
Couldn’t get the required clearances at either or both positions? If so, the third step is to get the secondary brake shoe centered vertically on the backing plate so that there is .015 inch clearance at both positions. To do this, refer to Figure 56 on page 65 of your shop manual. You’ll see at the top of the brake mechanism on each wheel is the “anchor pin”, onto which the two “brake shoe return springs” are hooked. You can’t see it, but this anchor pin is an “eccentric”, which means it can be adjusted up and down and right to left.
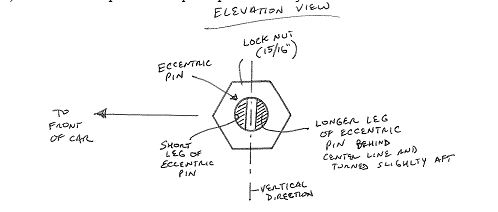
To adjust the anchor pin first refer to the illustration below, and then stick your head under the car to the rear of the backing plate. You’ll see that the back of the anchor pin is in the form of a bolt, onto which is screwed a large 15/16 inch (2.4 cm.) diameter lock nut. Also, the back end of the anchor pin has a large slot for inserting a flat tool such as a large screwdriver or the end of your brake adjusting tool. You’ll notice that one leg of the slot is longer than the other.
To adjust the anchor pin, the shop manual merely says to “loosen the anchor pin lock nut….and turn eccentric anchor pin in direction required to equalize clearances. Re-tighten lock nut and check clearances.” This statement doesn’t provide much detail since it doesn’t tell you which direction to turn the back of the anchor pin for the brake shoe clearances needed and, in addition, doesn’t tell you the best way to do so.
The answer to this is in a separate manual called “Manufacturing Information”. This publication, dated October 1948, was circulated in the Cadillac factory in Detroit to foremen and others to provide instructions on assembling ’49 Cadillacs. At the bottom of page 5-A-1 it says: “Assemble the anchor pin so the long end at the slotted [inner or back] end is just back to rear of vertical center line.” (Authors’ note: we interpret this somewhat unclear sentence to mean the longer leg of the slotted pin should be in a vertical position toward the back of the car with its upper tip pointing slightly toward the rear of the car, as in the drawing below.) This locates the pin for subsequent up and down adjustment.
And how to do so? We found the easiest way to turn the anchor pin is to loosen the lock nut, insert the blade of your brake adjusting tool in the slot, get a good grip on it and, to get a .015 inch clearance at both the upper and lower positions, turn it toward the rear of the car if you need to lower the secondary brake shoe and toward the front of the car to raise it. When finished, it says in Manufacturing Information to torque the lock nut to 70 foot-pounds. This procedure should yield the best possible brake pedal for your car, while minimizing drag on the brakes.

Eric Westphal, our member in Germany, recently drove his 6107 to the annual Rheinbach Classics 2011 car show. There, a lovely fraulein who has just been elected “Miss Petticoat” posed in front of the car. (Test your devotion to ’49s. Which did you check out first, Eric’s car or the young lady?)
Over the years that I’ve owned my ’49, I’ve agonized over the vacuum antenna not always operating as it should, and finally not operating at all. So, for the nth time I disassembled the unit this year and noticed that one of the original plastic disks had cracked in half where a glued repair had failed.
Maybe it was time to replace those disks; but how and with what? A friend, who can repair antique radios, build furniture, and use power and hand tools to recreate just about anything, came to the rescue. I gave him the original plastic parts and he recreated them in Lucite, drilling the correct holes as well. The original leather or rubber gaskets were not part of this project, but I was able to reinstall them after oiling them well.
Almost voila! The antenna rose when the volume control was pulled, but would not retract when the knob was pushed. Time and our warm Georgia spring came to the rescue and now the antenna goes up and down as it was intended to.
If you want to troubleshoot and rebuild your own antenna, you can order a set of the two disks from my friend for $30 postpaid in the US. E-mail Mark Palmquist at jmpalm@mindspring.com
The annual CLC Grand National Meet was held August 10-13 at the Marriott Hotel, Dublin, Ohio, a suburb of Columbus. I decided to drive the 800+ miles in my “modern” vehicle, a 2004 Jeep Grand Cherokee, in the hope of filling it with 1949 Cadillac parts. I have a longtime friend, formerly of my home state of Massachusetts, who re-located to Dayton, who graciously put me up (and me with him) for the week.
Early Thursday morning, the 11th, I drove the hour-long trip to Dublin with high hopes. I immediately spotted Jay Friedman and Art Gardner, who had arrived from Georgia and were searching for parts themselves. After exchanging pleasantries, I commenced my own search for those elusive parts and hit the “mother lode”, finding ’49 parts everywhere I looked it seemed. It’s amazing how fast one (me) can blow through $900, and with payday not occurring until the next day, I had to be rescued by CLCer Bob Mooney of Chicago, who lent me $200. Thanks, Bob…… you’re #1 in my book.
Other ‘49ers and CLC members I met at the meet included: Ed Cholakian, Don Cleveland, Randy and Susan Denchfield, Martin Blasinsky, George Louthan, Henry Ruby, Harry Scott, Joe Gildea and Bill Callahan, Past President and Head Judge, respectively, of the CLC New England Region and Richard Sisson. My apologies if I missed anyone.
The morning of the judged show on Saturday dawned overcast with a light drizzle. Fortunately, it had all burned off and was bright and sunny by the time I arrived at the Marriott. The number of ‘49s was somewhat disappointing, especially compared with the ’08 GN in Cherry Hill NJ where there were 13 in attendance. Besides Don Cleveland of Perrysburg, Ohio, who was the only ‘49er chapter member there with his car, a gorgeous 60S (see below), there were 2 modified ’49 club coupes. Also present were three ’48 Club Coupes, two belonging to new member Richard Stahl of Temperance, Michigan and his son, and another Madeira Maroon beauty belonging to a couple from Indiana. One of the more unusual, unique, albeit morbid, vehicles on display was a ’48 Cadillac hearse belonging to Mark Rodgers of, Cleveland Ohio. The weather continued to cooperate, and though it was somewhat warm and humid, everyone was thankful the predicted “scattered thunderstorms” never materialized. A wonderful time was had by all.
A highlight of the GN from a ‘49ers point-of-view was a chapter meeting 3:30-4:30 pm on Saturday, August 13. Only 5 members were in attendance: Ed Cholakian, Don Cleveland, Randy Denchfield, George Louthan and yours truly. A spirited discussion ensued regarding 6 volt starting problems, their causes and various solutions. Ed Cholakian once again reminded ‘49ers that they will receive a 20% discount on all Steele Rubber Products ordered through his company, All Cads of the ‘40s. (You cannot get this discount from Steele directly.) We thank Ed once again for his generosity in doing this for us. Refreshments were then served.