Monthly Archives: March 2010

MOTOR TRENDS CAR OF THE YEAR

For more than 60 years Motor Trend Magazine has been the “Bible” of auto publications. In 1949 they started their annual practice of doing a multi-page spread on their “Car of the Year”. The first was the 1949 Cadillac, due primarily to its post-war styling and, more importantly, the fact it was powered by a new OHV V-8 engine and an improved Hydra-matic transmisison. The magazine has decided to do a commemorative on the 1949 Cadillac and they have chosen my 49 Coupe as the featured car. Obviously, I’m excited about this and had a full day of shooting at the Muckenthaler Museum in Fullerton, Calif. The cover story was in the January 2010 issue. Below is my own photo, taken unfortunately during a drizzly day in 2009.

mototr trwnd mar 10

newsletter

DID YOU KNOW THAT rear axle housing has a built-in air vent in the case

your ‘49’s rear axle housing has a built-in air vent in the case? I certainly didn’t

Some background: When I bought my 6107 25 years ago the differential pinion seal was leaking. The mechanic who replaced it looked everywhere on the axle housing and could not find a vent to the atmosphere. In addition to the motor, he said these were necessary on all housings that contained a rotating mechanism in gear oil, including the rear end and transmission, to prevent oil pressure building up which can cause leaks and the oil to foam (which reduces its ability to lubricate). To rectify this he drilled and threaded a hole above the right-side spring and screwed in a small venting valve he took from a junked car.

I had no further problems in this area until recently, when my rear axle housing started leaking gear oil on the right side at the junction of the axle housing and the passenger’s side brake backing plate. (There’s a special channel at that point to direct away from the brake shoes any gear oil leaking past the axle seal.) It was a small leak, but it became very annoying to see it whenever I climbed under the rear of car for any reason. I replaced the axle seal, and even installed a spare axle shaft on the assumption that might help, but the leak persisted.

Thinking the leak might be due to a crack or flaw in the axle housing, I bought a used one from ’49er Joe Cutler and started the formidable task of removing and replacing it. However, while cleaning up my new purchase I noticed a slit-like hole on the upper right of the back of the round part of the housing, which is the long-lost air vent. (See arrow in photo on next page.)
I then checked out the same hole on the housing still in my car to find that it was barely visible and completely clogged with dirt. I cleaned out the hole with a small knife which stopped the leak. Problem solved.

did you know mar 10

newsletter

A PRESERVATION TIP

There is a drain hole at the bottom of each end of the rear ’48-’49 Cadillac bumper where an upright brace is welded on the inside of the bumper (by the large cheek of the upright under the tail light). The hole, the size of your finger, is not round but rather of an odd shape as it is formed by the brace welded to the bottom of the bumper. It is apparently to drain out the water that will collect inside of the mounting brace that is welded to the back of the bumper at that point. If you lay on the ground and look under the rear bumper you will see what I am talking about.

Well, when I took off my rear bumper for plating I noticed that a large nut was wedged in one of the holes. When I tried to pop it out with a screwdriver it would not budge. When I tried a long drift punch and a hammer I got a large amount of small rocks and sand. Both sides were plugged up. I had to put the bumper in my sand blaster to really clean the area up for plating and got enough sand and rocks to fill two coke cans. My suggestion is that when you wash your car you should give these two holes a very generous spray of high pressure water. Incidentally, I have wondered why the ‘49s I have seen in junk yards have rusted out rear bumpers; now I know.

series 62 mar 10


newsletter

ANOTHER TECH TIP

If doing a detailed restoration on your ’49, you’ll probably want to remove the hood hinge assembly so that not only can you blast and paint it and the hood springs, but so you can paint the firewall. The four holes on each side, through which go the large bolts and flat washers to attach this unit to the firewall, were purposely made larger to make a fair amount of adjustment possible. Thus, it can be tricky to re-install this assembly in the same position it was originally and, once the hood springs have been re-installed, virtually impossible because of the tremendous spring pressure. I’ve devised a solution to this problem that I’ve used on several restorations that is not only easy, but foolproof and very successful. This procedure should be followed, of course, only if your hood fits and was aligned properly in the first place.
First, remove the hood. Then remove both hood springs. (In the next installment I’ll write up my method for removing and re-installing them.) Now take a 6-point socket (½ inch drive recommended) with a 3 inch extension and ratchet, and remove only one of the four large bolts and thick flat washer that attach the hinge assembly to the firewall. Now center-punch a mark close to the bolt hole and drill a 1/8 inch (0.3175 cm.) diameter hole through the hood hinge bracket and through the firewall at this location. Be sure this 1/8 inch hole close enough to the hole so it will be covered later by the thick washer upon re-installation.

Now re-install this bolt and the flat washer and tighten securely. Repeat this step on the remaining 3 large bolts, doing only one at a time. (See sketch below.)

When re-installing the hood hinge assembly, you simply slide a 1/8 inch (0.3175 cm.) drill bit through each hole previously drilled, then re-install each large bolt and flat washer one at a time. The hood hinge assembly will be in the exact location it was originally. IMPORTANT NOTE: When removing the hood hinge assembly, be sure to place your hand under each large bolt as you remove it, as often times there are one or more shims installed behind the hinge assembly at the factory. Label each shim so you can re-install it in the same position.

I’ve also used this technique of drilling “alignment holes” before removing doors. As long as the doors fit properly originally, using this method they will fit properly when re-installing. This saves untold time and aggravation.

tip mar 10

tip  2 mar 10

newsletter

49 CADILLAC IN ITALY

My passion for Cadillacs started in 1979 when as an exchange-student living for a year in Albuquerque, NM I was impressed by these big and excessive cars, so different from the little cars which I was accustomed to see here in Italy. A few years ago I decided to go for one of those big cars which, possibly, could to take me back to my youth. So I bought a ’76 Calais Sedan.

Starting from then my tastes in Cadillacs changed a little. Probably due to the fact I was getting older, I was more attracted by older cars like those of the 50’s. I thought about importing one from the US, like many people in Italy do but, as you may understand, this is not cheap at all. So I was calmly waiting for the right time to start such an operation. But
Some months ago, almost casually, I got onto the website of a sport cars dealer in the north of Italy, because a friend told me he was selling something I could be interested in, and I saw her: a 1949 Series 62 Sedan, VIN 496204825. Not in good condition, because she was abandoned for some years, but almost everything was there. What can I say? I saw the beautiful huge split windshield, the 40’s body lines and I realized that in some ways the 50’s cars were even too modern for me with their excessive Cadillac lines that came in the fifties and sixties. Instead this one was, at least for me, much classier and in some ways “severe”. After talking with the dealer we came to an agreement and the car was delivered to me a few months ago.

I knew she was in need of complete restoration but didn’t expect that even the engine was not in good working order, with seized rings and some valves not closing correctly. In a few days the engine will be taken out of the car and rebuilt. Inside, the car looks original, besides some dash painting which I am not sure is correct, along with lots of things that have to be verified. The car came in Cypress Green Poly, although during her life she had been repainted. There are some parts still in the original color like the firewall and wheels which, compared to the color data sheet, look brighter in color.

At this point you may think “wouldn’t it be cheaper buying a car in better condition from the United States?” Surely, this car will cost me more money in restoration, but what would have been the fate of the old lady if I didn’t rescue her? Are there many people willing to spend a fortune restoring it? I think she would have had a sad end. I hear of many people “fond of old cars” thinking with their wallet instead of the heart. A car can be an economic massacre for you by restoring it, but when you see something which moves your feelings so much, well, any consideration of money will fail. So it was for me.

Anyway, it looks like if this car has a quite interesting history. I obtained its build sheet from GM Heritage and was able to get in touch with a couple of previous owners. When new, the car was shipped to Ecuador. There is some darkness until 1976, when she was imported in Italy. I think that’s all for now. Will keep you updated as restoration will proceed.

italy mar10

newsletter

MORE POWER MR SCOTT

by Art Gardner

Your 1949 Cadillac has 160 horsepower, right? Well, maybe, maybe not! The official published number is 160 hp, but what does it mean, how was it measured and how does it stack up to “real world” horsepower? Was Cadillac being overly optimistic to sell cars? Does anyone really think that the cars rolling off the line had 160 hp hitting the ground at the rear wheels?

In the early ‘50’s, hot rodders were drooling over the Cadillac 331 OHV V8 as the most powerful motor available (though expensive for many). A 1951 hot rod magazine reported that the bare ‘49 Cadillac engine (with no generator, water pump, fuel pump, air cleaner, muffler, etc) produced 160 gross BHP at 3800 rpm, the same number Cadillac published but without explaining where it came from. The magazine also reported that with all accessories but the transmission the engine developed 141 net HP at 3400 rpm. Automatic transmissions and the rest of the driveline consume 15-30% of the power available before reaching the rear wheels, while stick shift transmissions consume less, maybe saving 5-10%. Using 20-25% as a rough guess for losses, on a stock Hydramatic ‘49 the 141 flywheel HP was probably only 105-113 HP at the rear wheels, which is the horsepower you can actually use and feel while driving. (Modern automatics are more efficient, due to lock-up torque converters, etc.)

By the way, the 46.5 “taxable horsepower” mentioned in the official published specifications is a theoretical calculation, taking into account the number of cylinders and the bore but not the stroke, and was used primarily in Britain to determine car taxes.

Another measurement is “torque”, which is the twisting power of the engine. It is torque that you actually feel when you step on the gas. One way to think about torque is that it is pure pulling power, while horsepower also takes into account engine speed. A chassis dynamometer is used to measure torque directly and then a horsepower figure is calculated from the torque number (HP=Torque x RPM/5250). Above 5250 rpm, the calculated horsepower will be a larger number than the torque number and the opposite below 5250 rpm (ignoring the units). At 5250 rpm, the horsepower and torque curves cross. The published number for torque on 1949 Cadillac engines is 312 pound feet of torque at 1800 rpm (the calculated HP at this torque measurement would be 107 hp).

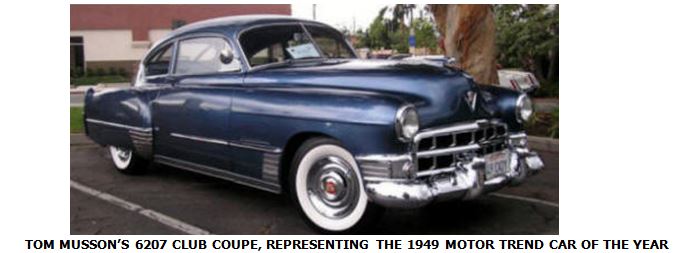
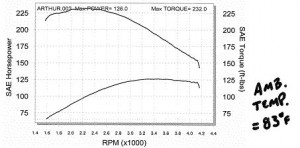
I recently tested my engine’s performance. I have the (numbers-matching) early version 1949 Cadillac engine (two-bolt valve covers, spring loaded camshaft) in my 6107 Club Coupe with a few minor changes. First of all, when rebuilding the engine, we did a high-precision balancing and “blueprinting” job to make the engine as smooth and efficient as possible. Second, the engine was bored out 0.030″. Third, I’m using 12 volts, a Pertronix electronic ignition module inside the stock distributor, electronic fuel injection (throttle body) atop the stock intake manifold and a slightly larger exhaust pipe (2-1/4″ vs. 2″). But the engine is still using the small valve 1949 heads with single exhaust. Below is a printout of the horsepower and torque numbers, tested on a local chassis dynamometer (measured at the rear wheels). These numbers are the net numbers after losses by my transmission, rear end, water pump, exhaust, AC compressor, power steering pump, etc.

My peak horsepower number of 126 hp shows a 12%-20% increase over stock, while my peak torque of 232 lb-ft at 2200 rpm is 74% of the published gross torque number of 312 lb-feet at 1800 rpm. Of course, the published torque number would need to be reduced by some percentage to estimate what the torque would have been at the rear wheels and with the engine equipped with normal accessories. If we reduce the published gross torque number to the same extent as the published horsepower number, the net torque at the rear wheels for ’49 Cadillac rolling off the assembly line might have been around 206-220 lb-feet, instead of the gross number of 312 lb-ft. My measured 232 lb-ft of peak torque fits right in with that (a 6%-13% increase).

power 1 mar 10

newsletter