If doing a detailed restoration on your ’49, you’ll probably want to remove the hood hinge assembly so that not only can you blast and paint it and the hood springs, but so you can paint the firewall. The four holes on each side, through which go the large bolts and flat washers to attach this unit to the firewall, were purposely made larger to make a fair amount of adjustment possible. Thus, it can be tricky to re-install this assembly in the same position it was originally and, once the hood springs have been re-installed, virtually impossible because of the tremendous spring pressure. I’ve devised a solution to this problem that I’ve used on several restorations that is not only easy, but foolproof and very successful. This procedure should be followed, of course, only if your hood fits and was aligned properly in the first place.
First, remove the hood. Then remove both hood springs. (In the next installment I’ll write up my method for removing and re-installing them.) Now take a 6-point socket (½ inch drive recommended) with a 3 inch extension and ratchet, and remove only one of the four large bolts and thick flat washer that attach the hinge assembly to the firewall. Now center-punch a mark close to the bolt hole and drill a 1/8 inch (0.3175 cm.) diameter hole through the hood hinge bracket and through the firewall at this location. Be sure this 1/8 inch hole close enough to the hole so it will be covered later by the thick washer upon re-installation.
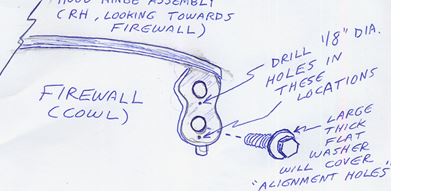
Now re-install this bolt and the flat washer and tighten securely. Repeat this step on the remaining 3 large bolts, doing only one at a time. (See sketch below.)
When re-installing the hood hinge assembly, you simply slide a 1/8 inch (0.3175 cm.) drill bit through each hole previously drilled, then re-install each large bolt and flat washer one at a time. The hood hinge assembly will be in the exact location it was originally. IMPORTANT NOTE: When removing the hood hinge assembly, be sure to place your hand under each large bolt as you remove it, as often times there are one or more shims installed behind the hinge assembly at the factory. Label each shim so you can re-install it in the same position.
I’ve also used this technique of drilling “alignment holes” before removing doors. As long as the doors fit properly originally, using this method they will fit properly when re-installing. This saves untold time and aggravation.