Category Archives: Engine

Stopping an Oil Leak – Update

Thanks Art and Jay! This is a compilation of some earlier work.

I hate an oil leak. It is embarrassing, frustrating and just plain messy. One of the worst oil leaks on a 1949-55 Cadillac motor is the engine rear main bearing seal, a repair job that intimidates many owners. I know, I suffered with this leak in my 55 Series 62 Sedan for about 12 years because I didn’t want to take the engine out, but replacing the rear main seal CAN be done correctly with the engine in the car.

The engine in my ’49 6107 Club Coupe was carefully rebuilt recently with the installation of a Teflon-impregnated rope rear seal, which after 500 miles started to leak. The oil pan also seemed to be leaking for two additional reasons: 1. the bolts were slightly loose, which typically occurs after the engine is put back in service and the engine heat shrinks the gasket; 2. the rear pan gasket had been made out of silicon liquid instead of the original cork strip, and it came apart. I repaired everything without removing the motor and it seems to be holding perfectly — no more drips on the driveway! So here is my recommendation on how to proceed:

1. Buy a neoprene (rubber) seal from Terrill Machine in Deleon TX, Olson’s Gaskets in WA or from one of several other Cadillac parts vendors that sell them. Do NOT use a rope seal. Some guys are good at installing the rope seal, but the installation and trimming of the rope to just the right length is CRITICAL. Instead, the modern-style rubber seal provides a true dynamic lip seal and the installation is more idiot-proof. Also buy a quality oil pan gasket set. I like the “BEST” brand for these types of parts instead of FELPRO. Olson’s carries them.

2. Drain the oil, then use a lift or jack the front of the car up relatively high, preferably putting the front wheels on ramps (be sure to chock the rear wheels or put the rear of the car on jack stands);

3. Remove the 2 bolts in the frame holding the idler arm on the passenger’s side of the steering links and lower the center link. Remove the exhaust crossover pipe;

4. Disconnect the battery ground cable and remove the starter (heavy!). To do this, unscrew both of the small wires that attach to the solenoid, noting which one connects to which terminal. Place a rag on the frame rail and rest the starter on it. The positive cable will hold it there satisfactorily, so there is no need to undo any of the other wires;

5. Remove the oil pan and the lower flywheel cover (heavy) to provide working room to get at the seal. Inspect and repair any “dished” bolt holes in the pan — the oil pan surface should be flat. Often, when an oil pan or valve cover is leaking, some ham-fisted mechanic or owner will over-tighten the bolts trying to stop the leak. This deforms the pan or valve cover and ensures that it will leak from now on. If need be, hammer the bolt holes flat with a small hammer and a narrow block of wood to act as an anvil. Re-check for flatness. Use a long, STRAIGHT board with a long piece of sand paper to flatten and re-surface the bolt pattern surface, if desired.;

6. Remove the windage pan, the tray-like baffle bolted to the bottom of the block and the oil pump;

7. Remove the rear main bearing cap. Remove or, better yet, just loosen the 3 middle main bearing caps, leaving the front one alone. (Note the direction the middle bearing caps face if you remove them, as it is important to replace them in exactly the same position.) You do this to let the crankshaft droop just a fraction of an inch or so to slightly free up the upper half of the rear main seal;

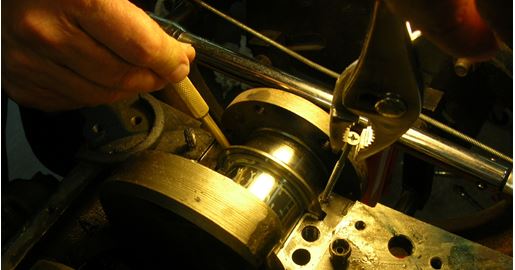
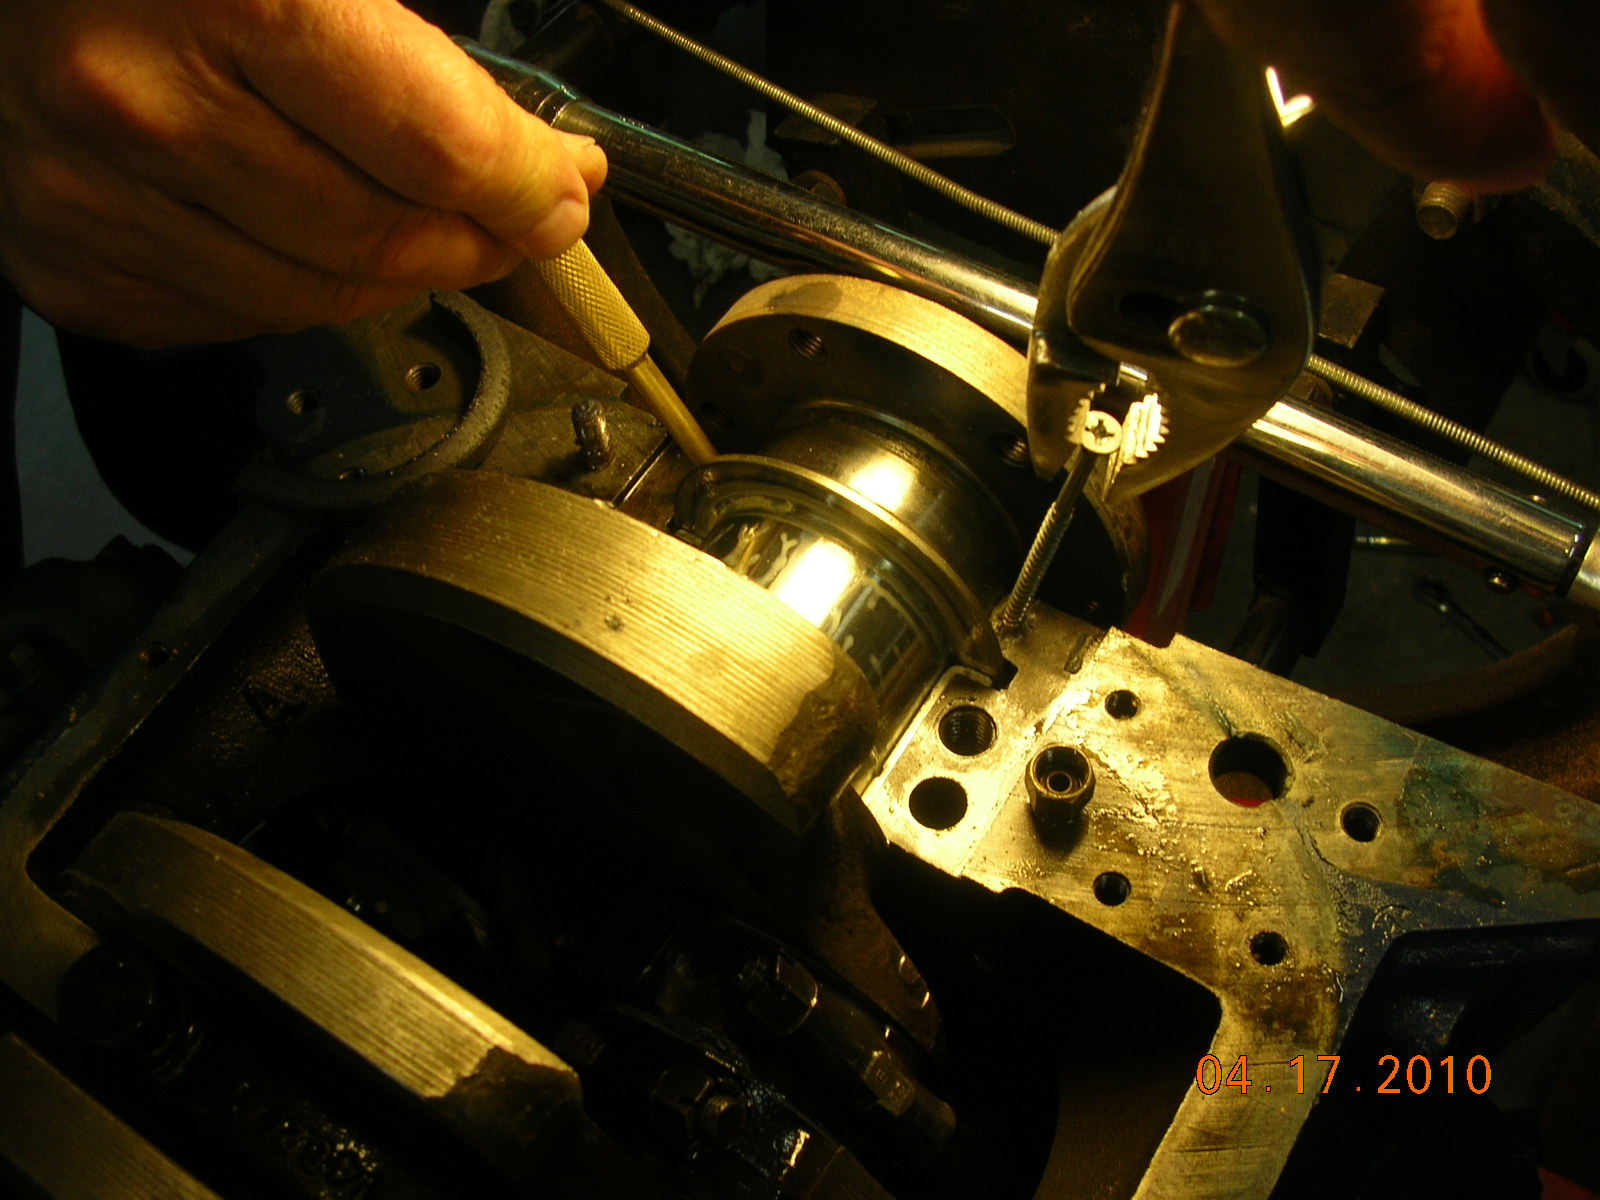
8. Screw a slender wood screw into one end of the upper half of the rope seal and grab the screw with pliers. Using a brass, wooden or plastic rod (in order to not scratch the crankshaft journal), push up on the other side of the upper half of the existing rear main seal, while pulling down on the pliers to draw the rope seal out of the crankshaft journal. Once it protrudes out a bit, you can grab the seal itself and pull it with the pliers.

ART GARDNER DEMONSTRATES HOW TO REMOVE THE UPPER HALF OF A ROPE-TYPE REAR MAIN BEARING SEAL WITH THE ENGINE IN THE CAR. YOU MUST REMOVE THE OIL PAN AND REAR MAIN BEARING CAP, LOOSEN THE 3 MIDDLE MAIN BEARING CAP BOLTS AND SCREW A WOOD OR SHEET METAL SCREW INTO ONE SIDE OF THE SEAL. PULL ON THE SCREW WITH A PAIR OF PLIERS WHILE PUSHING AGAINST THE OTHER SIDE OF THE SEAL WITH A SOFT PUNCH AND OUT IT WILL COME.

rope main bearing seal

9. Installation of the rubber seal requires no tools — just slip it into place in the upper half. NOTE: the direction/orientation of the new rubber seal is critical. Follow the directions on this that come with the seal.

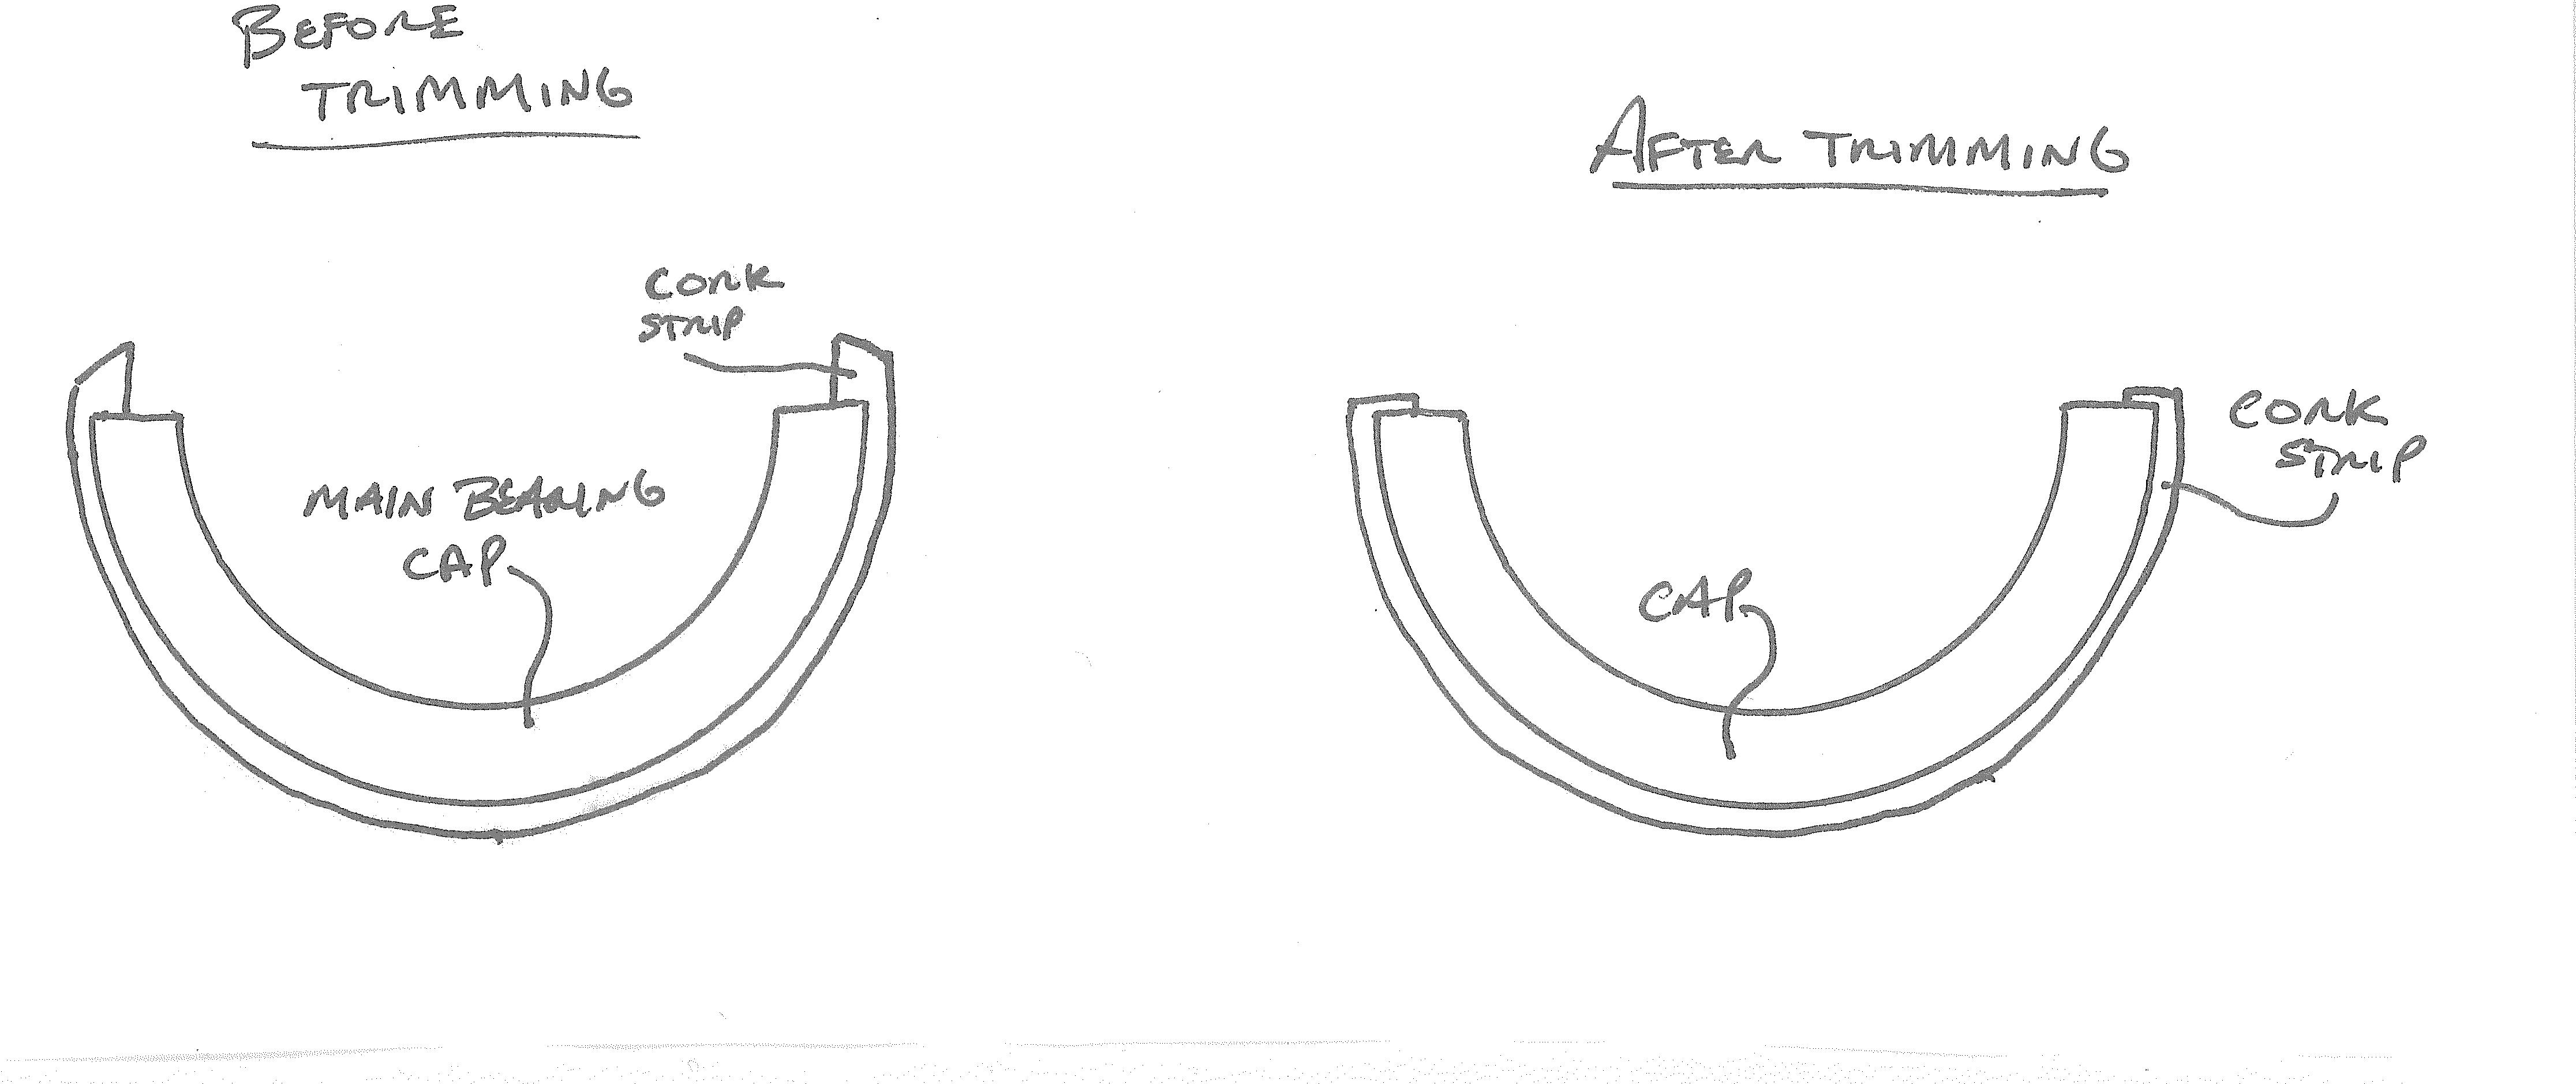
10. Install the cork strip in the groove/channel in the rear main cap and trim to length, as shown below. Trim it so that the ends of the cork slightly protrude from the end of the cap in such a way that the ends of the cork strip are parallel to the ends of the cap. You want the cork gasket to have some “crush” to it when the oil pan is bolted up. This is much easier to trim before installing the cap (otherwise, substantial trial and error is required). Although probably unneeded, you can place a small amount of silicone gasket sealant on the end of the cork strip immediately prior to final fitment of the rear main bearing cap against the block (before the silicon has a chance to set). Place the lower half of the rubber rear main seal in the rear main bearing cap and orient it according to the instructions;

timing cork strip

11. After coating the lower main bearing halves with oil, replace the main bearing cap(s), including the rear cap, and torque them according to the shop manual specifications. Cleanliness is of paramount importance here.

12. Take apart and clean the oil pump. If the lower plate upon which the gears rest is worn, send the pump away for rebuilding. Unless it is broken, I would retain and re-use the same oil pressure regulator relief valve spring, since some rebuilders install a stiffer spring which would increase the oil pressure excessively and maybe cause more oil leaks! Before replacing the pump, fill it with Vaseline so that it is primed and will have pressure when you first start the engine. The Vaseline will then melt away.

13. Install the front cork seal, after trimming to length. This trimming is a careful, slow, iterative process of stuffing it in the groove, noting the excess length, removing the cork, trimming it slightly and test fitting it again and repeating as needed until done. Trim small amounts and sneak up on the final trimmed length. Again, you want a slight crush to the cork seal. Also, you want the ends of the cork seal to be parallel to the machined engine block surface. Here, as contrasted with the rear cork seal, you definitely want to seal the ends (tops) of the cork seal with a dab of silicone sealant just prior to final fitting (and just prior to installing the pan).

14. With the front and back cork seals now trimmed and in place, next test fit the side gaskets and trim them to closely abut the sides of the cork gaskets. Use as little silicone sealant as needed to seal the side gaskets to the cork gaskets. Use gasket sealant to hold the side gaskets in place against the underside of the block while you bolt the oil pan in place. Apply the gasket sealant only to the top surface of the gasket, since it will be easier to scrape the gasket off the machined engine block than off the ribbed surface of the oil pan next time this job has to be done.

15. Replace all parts mentioned in steps 3 through 7. When installing the oil pan, torque it to proper specs (10ft-lbs max). Do NOT over-torque or the pan will distort in the vicinity of the bolts and cause leaks.

16. When you start the motor, the first thing to do is make sure the oil pressure is normal. Then check for leaks. After 500 miles, re-torque all bolts, especially the oil pan bolts. Two of the oil pan bolts are above the starter, which will have to be removed temporarily to get at them.

If the engine has a lot of miles, then it would be prudent to replace the main bearings while doing the rear seal (and won’t cost much). If you were going to do more than just the main bearings and these seals, you would remove the engine, but this job can be done with the engine in the car. There is a trick to “spinning” the top half of the bearings out (using a flattened cotter pin inserted in the oil hole of the crank and turning the crank by hand). Taking off one bearing cap at a time, after installing the new bearings halves re-install and torque the bearing cap back on twice: the first time for a preliminary bearing clearance check with Plastigage; the second a permanent installation.

By the way, on a lift this job can be done in 4-6 hours, maybe a good bit less. It took me the better part of a weekend on a creeper since extra time was spent over-restoring some parts (powder coating the oil pan and some bolts, etc). NOTE: A high-quality torque wrench is the key to this job. You probably need two different torque wrenches. A low torque unit for the pan bolts (probably 1/4″ drive” and a stronger one for the main caps (probably 1/2″ drive). The specified torque on the pan bolts (and the valve covers) is so low that there is a substantial risk that you will over tighten them or under tighten them by a good bit if you use too large a torque wrench, with equally leaky results either way. Below is a picture of the rear cap reinstalled, with the cork gasket in place on its underside, just to the left of the flywheel in the right center.

Lily Restoration Series 60

Jon Yinger passed along this video of his series 60 Lily undergoing a complete restoration finishing with a mild custom. There are some nice still of the engine compartment both before and after the restoration. He has a nice shot at the end with it cruising down the road. He also passed along a link to the rest of the cars in his collection.

I am going to add another category for videos on the right hand side to make these easier to find. I will try to categorize these as much as possible but some will just be eye candy.

HOW TO REMOVE THE UPPER HALF OF A ROPE-TYPE REAR MAIN BEARING SEAL

HOW TO REMOVE THE UPPER HALF OF A ROPE-TYPE REAR MAIN BEARING SEAL WITH THE ENGINE IN THE CAR AS PER HIS ARTICLE IN THE DECEMBER 2008 TIMES.
YOU MUST REMOVE THE OIL PAN AND REAR MAIN BEARING CAP AND SCREW A WOOD OR SHEET METAL SCREW INTO ONE SIDE OF THE SEAL. PULL ON THE SCREW WITH A PAIR OF PLIERS WHILE PUSHING AGAINST THE OTHER SIDE OF THE SEAL WITH A SOFT PUNCH AND OUT IT WILL COME.

dec 12 seal

newsletter

ENGINE PAINT INFO FROM THE CADILL-IKES, THE CLC 1954-56 CHAPTER

Here is the formula number for Cadillac engine dark blue according to paint manufacturers:
• BASF aka R-M: Formula Number 243212. BASF carries this color in 22 varieties of paint. Everything from base coat to single stage and high end to low end paint.

• Dupont: Formula Number BS454. Dupont has a cross over formula that is available in their most popular varieties. The color swatch has been checked and looks correct

It is recommended that the BASF formula be used. R-M (BASF) was a main paint supplier to Cadillac when engines were painted dark blue and it looks like R-M has maintained this color formula until the present time.

newsletter

REMOVING AND REPLACING A 49 CADILLAC CYLINDER HEAD

Some months ago the cylinder heads of my ‘49’s motor needed rebuilding, so I removed them and took them to a machine shop for repair. Taking off the cylinder heads with the motor in the car is not particularly difficult technically and the only special tool needed is a torque wrench. On the other hand, there are lots of parts to remove (and later re-install) and the heads are heavy, weighing more than 50 pounds each, so it can be a 2-person job.
The first task is to completely drain the coolant from the radiator and engine block. To do this, first raise the front of the car on jack stands. The motor has 2 small drain outlets on either side of the middle of the block, just above the oil pan. The Cadillac factory closed these off with small pipe plugs, which when removed usually results in the coolant flowing out in the wrong direction and making a mess. I replaced mine with drain cocks identical with the radiator drain cock, so I can put a rubber hose on each to direct the flow into buckets. While you are under the car, remove the oil dipstick tube and dipstick. Back on top, after lowering the car, unfasten one of the battery cables and remove the windshield washer bottle and bracket.
Next, remove the rubber fuel line. Then, drain the oil filter if you have one. Now, disconnect the upper and lower oil filter tubes at the oil filter end, leaving the tubes attached to the motor, and remove the oil filter. Unfasten the 4 bolts holding the thermostat housing to the water pump. Loosen the upper radiator hose clamp, turn the upper hose on the radiator outlet one quarter to one half turn to free the thermostat housing and remove the hose and the thermostat housing as a unit. Remove the fan belt, the fan and the generator along with its adjusting strap. Remove the lower radiator hose. Now the radiator and water pump can be unbolted and removed. I find it’s easier for 2 people to lift the radiator.
The next task is to remove the intake manifold. First, remove the air cleaner. Next, remove the accelerator linkage spring and unhook the accelerator linkage from the carburetor. Fold the accelerator linkage back against the firewall and hook it under one of the hoses or wires on the firewall. Disconnect the Hydramatic “kickdown” rod at the carburetor and transmission ends and remove it from the car. Disconnect the vacuum advance tube at both ends and remove it. Disconnect the manifold vacuum tube at the fuel pump end. Disconnect the automatic choke tube at both ends and remove it from the car.
Disconnect all wires from the coil (back-up light wire, coil power wire, coil to distributor primary and secondary wires) and tie them back to a hose or wire at the firewall. Disconnect the fuel pump to carburetor tube at the carburetor end. Tilt it up to a sufficient angle on the fuel pump that fuel doesn’t flow out but leave it in place. Loosen and remove the four bolts and four nuts with their washers that hold the intake manifold to the cylinder heads. Now the manifold can be removed with the manifold-to-fuel pump vacuum tube, carburetor and coil still attached. One person can lift it, it may be easier if you are two people.
Now the heads are almost ready to remove. Starting with the driver’s side head, unthread the spark plug cables from the loops on the valve cover on a late motor, or unfasten the spark plug wire conduits on an early motor, and tie them up to a hose or wire on the firewall. Remove the valve cover and set it aside. Remove the water hose that runs between the head and the defroster assembly. (I find it easiest to cut this hose, as it is hard to get a good grip to pull it off.) Unscrew the cylinder head ground strap at the firewall end. Now, unscrew the cylinder head bolts. Since the rocker arm assembly is full of oil, before removing it get a pan or other receptacle longer than the rocker arm assembly. With the pan ready to catch any oil, lift off the rocker arm assembly with its four bolts and set aside on the pan.
Remove the push rods. You must re-install the push rods with the same end toward the rocker arms and, preferably, in the same valve lifter. Note the shape of the push rod at each end. Punch holes in a piece of card board, number the holes with a pen or pencil and, to keep them organized, insert the push rods into the holes in numerical order with their top ends up.
Remove the 6 exhaust manifold bolts. Leave the exhaust manifold in place, since the crossover pipe is very rigid and will easily support the exhaust manifold after the head is removed.
Getting the passenger’s side head ready is similar. Unscrew the nut holding the wire to the water temperature sending unit. The voltage regulator can be left in place, but you risk banging the head into it. I usually unscrew the voltage regulator mounting screws and lay the regulator with its wires still attached on the nearby shock absorber with a rag underneath it. Deal with everything else in the same manner as the driver’s side head. The crossover pipe and exhaust pipe are very rigid and will support the exhaust manifold easily after the head is removed.
Before lifting off the heads, it’s a good idea to put some towels or other protection on the fenders and on the baffle in front of the radiator. If a head is stuck, tap it with a hard rubber hammer to dislodge it. You can grab the head by the water pump hole at one end and either the heater pipe, temp gauge sending unit or the ground strap at the other end. An assistant’s help can be useful at this point. Alternatively, you could use a “cylinder head lifting tool”, which are T-shaped tools that screw into the spark plug holes. You then pick up the head by the “T” crossbar. I have two I’ll lend to anyone who needs them. On the bench, remove the driver’s side head heater hose pipe, the passenger’s side head temperature gauge sending unit, both ground straps and the small pipe plugs at the rear of the passenger’s head and the front of the driver’s head.
Have your heads rebuilt in a reputable shop. It’s a good idea to have the re-builder install hardened steel exhaust valve seats so the engine can better cope with unleaded fuel.
Re-install everything in reverse order. Head gaskets will say “TOP” on one side, so lay new ones thusly on the block with the guide studs engaged. Carefully lay the heads on the block, engaging the guide studs underneath it and ensuring that the gasket is not folded back or kinked. Torque the head bolts to 65-70 foot pounds in the order shown on the next page:

Re-install everything else using new gaskets. Be sure to put a bit of oil at both ends of the push rods. To make their installation easier, lightly cement new water pump gaskets to the front of the pump after scraping off the old gaskets. To facilitate exhaust manifold gasket installation, use a pry bar or large screwdriver to slightly pry the manifolds away from the head. Don’t install the intake manifold until all cylinder head bolts are torqued. Intake and exhaust manifold bolts and water pump bolts should be torqued to 25-30 foot-pounds.

head sep 12

newsletter

WHAT TO DO IF YOUR MOTOR SUFFERS FROM VAPOR LOCK

Lately, I’ve been hearing more stories about ’49 Cads experiencing vapor lock. This ailment is due to engine heat causing gasoline to boil away or vaporize at certain spots in the fuel line. This makes for air in the fuel line, starving your engine of fuel, which will then stall or refuse to start. As ’49 Cadillacs were not known for having this problem in the past, it makes me wonder if it is not some new problem with the formulation of gasoline. The following may help and if any members have additional suggestions, please send them to the Times:

1. Check to see if air is freely flowing through the radiator and that the motor is running at a normal temperature;
2. Check your steel fuel line make sure it is not passing to close to the driver’s side exhaust manifold and check the flexible fuel line from the end of the steel line into the fuel pump to make sure it is not touching or passing very close to the oil filler housing or another hot part of the motor;

One possible solution is to wrap an insulating material around the rubber fuel line between the end of the steel line and the fuel pump. You can also do the same for the steel line between the pump and the carburetor. A good insulator is a length of rubber fuel line or, alternatively, insulated hose used for radiator return lines. It should be of the right diameter; that is, of course, bigger than the line to be wrapped. Cut it longitudinally (along its length) and place it around the length of the fuel line to be insulated. It’s expensive (at $4 / foot here in GA), but if it solves the problem is money well spent. Another insulation material is aluminum foil. I’m not sure about other alternatives to cover the fuel lines, but you can try McVey’s for some insulating material, as they do sell stuff of this type for exhaust pipes, or go to a hardware store and see what they suggest.
Another solution is to install an electric fuel pump. If you do so, I would not do away with the mechanical pump, but merely have the electric pump as an auxiliary. I have such a set up on 2 of my cars (but not my ’49 Cad which does not vapor lock yet). Install it so that the electric pump on a separate small fuel circuit with 2 “T” connections near the fuel tank and not merely in line with the mechanical pump. A more ambitious electric fuel pump installation involves installing a “T” connection just outside the fuel tank, with one branch of the “T” connection serving the existing steel fuel line and the mechanical pump. From the 2nd branch of this “T” connection near the fuel tank, install a short line to the electric pump. From the outlet of the electric pump install a second long steel fuel line, parallel to the long steel existing line, all the way to a rubber line going into a second “T” connection near the carburetor, thereby bypassing the mechanical pump altogether. This second set-up will look funny but will probably work well. The mechanical pump puts out 4 to 5¼ lbs, so the electric pump should not put out more than this.
If you suspect your engine temperature is too hot, a good way to accurately check it is to temporarily hook up a mechanical temp gauge to the same point on the rear of the passenger’s side cylinder head as the stock electrical sending unit. You can buy one and any necessary screw-in adapter inexpensively at an auto parts store. You install it by temporarily removing the passenger’s side ventilating tube, run the cable through the hole and gently close the vent valve over the cable to prevent most hot air entering the engine compartment. I’ve done this with my own car and have been surprised at the difference in readings between the stock electrical and auxiliary mechanical temperature gauge readings.
On the other hand, the motor’s symptoms may be due to something else altogether, a constricted fuel line. See John Washburn’s article in the May 2011 Self Starter.

newsletter

AN ALTERNATE VIEW ON IDLE MIXTURE ADJUSTMENT PROCEDURES

by Art Gardner

Jon at the Carb Shop in Missouri suggests a slightly different approach to adjusting the idle mixture screws on an old Cadillac carb. According to Jon, the Shop Manual’s approach of first setting the idle speed and then tweaking the mixture is backwards. He says you should set the mixture first and then adjust the idle speed to achieve the desired/specified idle speed. Jon says that on a Carter 722, the mixture screws should be somewhere between 3/4 of a turn from all the way in to 1-1/2 turns. He suggests that one should break that up into thirds, so you would have more or less discrete positions of 3/4 turn, 1 turn, 1-1/4 turns, and 1-1/2 turns. He says for a brand new engine, 3/4 turn is typically the right position. As the engine wears, 1 or 1-1/4 turn become the norm. Moreover, he says that there is almost never a need to turn a mixture screw more than about 1-1/2 or 2 turns out from closed. He says that with these relatively steep mixture needles, once you turn the screw out about that much, the mixture passageway is fully open and further turning of the screw doesn’t make it any more open (open is open, after all). I followed Jon’s advice in fine tuning the performance of the Carter 722 on my last 1949 (sadly now enjoyed by someone else) and found it to be very sound. Give it a try!

newsletter

AIMING THE SPRAY NOZZLES IN YOUR CARTER 722S CARBURETOR

by Art Gardner

Many of you may have rebuilt your 1949 Cadillac carburetor, the trusty Carter WDC 722S. Although the instructions in the Shop Manual are very good, in paragraph 10 on page 124 there is insufficient detail on an important tuning trick: aiming your accelerator pump discharge jets for optimum throttle response. The Carter 722S carburetor has two little dots cast into the carb body and the sprays from the accelerator pump jets are supposed to hit these targets. The Cadillac engineers figured out that when the spray hits these targets you get the best atomization of the accelerator pump spray and thus the best throttle response.

This tuning can be done while rebuilding the carburetor or simply by removing the air horn (the very top of the carb) to gain access to the accelerator pump jet nozzles. Indeed, once you take off the air horn, you have good access to the nozzles. The targets are little dots cast into an upper portion of the lower half of the carb. You just take a pair of needle nose pliers and gently bend the jet nozzles until the fuel sprays directly onto the “targets”. If there is fuel in the carburetor bowl, manipulating the rod from the gas pedal a little causes fuel to be sprayed from the nozzles and you can see if it is hitting the targets or not. The carburetor does not have to be totally disassembled or even removed from the engine to do this.

So on my own car, I removed the air cleaner and the air horn from the top of the carb and tweaked the aim of the nozzles to hit the targets exactly. It really made a difference. We also did this with Jay Friedman’s car and he reports that his car is running better than ever as a result. By the way, I didn’t figure this out myself; I found the details in an old carburetor user guide.

newsletter