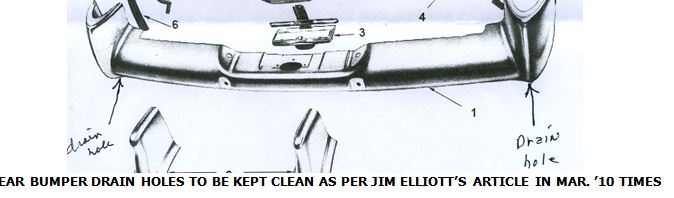
REAR BUMPER DRAIN HOLES TO BE KEPT CLEAN AS PER JIM ELLIOTT’S ARTICLE IN MAR. ’10 TIMES
by Art Gardner et. al.
For various reasons, all four authors removed the large hood hinge springs on their’49s. They have similar takes on removing and re-installing these springs, as has the Cadillac factory itself in an article in the June 1949 Serviceman bulletin (supplied by John). Their comments include Herman who said that, “It is not an easy job”, while Art says it can involve “safety issues” and Jim goes so far as to say “Wow, is this ever dangerous; be very careful”. So, if you are going to do this job, it’s best that you heed these voices of experience. You should also consult page 192 and 193 in the ’49 Cadillac Shop Manual which has the factory take on the procedures involved. (Note: Doing this job on Series 75 limousines is slightly different.)
1. JIM ON TAKING OFF THE SPRINGS
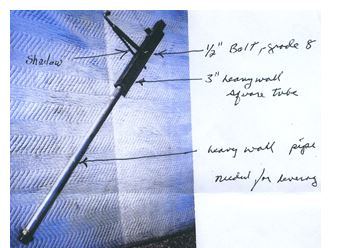
Jim made the tool shown in the photo below and writes: “1. Take hood off hood hinge brackets on cowl; 2. Take both front fenders off; 3. Slip hook into lower eye of spring and set angle iron on top of frame and pull down; 4. Remove lower hook of spring from bracket and SLOWLY relieve pressure on spring.”
2. HERMAN ON RE-INSTALLING THE SPRINGS
Herman writes, “When re-attaching the hood springs to the hinge assembly the items that you will need to begin are:
1. A 5/16″ braided, tar impregnated wire loom, Cut 4 pieces about 2 inches long and place one on each end of the spring hook.
This prevents chafing and was originally done by Cadillac;
2. Next you will need 2 “S’ hooks as used in mounting garage door springs (available at any hardware store);
3. Next, a piece of heavy duty chain, about 16-20 inches long;
4. A very sturdy long steel, bar (a piece of one inch pipe about 6-8 feet long will work).
You are now ready to tackle the job. Hook the hood spring (with wire loom slipped over the end) on the hood hinge assembly with upper hook facing to the front of the car. Next slip a piece of wire loom onto the lower hook of the spring. Hang the “S” hook on the lower spring. Make a loop of the chain and hook the ends onto the bottom of the “S” hook.
With this assembly hanging down toward the ground, slide your pry bar or pipe into the loop. Have someone hold the pry bar for you when doing this so nothing falls off or becomes unhooked. Slide your pry bar through the loop of chain and under the car frame. Apply downward and backward (toward rear of car) pressure to the pry bar, while trying to hook the spring to the boss on the firewall. This may take a few tries to get the hang of it. It helps if you have an assistant trying to nudge the spring while you apply downward pressure on the spring towards the boss on the firewall. The job is certainly easier with two people and is much safer with the two front fenders removed.
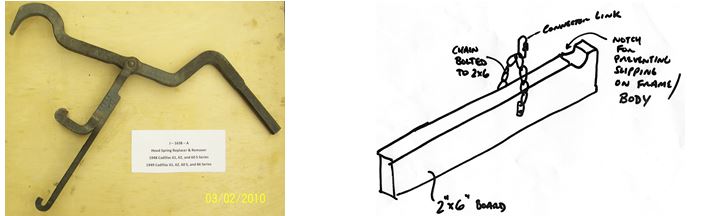
3. ART ON MAKING HIS VERSION OF THE TOOL NEEDED FOR WORKING ON THE SPRINGS
Art writes, “The photo at the left was taken by Forty-Niner John Washburn of an original factory “Hood Spring Tool
J-1638A” which is used to remove and install hood hinge springs.
I designed a replica of this tool as shown in the drawing at the right. This tool can be made by anyone and would be relatively safe. Basically, the 2×6 needs to be long enough to give you good leverage. The notch in one end avoids it slipping off the frame as you lever the hood spring down. The chain (bolted to the board) is coupled to the hood spring with a “connector link”, sometimes called a “master” link. This is a special chain link that has a split in it with a nut to connect the two halves and allow the link to be slipped over another link or, in this case, over the J-hook part of the spring.
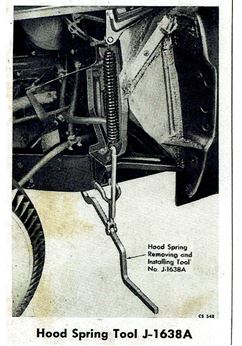
4. JOHN ON USING THE TOOL NEEDED FOR REMOVING AND RE-INSTALLING THE SPRINGS
Besides his photo at the left above of the original tool, John also sent in a copy of the June 1949 Cadillac Serviceman bulletin which contains the photo on the next page and the following instructions on using this tool: “The long pivot hook should be slipped over the bottom bracket of the hood spring, and the stationary hook slipped over the frame side member. Force the handle of the tool down to release the spring bracket from its catch, as shown. Although the picture shows the fender removed to photograph the tool in use, it is not necessary to remove the fender. To install the spring, first hook it in place at the top and then pull down with the hook, and fit the spring into the catch of the spring bracket. To obtain added leverage on the tool, make up a section of 1 inch pipe about 4 feet long and slide it over the handle of the tool.”
I retired October 30th after 30 years running a one-man office and just sold my Vashon Island, Washington home. I moved to my retirement home March 11th on the ocean at the mouth of the Columbia River on Washington State’s Long Beach Peninsula. My first visit to the Peninsula was with my late grandmother in her ’49 Cadillac sedan in 1953 to see her ocean house that was just being built. Many nice memories.
I drove my ’49 Coupe De Ville down to the ocean house on a beautiful day and had a beautiful drive. It looks mighty handsome tucked in its new garage. Can’t wait to begin driving my baby around its new home.
Late one morning I took this picture of the CDV at the mouth of the Columbia River where it meets the Pacific Ocean on the Washington side, with Waikiki Beach (yes, that’s the name of the little beach to the left and in front of my car) and Cape Disappointment Lighthouse. Across the river on the Oregon side is Warrenton and Fort Stevens and, in the distance, Saddle Mountain. This is about where Lewis and Clark would have first seen the Pacific Ocean before crossing over to the Oregon side for the winter. The morning sun, unfortunately, was intense and almost directly in front of me. It probably would have been better to take the picture later in the day.
1. Jeff Maltby writes that one of the above brass fittings is a “must have” to seal the main fuel line into the gas tank fitting. This part often falls out when servicing the gas tank, and when it is missing the tank will leak badly at the fitting. Jeff had 2 extras made, but can get more if needed. $35 shipped in the USA. Contact Jeff at gljeff1@earthlink.net or 209-595-5152.
2. Jeff also reports that NAPA, the nation-wide auto parts company, sells the 1948 and the 1949-50 flexible rubber fuel line, as follows:
Make & Model NAPA Part Number Factory Part Number
1948 Cadillac, All Models WH 11076 144 2527
1949 – 1950 Cadillac, All Models WH 11093 145 4597
3. Chapter member Bob Knutson has sent in a web address of a scanned ’49 Cadillac sales brochure. The site is: http://www.lov2xlr8.no/brochures/cadillac/49cad/49cad.html Hard copies of this brochure are occasionally seen for sale on ebay or can be bought from literature dealers who advertise in Hemmings Motor News. It’s a beautiful publication and is usually not very expensive to buy, so all members should get themselves one if they don’t have one already.

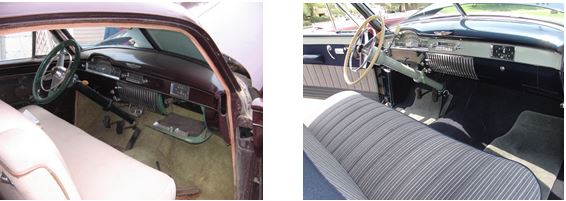
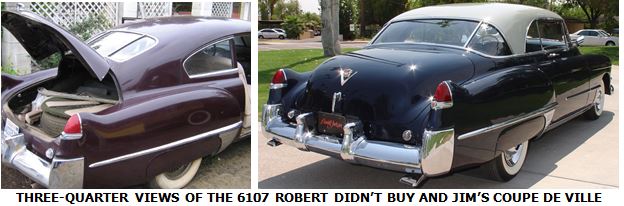
INTERIORS OF TWO ‘49s WITH STICK SHIFT. THE FIRST IS A 6107 IN “BEFORE” (RESTORATION) CONDITION THAT ROBERT ROBIN CHECKED OUT (BUT DID NOT BUY) AT AN ESTATE SALE.
THE SECOND IS AN “AFTER” PHOTO OF JIM JORDAN’S GORGEOUS COUPE DE VILLE.
During the 25 years I’ve owned my 6107, my tail lights have failed twice. Once was during a New England Region Driving Tour in the 1990s; the second was just a few weeks ago on a local street near my home. In both cases, I had turned on the headlights and a motorist admiring the car at a stop light pointed out the deficiency. Also, in both instances I assumed the problem was in the headlight switch and partially removed it to correct a loose wire.
Partially taking out the headlight switch, without detaching the many wires connected to it, is not difficult technically. However, it is a pain in the [choose your body part] because its location at the extreme upper left corner of the dashboard makes access difficult, particularly if you have large hands. The only reference to the switch in the ’49 shop manual is a picture of it on page 196, so I hope the following is an improvement.
1. Disconnect one or both cables from the battery and put the transmission in R (or in gear if a stick shift). Release the hand brake and unfasten the two bolts holding the bracket supporting the hand brake shaft from the bottom of the dash. Let the hand brake shaft and bracket hang down below its normal position.
2. The body of the headlight switch under the dash is box-shaped and roughly rectangular, about 3 inches (7.5 cm.) long from front to back, with several wires connected to it on both sides. Look at the illustration of the switch in the shop manual on page 196. You will see there is a “Knob Release Button” on the side of the switch facing the center of the car under the dash. Pull the exterior headlight switch knob fully out to its second (headlights on) position. With the hand brake mechanism now out of the way, lie on your back, slowly slide your hand up to the button on the side of the switch behind the dash and press the button. With your other hand you should now be able to fully extract (remove) the exterior headlight switch knob and its shaft from its place in the dash.
3. With the knob and shaft removed, the resulting empty hole in the switch bezel will accept a small Allen wrench, which you will then use to unscrew and remove the bezel.
4. The threaded dashboard end of the behind-the-dash part of the switch is now visible. Put your hand back behind the dash and push the rectangular part of the switch toward the front of the car until it is free of the dash. Then, with all the wires still attached, gently pull it down toward the bottom of the dash. This will take some twisting and pulling, but it can be done since the wires connected to the switch are relatively long. (Be careful that you don’t disturb the wires on the nearby fuel gauge.) Once it is pulled down and the switch body is visible, you can examine the headlight switch and its wires.
The first time I did this back in the ‘90s, the wire for the tail lights had become disconnected from the headlight switch for unknown reasons. Looking at the “Chassis Electrical” diagram on page 203 of the shop manual, you’ll see that the headlight switch is in the left center of the diagram and that the tail light wire is connected to the terminal numbered “3”. I re-connected the wire and solved the problem.
When this happened for the second time a few weeks ago I found the tail light wire still connected to Terminal 3, revealing to my great annoyance that I had partially removed the headlight switch for nothing. However, looking straight back under the dash to the upper left corner of the inner side of the firewall, I noticed something was not right with a large plug held in a clip attached to the firewall. This plug connects the under-dash part of the tail light wire harness with the back part of this same wire harness going to the rear of the car. (From this plug, the rear part of the harness runs up the side of the windshield, then between the headliner and the roof to the trunk and the tail lights.) The two halves of this plug had become disconnected from one another for some reason, so connecting them back together solved the problem.
5. Everything is put back in reverse order. An exception is the exterior headlight switch knob and shaft, which can merely be pushed back into its place in the bezel and switch without pressing the button on the under-dash part of the headlight switch.
March 2001: Did You Know? Production Numbers For 1949; First Aid For Fog Lights.
June 2001: Radial Wide Whitewalls For Your ‘49? Did You Know?…1949 Convertibles.
September 2001: To Plate Or Not To Plate: Headlight Rims/Bezels; Tech Tip: Check Your Battery;
Forty Nine Fastener Fun: Club Coupe (Fastback) Rear Window Removal; Drooping Door Handles (Again).
December 2001: How To Take Out Your 1949 Radio.
March 2002: Tracing Turn Signal Wires; Your Shock Absorbers; Rebuilding The Rear Stabilizer;
’49 And ’50 Ammeters—Not The Same.
June 2002: Wind Wing Chroming.
October 2002: Restoration Tip: 1949 60 Specials And All ‘49s With Parking Lamps: Painting Fine White Lines.
December 2002: Did You Know?…Early And Late Engines, Convertibles And Trunk Lids; Make Your Own Rubber Gaskets; Getting A Vacuum Antenna To Rise To The Occasion; Replacing Your Windshield Wiper Transmission Shafts;
Removing The Chrome Trim On A Club Coupe Rear Window;
March 2003: Did You Know?… Early ’49 Convertible Trunk Lids; Dealing With Those Six Volt Blues;
Windshield Wiper Restoration Tip; A Final (?) Word About Vacuum Antennas; Servicing Hydro-Lectric Pumps.
June 2003: Technical Help 4-U “Technical Assistance Hotline Numbers”; Some Tech Tips: Rear Shock Absorber Link;
Fix For Locked Up Brakes; Windshield Washer Pump & Nozzle Repairs; Hydro-lectric System; Auto Glass Source.
September 2003: Did You Know?…’49 Fuel Filters And Fuel Lines; Other Voices, Other Opinions: Hydraulic Brake Hoses.
December 2003: Those Other 1949 Cadillacs Or Stick Shift’s Last Hurrah;
Did You Know: Differences Between Series 61 And 62 2-Doors And 4-Door Cars In 1949.
March 2004: Our Readers Write: Fixing No Start Problem, Fuel System; Replacing A Front ’49 Shock Absorber.
June 2004: Two Tech Tips: Tighten Those U-Bolts (Rear Leaf Springs) & Car Won’t Start: Adjusting Neutral Safety Switch;
Filling Your Shock Absorbers With Fluid: Doing The Back Ones Ain’t As Easy As It Might Look.
September 2004: Viagra For Windshield Wiper Motors: A Tech Tip;
Overheard At The Grand National: Correct Gas Cap And Door Handle Escutcheon Gasket
December 2004: From The Busted Knuckle Garage: Slicker Sweepers (Aka Fuzzies) On Exterior/Interior Window Moldings;
Shocked Again: Adding Fluid To Shock Absorbers; Don’t Neglect Those Windshield Washers!
March 2005: Did You Know That: (Correct Procedure For Checking Head Bolt Torque); More On Those Other ’49 Cadillacs;
Restoration Tips From The Busted Knuckle Garage: Priming And Painting Small Bolts And Screws.
June 2005: Forty-Nine Engine Colors; Check Your Fuel Pump; More On Filling Your Master Cylinder;
’49 Times Index Of Articles (Technical And General Interest) March ‘01 To Dec. 2004; That Gas Filler Light.
September 2005: Mistakes In The ’49 Cadillac Shop Manual; More On Battery Cutoff Switch;
Trico Equipment And Service Specifications 1949 Cadillac.
December 2005: Taking Out Your 1949 Instrument Panel; If Your Horn Doesn’t Work.
March 2006: ‘49 Radiator Hoses; Detailed Specifications: Series 60, 61, 62 And 75;
Restoration Tips From The Busted Knuckle Garage: Restoring Your ’49 Cadillac Radio Speaker Grille.
June 2006: Tech Tip: Outside Door Handle Escutcheon Mounting Pads; More On Drooping Driver’s Outside Door Handle;
Series 61 And 62 Four-Door Sedans Compared To Series 60 Four-Door Sedans (Body, Trim, And Upholstery).
September 2006: ’49 Interior Paint Colors.
December 2006: Little Known Secrets Of Master Cylinder Rebuilding; Good Housekeeping In Your Car;
The 1949 Cadillac Vacuum System; Tech Tip: Larger Diameter Exhaust Pipe.
March 2007: Inoperative Cadillac Windshield Washers Can Be Easily Diagnosed And Serviced;
Unleaded Fuel And Exhaust Valve Seats; Tech Tip: The Clevis Pin On Your Master Cylinder.
June 2007: ’49 Cadillac Dimensions (Body); Replacing Motor Mounts; Locating The ‘Sweet Spot’ For Outside Door Mirror.
September 2007: Mini-Tech Tips: Have Your Brake Lights Failed? And Graphite Phright!
Fine Tuned Installation Of A Door Latch Repair Part.
December 2007: Keep Your Hats ‘Er, Sombreros On; Trunk Handle Problems; ’48 And ’49 Design Differentiation.
March 2008: Hood Bumpers; How To Remove/Replace A 1949 Cadillac Speaker Grille Without Taking Half The Dash Apart;
How To Fix Your Trunk Lock; Different Chrome Trunk “V” Emblems.
June 2008: Be Seen With Halogen Bulbs! Engine Of Change: Early And Late ’49 Cadillac Motors;
Deck Lid Designs; More On Trunk Lid “Vs”.
September 2008: 1949 Cadillac Carter 722S Carburetor Rebuilding Tips; Tech Tips: Sixty Special Dome Light
And Outside Door Handle Removal; Repairing Heater Control Valves; The Wooden Wheel Chock.
December 2008: Hydra-Matic Shifting Problems On My Coupe De Ville; Stopping An Oil Leak (Rear Main Seal);
Hydra-Matic Shifting Problems II: Shift Lever Slop; Did You Know That 60 Special Trunk Letters Are In 2 Pieces?
March 2009: Tech Tip: Chasing Down Those Elusive Exhaust Noises; Semi Tech Tip (Directional Signal Flasher);
Beware Non-Steel Head Gaskets; Mysterious Nether Noises In A ’49 (Rear Springs, U-Joints, Drive Shaft).
June 2009: Bias Ply Versus Radial Tires: A Never Ending Discussion; Conversion Of Air Cleaner To Use A Paper Element;
How To Hook Up Your 49’s Under Hood Heater Hoses; Come Blow Your Horn.
September 2009: A Better Way To Remove Coupe Door Glass: It Worked For Me; Removing An Outside Door Handle;
New Procedure For Testing Gas Gauge Tank Units; More On Bias Ply Versus Radial Tires.
December 2009: A Tail Light Tale; If Your Ammeter Is Neither Positive Nor Negative, But In Between.
March 2010: More Power, Mr. Scott (’49 Horsepower); Power Window Switches;
Another Tech Tip From The Busted Knuckle Garage: Hood Hinge Installation