by Art Gardner
My driver’s side front door glass cracked, necessitating replacement. The 1948 Olds 98 and Cadillac Fisher Body Manual, pages 45-47, sets forth the procedure, which seemed lengthy and complicated. As I proceeded, I realized there is a simpler way, which worked on the front door of my 2-door Club Coupe and MAY work on other body styles, as well as sedan rear doors and cars with power-operated windows.
Everything is done to the inside of the door with the door open. As there are lots of screws and small parts, I suggest using several containers to keep the loose parts organized according to the large parts they fasten.
1. Remove the reveal molding at the top and sides of the window frame. Be careful not to lose the two small pieces of rubber at either end which prevent the garnish molding below from being scratched.
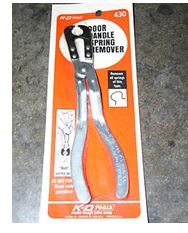
2. Remove the inside door handles and window cranks. Although these can be removed with dental picks or other pointed tools, you will do better to use an inside handle removal tool. I recommend the pliers-type illustrated below. This one is made by the KD Company, but similar tools are made by other firms. The flat-type tool is inferior. (See the body manual for removing the switches on Hydro-lectric equipped cars.)
.
3. Remove the arm rest if a front door.
4. Remove the screws holding the garnish molding below the window to the door. Besides the visible screws, this molding is held to the door by: A. an L-shaped metal hook screwed to the door frame, and;
B. the large heads (diameter: ¾ inch, 18 mm.) of screws which slide into slots in the back of the molding, whose shafts are screwed to the door frame. You have to twist the molding slightly to remove and re-install it. To remove it, you push down on the back end and pull up on the front slightly to get it off the hook. Then, the molding is unlocked from the screw heads by pushing down on the molding while gently pulling it toward you. Later, when re-installing it, you hook the molding over the L-shaped hook with the rear of the molding pushed down to get the large heads of the screws into the keyholes. Once the heads are through the big openings in the keyholes, you pull up on the rear of the molding while keeping the front over the L-shaped hook. Pulling up on the back of the molding brings the heads into the narrower part of the keyholes and secures the molding in place, ready for the small finish screws to be installed. (There won’t be a quiz.)
5. Remove the screws holding the upholstered door trim panel to the door. This panel is also held to the door by several metal tabs that protrude upward and outward from an access panel in the inner door into the back of the trim panel. In addition, the trim panel is held to the door by tracks at the bottom and front side of the door which enclose the corresponding edges of the panel. To remove the panel, gently pull it up and toward the back of the door.
6. As it is now visible, remove the large, square-ish access panel secured to the inner door with screws.
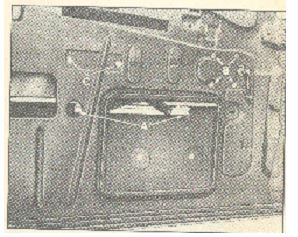
7. Raise (or lower) the window so that two of the four screws that hold the window support channel to the window regulator lift arms are visible through the hole uncovered when the panel in paragraph 6 was removed. At the same time, the second two of the four screws should be visible in the small, round hole to the side of the square hole. See the arrows of letter “A” in the illustration below. Remove the four screws.
8. Lower the glass all the way to the bottom of the door, slipping it past the regulator arms and out from the lower end of the window channels. If the channels are too long to release the glass, it may be necessary to unfasten the lower mount of the divider channel between the quarter window mechanism and the large window and move it slightly to loosen the glass.
9. To make room through the slot at the top of the inner door for the window support channel under the glass, particularly the lower pieces through which screws attach it to the regulator and the rubber molding under the glass, you must now remove the inner beltline fuzzy strip carrier which runs along the length of the top of the door and is secured with a half dozen screws.
10. With the glass now at the bottom of the door and free from the side window channels, it can be rotated 45 degrees or so and eased out of the upper slot in the door.
If the glass is removed this way, you don’t have to remove the divider channel, which is how the Fisher Body Manual says to do it, thereby saving a ton of time and effort. Installation of the new glass (after setting it in the support channel) was simply the reverse.
newsletter